
In macOS 10.15 Catalina, Apple have made a number of security improvements, including hardening the system by making all executable files subject to scanning by XProtect, regardless of whether the file is tagged with the com.apple.quarantine bit or not. For security researchers, this means it’s now no longer possible to run malware known to XProtect just by removing the quarantine bit with the xattr utility, as has always been the case on older versions of macOS. This is great news for users, but potentially a problem for researchers who want to explore the finer details of how a sample known to XProtect actually behaves. In this post, we’ll look at the ways researchers can bypass this hardening and still run known malware on Catalina if they need to.
Why You Might Want to Run Known Malware on Catalina
Not so long ago, researchers probably wouldn’t have cared much about malware known to XProtect, as XProtect was updated only infrequently and didn’t cover a lot of threats known to the macOS research community. On top of that, prior to Catalina, XProtect was always easy to bypass anyway.
Times have changed, however, and Apple have belatedly come to recognize that Macs are being targeted in the wild by a variety of different threat actors. In recent months, Apple have not only been updating their internal security tools more frequently but also discovering some threats ahead of other researchers. It’s great to see Apple taking a lead, but Apple rarely shares threat intel, and if the threat is blocked by XProtect on Catalina, it prevents researchers from diving deeper into how the threat works. That deep dive is necessary for at least two reasons. First, we want to develop mitigations and blocks that are more effective than the legacy methods used by XProtect; and second, we want to be able to analyse malware behavior and track campaigns in order to get ahead of threat actors. That’s only possible when we have a deep understanding of what threat actors are doing.
How To Run Known Malware Samples on Catalina
Given that we can no longer just remove the com.apple.quarantine bit to allow malware to run on Catalina, researchers must resort to other tactics. There are a number of options.
First, we could just run the sample on an earlier version of macOS, like 10.14 for example, where we can use the usual XProtect bypass. That might be fine for some situations, but it means that we cannot test Catalina-specific behavior. Moreover, once we move on to 10.16 and beyond, the OS on our test machines will be increasingly behind those actually in use and targeted by malware authors. Eventually, we’ll end up with an OS that doesn’t even support the malware at all, so in the long-term, another solution is needed.
A second possibility is to disable SIP and modify the XProtect file (such as by removing all the signatures). While there’s no problem doing that in a lab machine or a VM used specifically for testing malware, it’s what I would call a ‘dirty’ solution. OK, as a last resort, but the problem is that with SIP turned off, you may run into further issues with malware behaving differently in such an unusual environment. Malware authors know that real users rarely run with SIP disabled, and one easy anti-analysis technique they can use is to run csrutil status then quit or alter behavior accordingly.
The third possibility is to determine what rule the sample is triggering, and then modify the sample to avoid the rule. XProtect long-ago became much more than just a simple hash-based file scanner. It now uses Yara rules, so just appending a byte or two to the end of the sample to change the computed file hash won’t work. However, as we’ll see, it’s still possible to get around XProtect with a little work, but there are a couple of ‘gotchas’ to watch out for, as I’ll explain below.
How to Damage Your Computer on macOS 10.15 and Higher
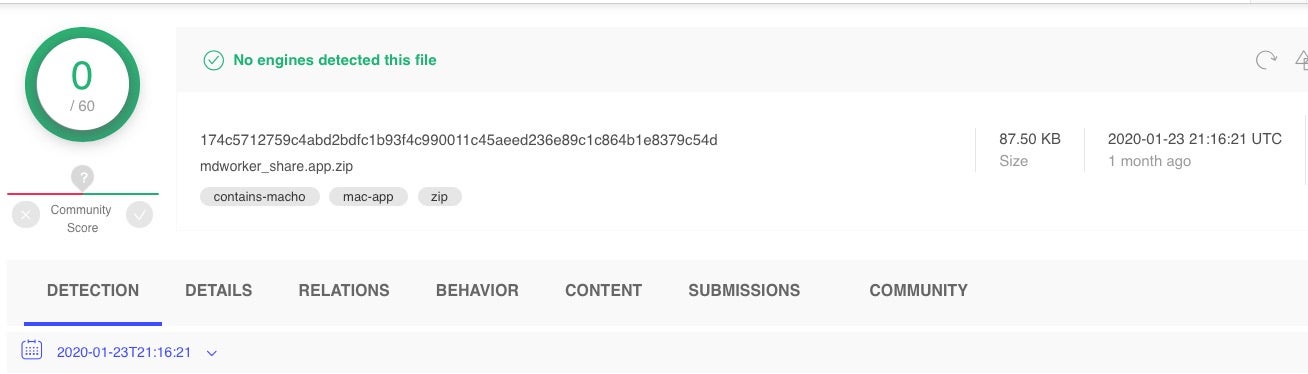
Of course, we mean “damage” your disposable VM instance that you have isolated properly before running malware! Once you’re in a safe, disposable environment, the first task is to determine what rule our malware is rubbing up against. For the purposes of this post, I’m going to use this sample, which at the time of posting is undetected by any of the static engines on VT:
174c5712759c4abd2bdfc1b93f4c990011c45aeed236e89c1c864b1e8379c54d
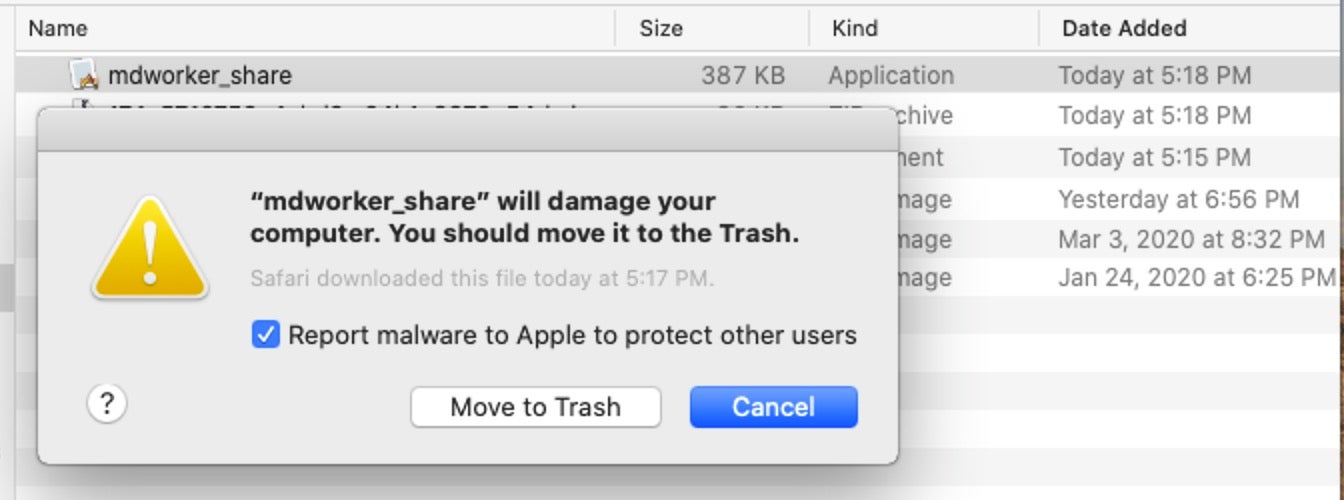
On Catalina, we still have to remove the com.apple.quarantine bit to get past both Gatekeeper and Notarization requirements.
$ xattr -rc ~/mdworker_share.app
However, as we see when we try to detonate the sample, although VT does not know about this malware, XProtect does.
That means we first have to examine our malware and compare it against the rules in XProtect.yara to find a match. I’ve written before about how to reverse XProtect’s signature definitions, so refer to that post for the skinny on that.
If you are trying to test malware that is already known on VT or other repository, then you may get a clue by looking at the malware’s detection name there, but Apple’s newer signatures do not use common malware names. Nowadays, Apple prefer to use meaningless alphanumeric identifiers like those shown below to obscure what they are detecting:

If, like the sample we’re using here, your malware is unknown to reputation engines and it is being blocked by XProtect, then look through the newer XProtect rules first. At least at present, newer rules tend to be at the top of the file, but I find it useful to keep a regular eye on changes to XProtect in order to see what’s changed each time, which makes the process faster and easier.
You may have to grep strings from the rules against your sample’s binary till you find a match.
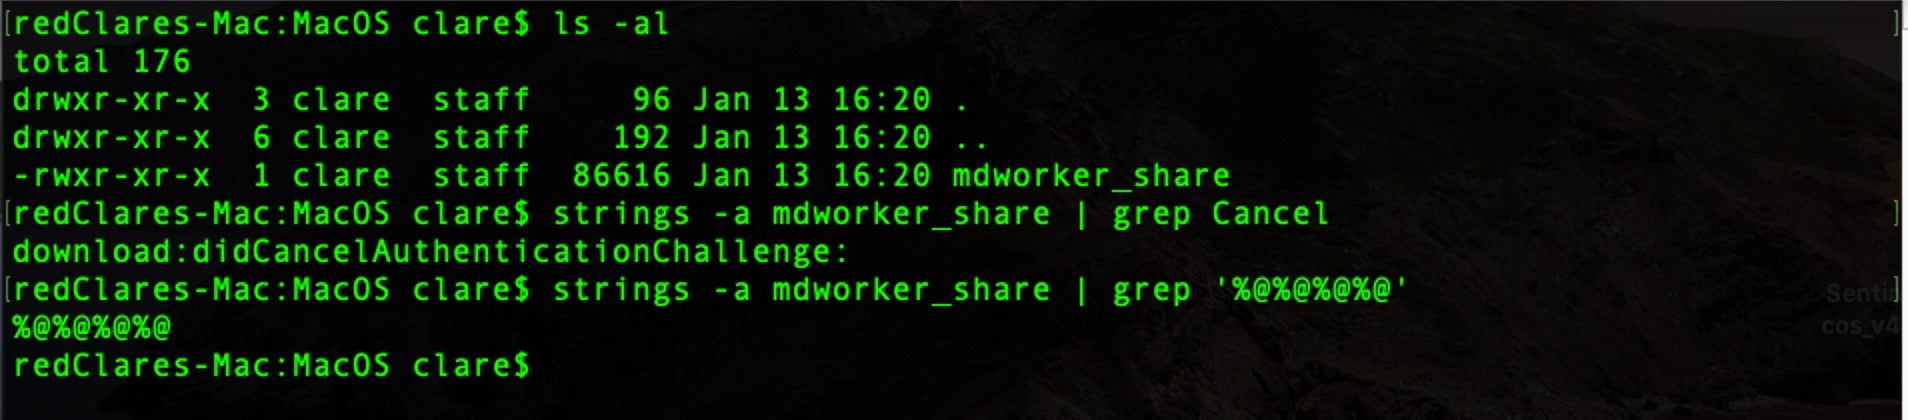
In the case of this example, it turns out that the strings match the rule for what Apple call MACOS.b264ff6, which was added in XProtect v2112.
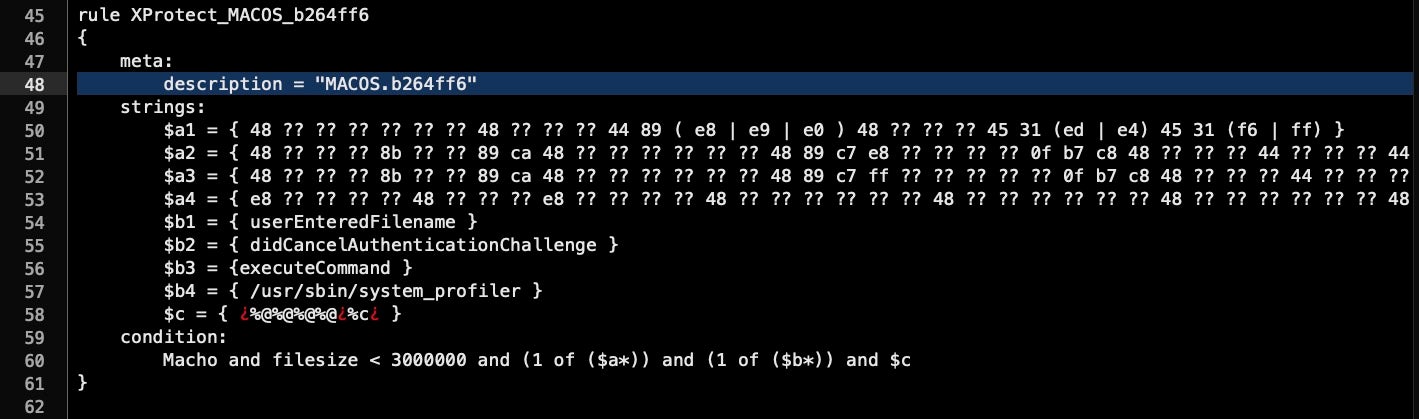
We can load the malware sample into a hex editor and search for the rules in hex to confirm if our sample matches the requirements:
Of course, ensure your sample meets the exact condition specified, not just one string. For this rule, we need one hit each from a string in the sets of $a and $b, as well as a hit on the string $c.
Macho and filesize < 3000000 and (1 of ($a*)) and (1 of ($b*)) and $c
How to Patch a Binary to Bypass XProtect Yara Rules
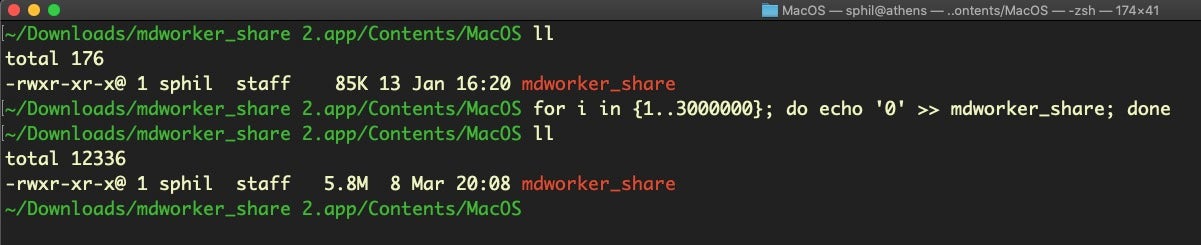
Given that this rule has a filesize in the condition, we can choose either to append junk data to the end of the binary or to modify one of the strings specified in the rule. This rule says the executable must be under 3MB, and in fact our sample is only 86Kb, so that’s a lot of junk to add. Nevertheless, appending junk to the binary is easy enough. Doing it this way may take a few minutes, but it’s easy to just substitute the number in the condition for the second number in parentheses below, and the code will bloat the file to way over the size required:
for i in {1..3000000}; do echo '0' >> mdworker_share; done
Although this method works fine on this particular sample, it’s both clumsy and may cause a different sample to alter its behavior if, for example, it conducts self-checks on its own file size. Also, although currently pretty much all XProtect rules specify a filesize in the conditions, that may not hold true in the future. Thus, we should also think about patching the binary rather than just appending junk data to it.
There are a few ‘gotchas’ to look out for when patching binaries, which I’ll list in the next section, but the first and most immediate one you have to look out for is making sure you don’t change something that will break or alter the malware’s behavior. For example, suppose our sample has the $b4 string specified in the rule for MACOS.b264ff6:
$b4 = { /usr/sbin/system_profiler }
We shouldn’t just change that to some junk string, as that may prevent our malware from working properly or at all on execution. Instead, we could change that path to another path (of equal length) and put a copy of the system_profiler binary there on our test machine. For example, we could create /tmp/sbin/system_profiler, then patch usr to say tmp in the binary. When the malware runs, it will get what it expects.
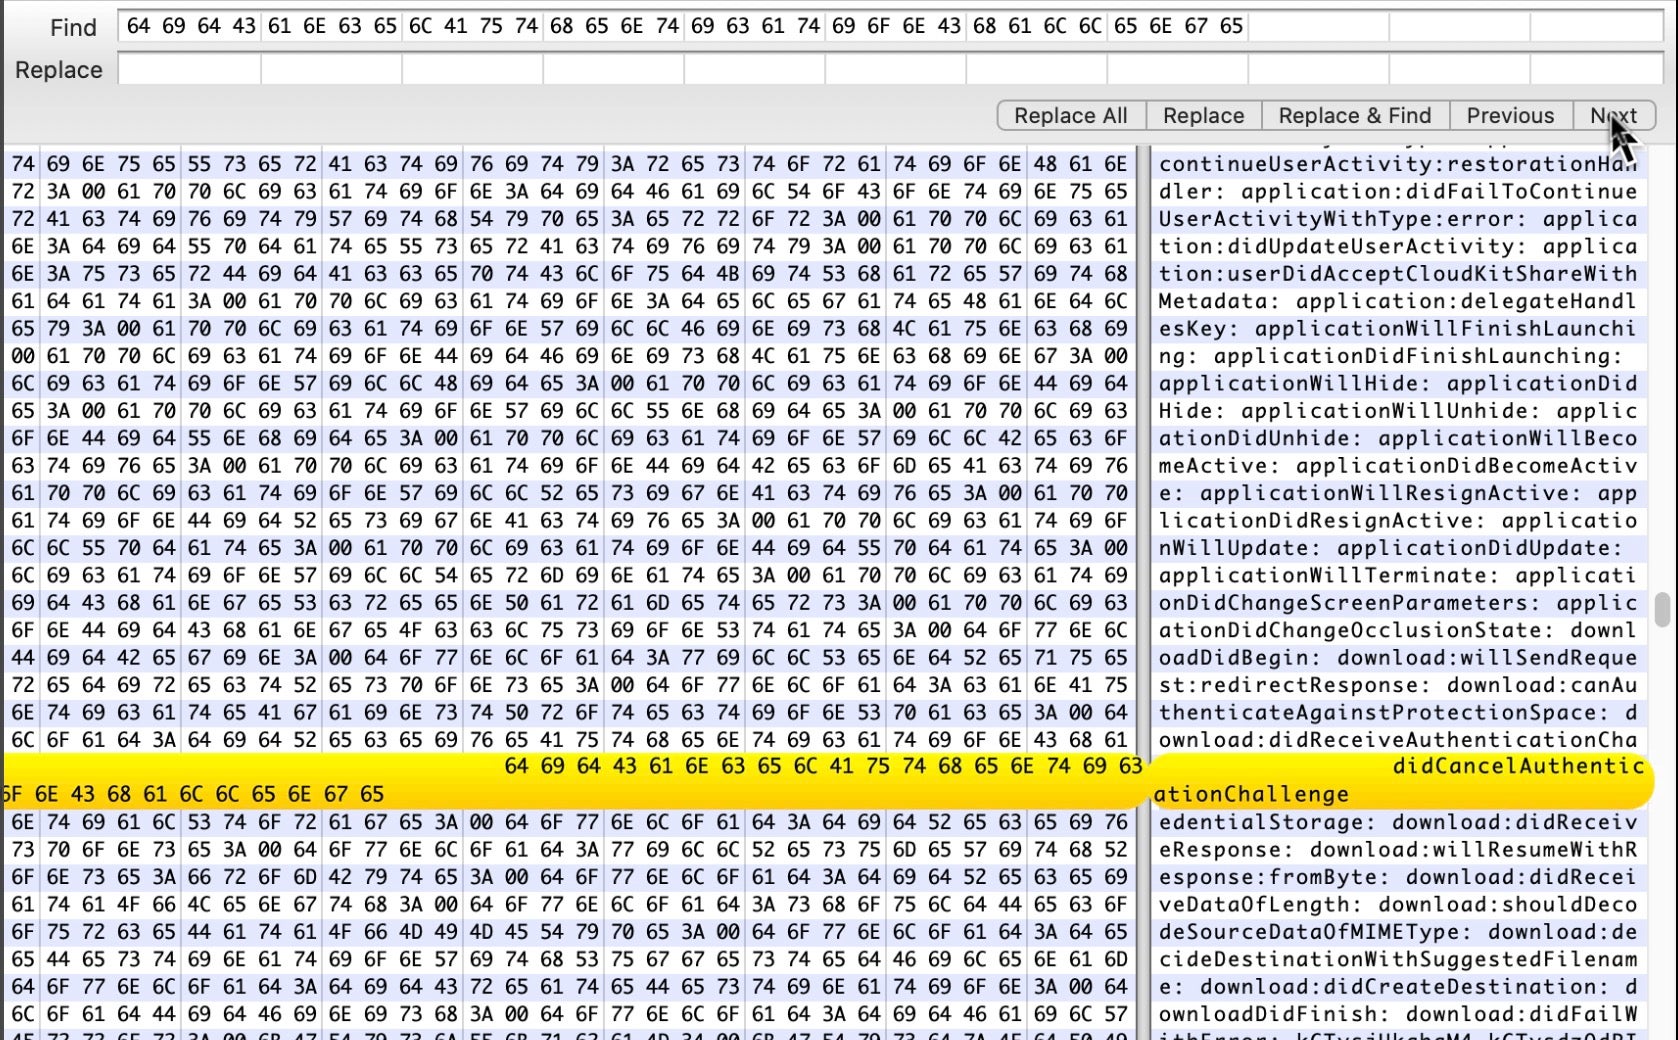
The patching itself is just a case of using a hex editor like Hex Fiend and doing a search and replace on every occurrence of the unique strings or hex bytes in the rule. Where you have a choice, choose code that ideally only appears in one place to reduce the risk of breaking the sample.
This particular sample we’re using matches strings $a1, $b2 and $c. We only need to change one of them to break the match. String $b2 looks like a method name that will only be called if the user cancels the request for authorization.
$b2 = { didCancelAuthenticationChallenge }
As I don’t plan to do that on my test, I’ll just change the first few characters of this method name in Hex Fiend and then save the binary.
In the worst case scenario, where the malware conducts internal checks on its own code integrity or you cannot find a value to change without affecting the malware’s behavior, you may have to make such a patch to first get the launch through XProtect, then unpatch the binary in the debugger to return it to its original state before the internal checks or patched code is executed. This involves setting a breakpoint on your patched code (remember you have to patch/unpatch it everywhere it appears) and then supplying the original value before continuing.
Some ‘Gothchas’ When Patching Binaries
My sample is now ready to run, but before we launch it let’s just go over some gotchas to make sure we’ve done everything right.
First, make sure you only replace and not add bytes within the binary. While it’s fine to append junk onto the end of the binary, any patches you make within it should not add extra bytes, or you’ll shift all the offsets and the code won’t run.
Second, make sure your patch tools can save binaries without corrupting them. Ghidra, for example, doesn’t seem able to patch and save without corrupting the binary. Hex Fiend is probably your best friend here, but of course other tools should work also.
Third, when you patch, you’ll break any code signing that might exist. That’s normally not a problem, since you’re going to disable code signing checks anyway by removing the com.apple.quarantine bit, but if you do need the binary to be validly code signed (e.g., if it checks its own code signature) either use an ad hoc signature to re-sign it after patching, or patch or jump the method that returns the code signing check in the binary.
Fourth, if you run a sample on Catalina and it gets blocked by XProtect, don’t patch the same instance that got blocked. It looks like Catalina, either via XProtect or LaunchServices, remembers a file that has been blocked, and won’t run it after that no matter how much you patch it. Thus, patch a clean copy of the malware on another machine or VM then transfer it over. Remember to remove the quarantine bit before you try to launch.
If you avoid all the above ‘gotchas’, you should now be able to detonate your malware and happily continue your macOS reverse engineering explorations of its behavior!
SAMPLES
mdworker_share.app.zip
791157ca6a1f10ee209ea71ffa0f8c9109028f4d1013d092276a6a7e50e1b2a4
174c5712759c4abd2bdfc1b93f4c990011c45aeed236e89c1c864b1e8379c54d
46724f195ea18e82d833ed92637a20ed95f9afe1ef749aa06c9156f2719ce389
helper.app.zip
0ac25a8dd9134284406248110ad66dbdb7f4ec557570be02fb9f92bee93727bf
fa88ca779f16e7adbe0702db8473883c20b0aaa69a2345d07c81d322ff2bc990
terninal.app.zip
cbc7751d5fcca12d9e7ea2fd90862d14af8d024710ff22f5457a2f8d427b7fee

