
Researching threats on macOS involves not only keeping up with what threat actors are doing but also with what Apple are doing in terms of updating their built-in tools like XProtect, Gatekeeper, and MRT.app. Apple is renowned (or perhaps notorious…) for its tendency toward security opacity and obfuscation, and it has long had an aversion to publicly sharing its threat intel with the wider security community. Given both Apple’s vast resources and its privileged position in vetting developers and signed software, the company has a unique ability to see threats addressing its platform that other security researchers do not. For this reason, it is important that researchers tap into Apple’s security updates to see what new threats they may have found, and to check that their own solutions already have such threats covered in the event that Apple’s own tools fail to protect the end user.
In this new series of posts, I want to share some examples of how you can go about staying informed of what Apple update and when they do it. Although there are some commercial tools and scripts that either do or have tried to address these questions, it’s a simple enough matter to “roll your own” check and notification scripts, which we will look at in this post. Later, we’ll look at how to run diffs on the plists, SQL databases and binaries involved to see what changes have been made. These should serve well enough to help you build your own tools to check on and analyse new Apple security updates.

Discovering macOS Security Updates: the Hard Way
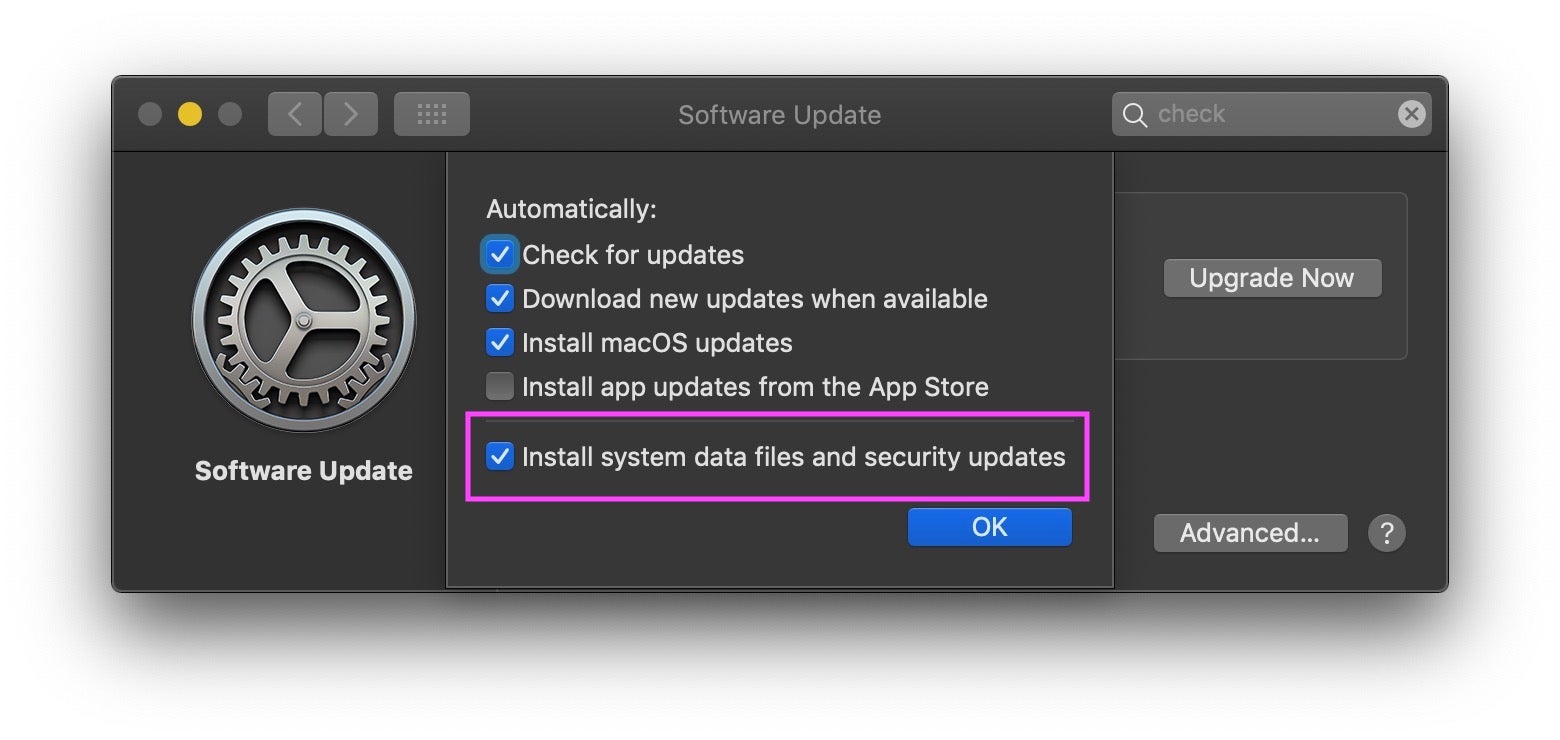
Unlike on some other platforms, Apple’s security updates are invisible to users. They occur transparently in the background without notification or user interaction, unless the user happens to have disabled these updates in System Preferences (not recommended, by the way), in which case they don’t happen at all.
In that case, or if you just want to manually check what’s going on, you can run software update check from the Terminal. Although the software update tool isn’t specifically limited to security updates, there are some useful commands available here that allow you to drill down on those in particular. The man page is informative, but there are also some hidden commands, such as background-critical that it doesn’t mention. If you’re interested try running strings on the binary and perusing what you find. For example
$ strings -a $(which softwareupdate) | grep -A10 -B10 critical
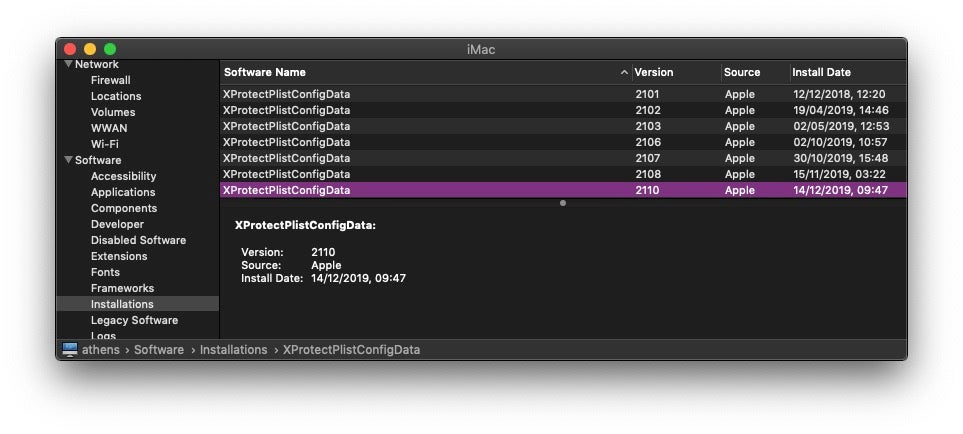
You can also check the history of earlier security updates that the machine has received in a couple of ways, too. From the command line, you could explore system_profiler:
$ system_profiler SPInstallHistoryDataType | grep -i -A2 -B2 xprotect

Alternatively, if you prefer the GUI, check out opt- > System Information… and scroll downwards to “Installations”. Incidentally, I regard it as a bug (one reported many years ago) that these two methods don’t show equivalent timestamps for the same installation, even after accounting for the two methods’ use of different timezones and locales.
Automating Security Update Checks
While those mechanisms are all well and good for their intended purpose, they won’t help us keep informed of changes as they happen, unless we have little else to do than constantly check for updates, and they won’t offer us the fine-grained detail we need to see what has actually changed in the latest update, either. Fortunately, we can do better. We can build a script that will pull Apple’s software update catalog and parse it for the specific kinds of updates that we’re interested in, namely, XProtect, MRT and Gatekeeper.
At this point, some readers might be thinking: why not just monitor the local version of these files for changes? Indeed, several years ago I built and distributed a free tool that did just that, but there’s a problem with that approach. Apple do not role out these updates evenly. Geographically, users in different regions can see these updates sometimes days apart, and there’s plenty of anecdotal evidence in various user forums of some machines not receiving updates when others do, even on the same network. For those reasons, simply waiting for the updates to arrive on your local machine isn’t a particularly reliable or punctual way to find out what new threats Apple’s security updates are addressing.
Returning to our script, then, once we’ve built and tested it, there’s a couple of other tasks we’ll need to take care of. The first is setting up a schedule to run the script at a chosen interval. The second is to implement some form of notification to alert us that an update has been posted. Beyond that, we will also want some “quick wins” for parsing the differences found in each update. That’ll be the subject of further posts. For now, let’s take a look at how to build a script to look for changes, run it on a schedule and get notifications of updates.
Finding Apple’s Software Update Catalog
To build our script, the first thing we need is the URL of Apple’s software update catalog. To find that, let’s see what the softwareupdate utility can tell us.
Running strings on the utility and grepping it for https turns out not to be very helpful.

Since we know the utility has to reach out to a download server at some point, perhaps it’s called with code from a shared library. Let’s check to see what shared libraries the utility calls with otool and the L switch.
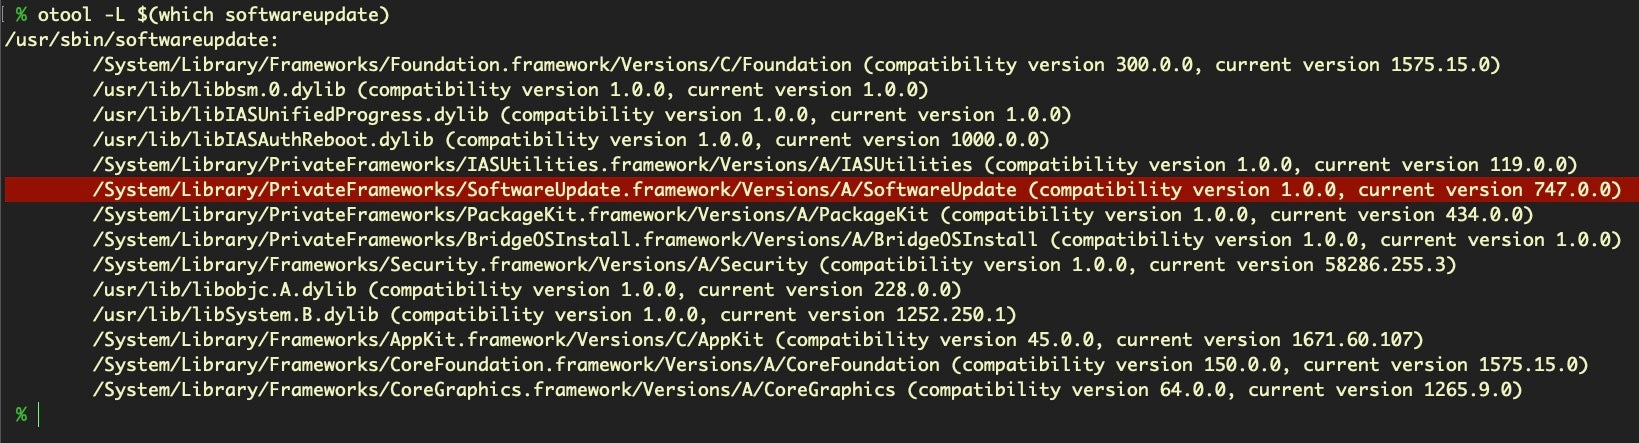
That private framework looks promising. Let’s try grepping that for network calls.
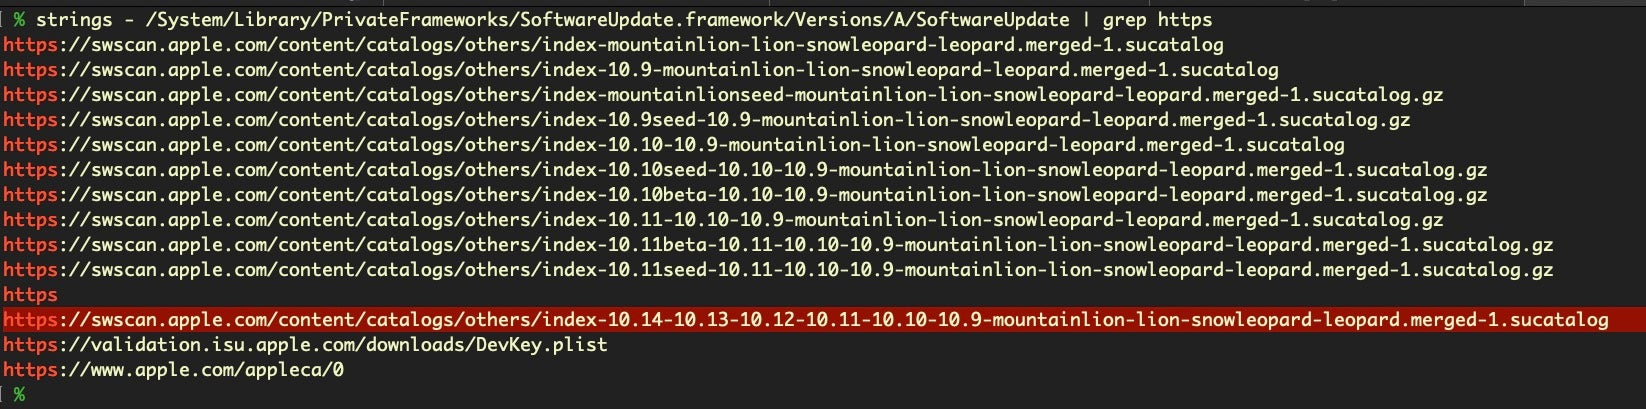
Bingo! As you can see, there’s more than one, and the URL does change from time to time, so it’s worth knowing how to find this catalog address. The latest one available on this system a (10.14 macOS install) is the final sucatalog entry shown above. However, if we run the same technique on a 10.15 machine you’ll find we get:
https://swscan.apple.com/content/catalogs/others/index-10.15-10.14-10.13-10.12-10.11-10.10-10.9-mountainlion-lion-snowleopard-leopard.merged-1.sucatalog
Fortunately, I don’t need to be running a 10.15 machine to download and parse that 10.15 catalog file, so we’ll use this URL so that we can see changes made for 10.15 as well. To see what the catalog looks like, change to a convenient working directory in Terminal and issue a CURL command to download it; it’s simply an ASCII text file of around 6MB.
$ curl -sL https://swscan.apple.com/content/catalogs/others/index-10.15-10.14-10.13-10.12-10.11-10.10-10.9-mountainlion-lion-snowleopard-leopard.merged-1.sucatalog -o sucatalog_latest
Yes, that’s a pretty large text file, containing some 90,000+ lines!
$ cat sucatalog_latest | wc -l
-> 90151
That’s because the catalog contains entries for a wide variety of software updates going as far back as 2008 and, as the name implies, covering versions as far back as Snow Leopard! Let’s find the date of the last posted update:
$ grep -A1 PostDate sucatalog_latest | tail -n 1
-> <date>2019-12-18T19:16:33Z</date>
Creating a Script To Check for Apple Security Updates
Great. Now from here on in, better scripters than I will have their own ideas on how best to parse this, and no doubt some will prefer to use python, or perl or whatever their favorite scripting language is. When it comes to this kind of thing, I’m a “quick and dirty” scripter focused on getting the result rather than the niceties or aesthetics of efficient coding. In short, I don’t promise this is the best way of parsing the catalog so feel free to adapt or improve the ideas here for your own use case.
To make a quick and easy tool that can notify us of changes to the catalog, we’ll do a diff on the latest version and a locally saved one. If you’ve already pulled down the catalog from above, make sure you rename it to sucatalog to be consistent with the script that follows and save it in ~/Documents/Security_Updates/. Inside that folder, create another folder called Changes.
The script will begin by changing the current working directory to the Security_Updates folder. It’ll then pull down the most recent copy of the catalog and diff it against the previous one that you saved earlier. If there’s any changes, our script will first write these out to a temporary file, called diff.txt.
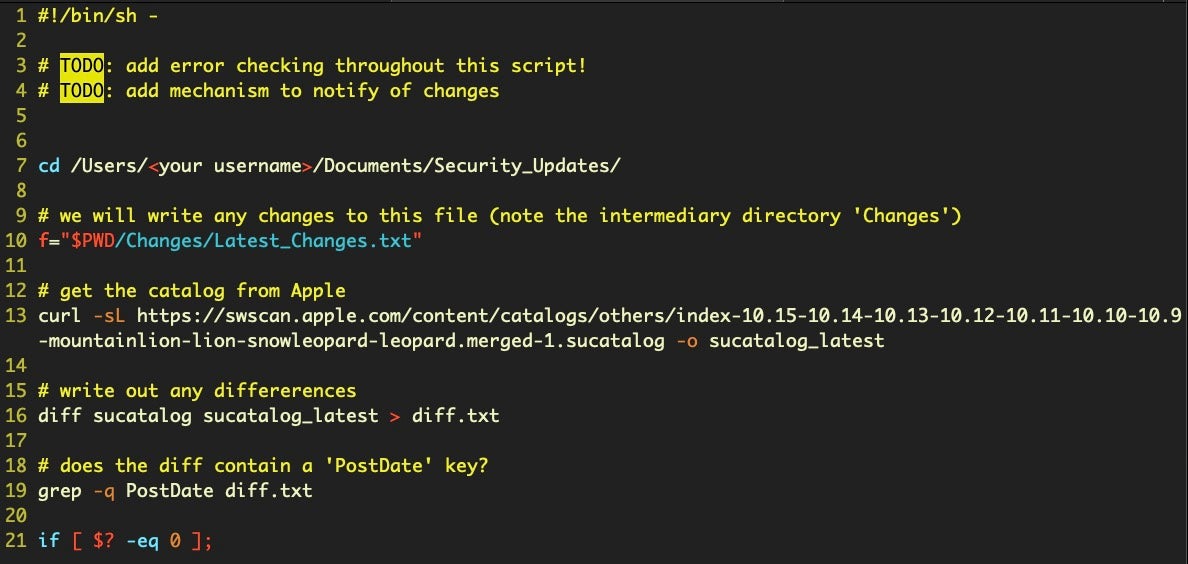
As a quick check we ensure the diffs, if any, contain a new PostDate (we don’t care if there’s been some other change that wasn’t a new item posted to the catalog). Then, we’ll use some regexs to search for the kind of changes we’re interested in. If we find any, we’ll pull out the URLs and save them to a separate file.
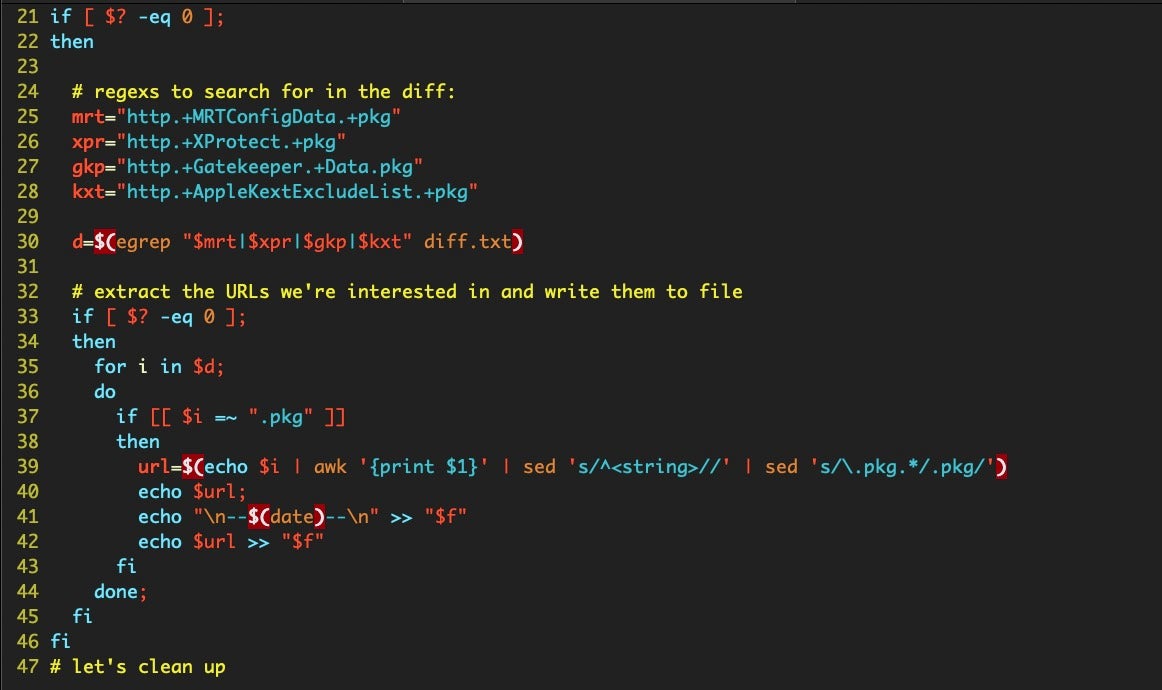
After the conditional has been evaluated, we’ll clean up any of our temp files and replace the local saved copy of the sucatalog with the one we just downloaded, ready for the next time.

Setting Up a Schedule
Setting up a schedule to run the script can be as easy or as hard as you like. The ‘proper’ way is probably to run it as a user Launch Agent. These aren’t that hard to create, but it’s easy to make tiny errors in the XML that can be difficult to debug. You can make your life easier if there’s some already existing agents in your ~/Library/LaunchAgents folder. If so, make a copy of any one of them, rename it, and then replace the label and appropriate keys with your own values. Delete any keys you don’t need.
A more efficient method, at least to my mind, is to run a cronjob. These are trivially easy to create with a one-liner. Assuming you call the script suCatalogScript.sh and insert your own username as appropriate, the following command will install a cronjob that calls the script 5 minutes past every hour while you’re logged in:
$ echo '05 */1 * * * /Users/<your username>/Documents/Security_Updates/suCatalogScript.sh' | crontab -
Note: if you have existing cron jobs don’t use this method, as it’ll overwrite them! Instead, use the -e switch to edit your crontab. See man crontab page for more details.
Setting Up Notifications
The final thing we need to set up is a notification system. We have a couple of choices. We could simply add some osascript to the suCatalogScript.sh that will fire off a notification banner. This is certainly the easiest solution.

Alternatively, you could plump for a dialog alert, replacing the osascript above with that shown below, making sure to escape all those quote marks and the exclamation mark, if you use it.
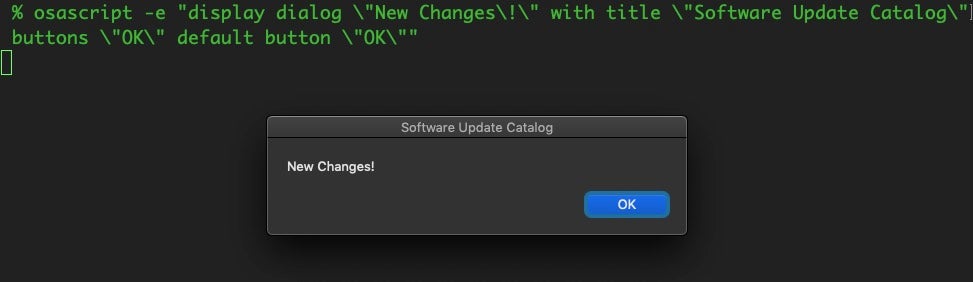
The advantage of a dialog alert over a display notification is you can use an arbitrarily long message, perhaps reminding yourself where to look to view the changes, and dialog alerts are not so easy to miss as notifications can be.
Personally, I prefer to keep the script and the notification mechanisms separate, which was the reason for saving the Latest_Changes.txt file to a separate Changes folder. With that folder dedicated to only holding this file, we can set up a Folder Action that will alert us whenever that folder is modified. Not so long ago, Folder Actions were a bit flakey, but they’ve become much more reliable in recent versions of macOS. Folder Actions are also pretty simple to set up and manage. You can learn about them and how to set them up here.
Conclusion
In this post, we’ve “rolled our own” notification system to tell us when Apple have made changes to Gatekeeper, MRT and XProtect. But simply being notified of the changes is only half (or less than half!) of the task. The major work involves finding out what has changed. Deobfuscating and running diffs on XProtect’s property list files, Gatekeeper’s SQL databases and MRT.app’s macho binary involves a variety of different techniques, given the different file structures and formats involved, and that’s exactly what we’ll start getting into in the next post!
If you enjoyed this post on Apple’s macOS Security Updates and would like to be notified when we post more content like this, please subscribe to the blog’s weekly newsletter (form to the left) or follow us on social media (links below the line).

