Resources for learning malware analysis and reverse engineering abound for the Windows platform and PE files, but by comparison there’s very little literature or tutorials for those who want to learn specifically about how to reverse macOS malware and macOS malware analysis techniques.
In this series of posts, you’ll take a sample file and use native tools and techniques to understand what a file does and to build a list of IoCs (Indicators of Compromise) that can be used in detection.
As there’s a lot of ground to cover, the tutorial is split over several parts. In Part 1, you’ll learn how to set up a safe environment to test malware on macOS. You’ll install all the tools you need (bonus: doesn’t cost a cent!) and learn where you can source samples of macOS malware from. You’ll examine an application bundle and its contents to understand how it works and find an interesting encrypted text file. In Part 2, you’ll learn the fundamentals of static analysis of Mach-O binaries, the native executable file type for macOS. In Part 3, you’ll use dynamic analysis techniques to execute a malware file in a controlled manner and read code from memory.
If you have ever wanted to learn how to reverse malware on macOS, this is the place to start!
How To Set Up A Safe Environment To Test Malware
To test malware, you’ll need to download some virtualization software to run a guest operating system. There’s basically three choices on macOS: VirtualBox, Parallels and VMWare. I have no preference here, so choose one, read the docs to set up a macOS Virtual Machine (any recent version will do, but this tutorial will use a Parallels Desktop VM instance running macOS 10.14.3) and come back here when you’re ready.
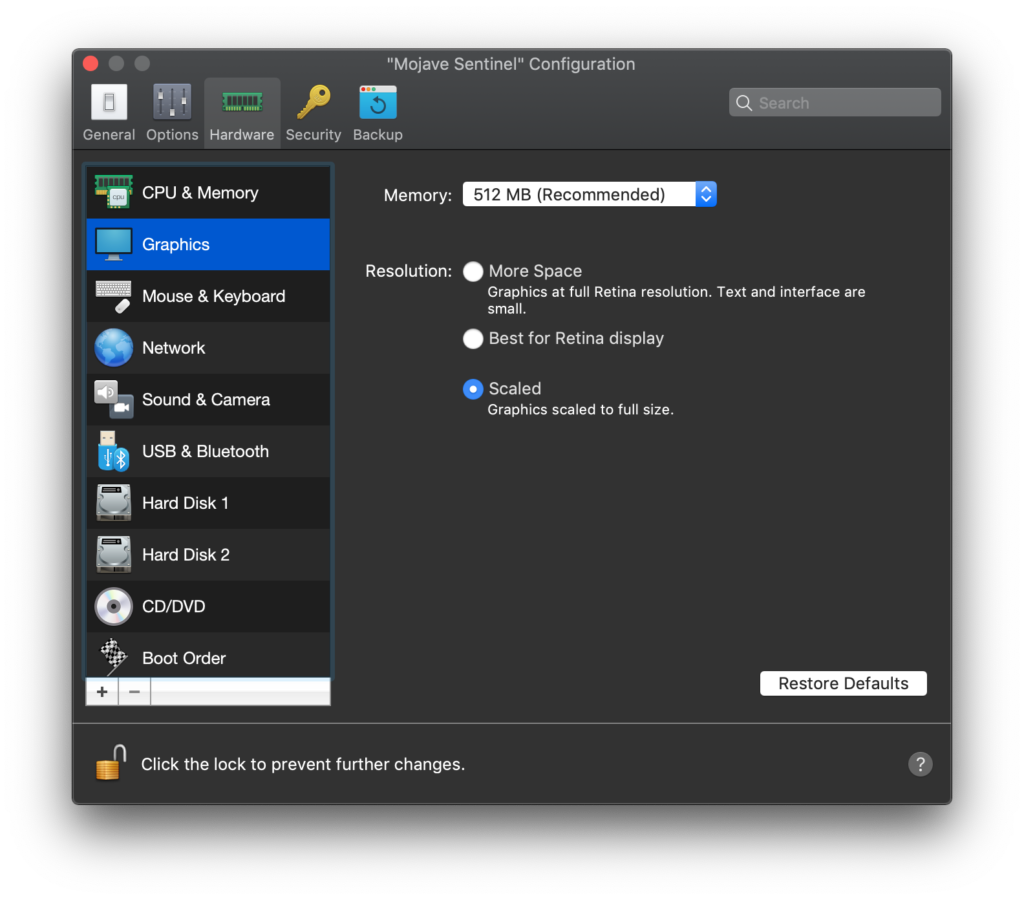
Take a look at the configuration options for your guest OS. There’s a few things you’ll want to change. First, VMs can be laggy, so make sure you’ve afforded the VM enough RAM: 2GB is a minimum, but 4GB should make things nice and smooth. For the same reason, up the graphics memory to at least 512MB.
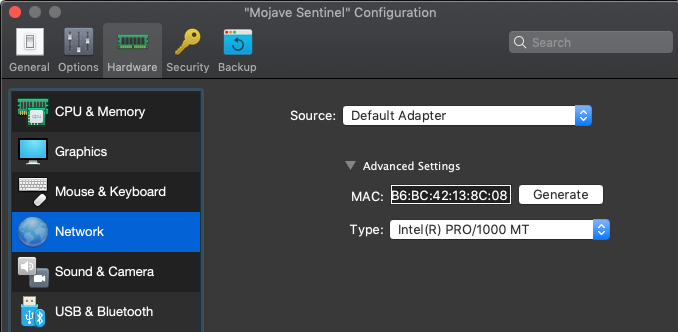
Some malware tries to detect if you’re running it in a VM and alters its behavior as a result. Although we won’t deal with that situation in this tutorial, one trick that can help is to change the default MAC address of the machine. For Parallels change the MAC address so that it doesn’t begin with 00-1C-42, for VirtualBox change it to anything other than 08-00-27, and for VMWare avoid the following prefixes: 00-50-56, 00-0C-29 and 00-05-69.
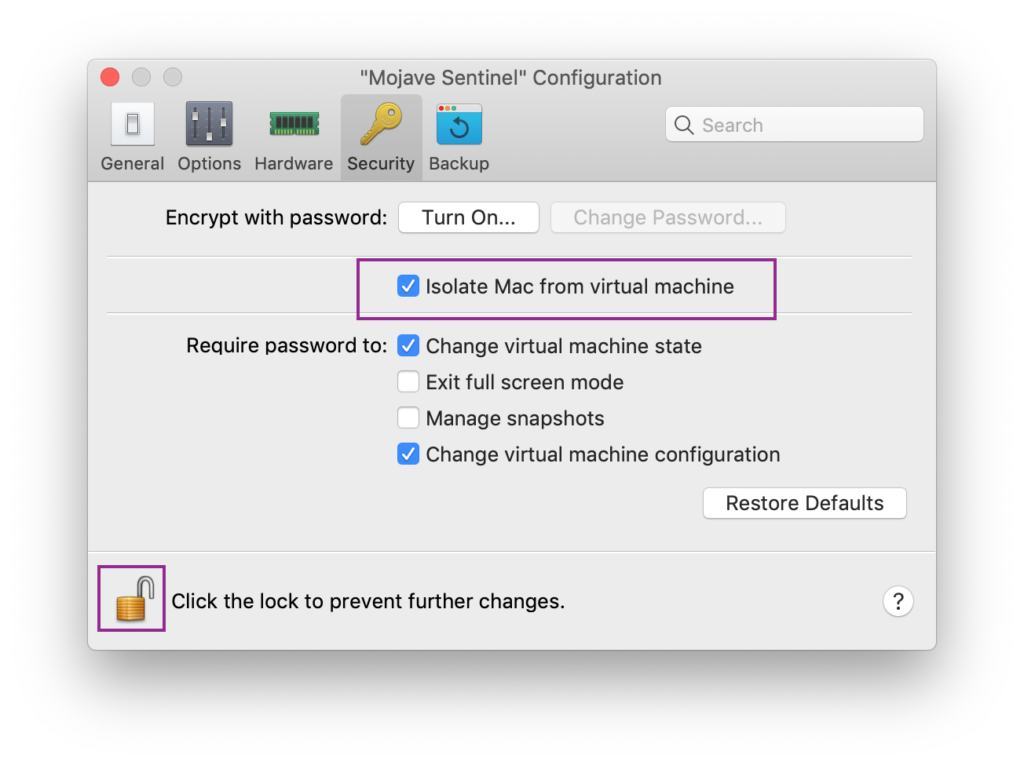
Isolate Your macOS Guests!
Most importantly, isolate the VM guest from your actual machine (the ‘host’). That means you must not share any drives or folders, including backups. The malware must have no means of escape from your VM guest. I don’t even share the clipboard.
How you do this depends on your particular VM software and its version, but the relevant options in Parallels Desktop 14, for example, are in the Security tab.
In the most recent version of VMWare’s Fusion that I have, the Isolation panel is not the only place to look. Go through the other panels (e.g., ‘Sharing’) and disable anything that connects the guest to the host. The only thing the VM instance needs access to is the internet, which is usually set up by default.
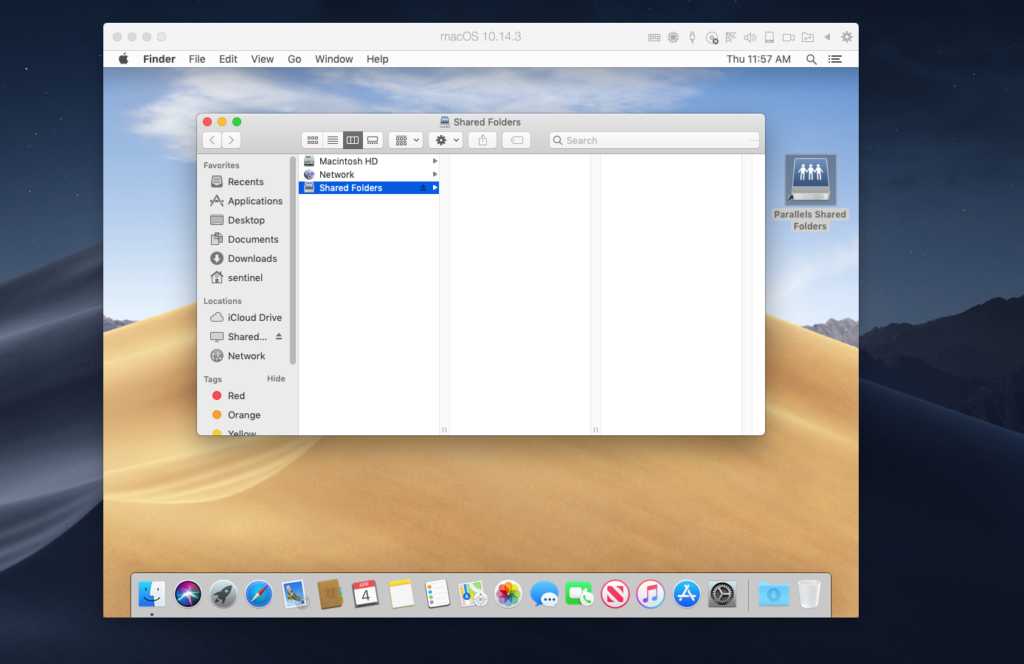
After making these changes, start the VM and make sure that the Shared Folders is empty.
Isolation is essential, but what if you want to offload some screenshots or output files for future reference? In that case, use the guest’s browser and a free service like wetransfer.com to email compressed and password-protected files to yourself.
Tools For Testing Malware On macOS
From here on in, assume everything we discuss refers to actions inside your isolated VM instance. Take a moment to adjust any System Preferences or Application preferences to your liking, in particular the Terminal, as we’re going to be in there most of the time.
On the command line, call the strings utility to set off the prompt to install Apple’s command line tools. Work through the prompts till you’re done.
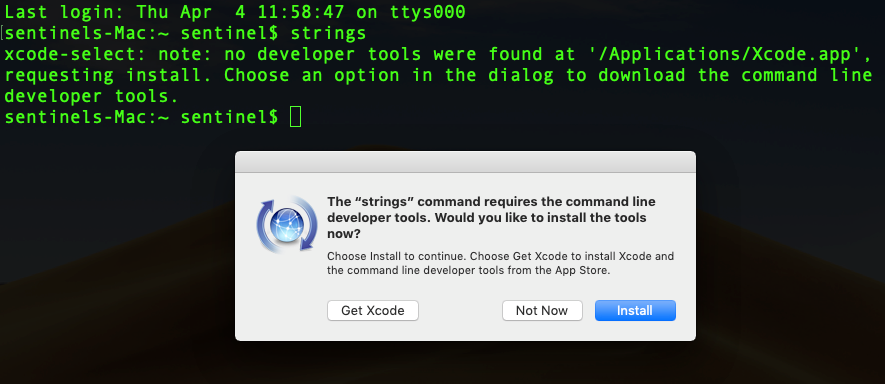
And here’s the good news: you actually now have all the tools installed that you need to learn macOS malware analysis and reverse engineering!
These tools include a string decoder (strings), file analysis utilities (file, nm, xattr, mdls and others), hex editors (hexdump, od, xxd), a static disassembler (otool), and a debugger, memory reader and dynamic disassembler (lldb). And we got all those for free!
Yes, you may have been expecting to hear about the many cool tools that professionals use like Hopper, Cutter, Radare2, Floss and the hundreds of excellent community-provided tools available on public repos.
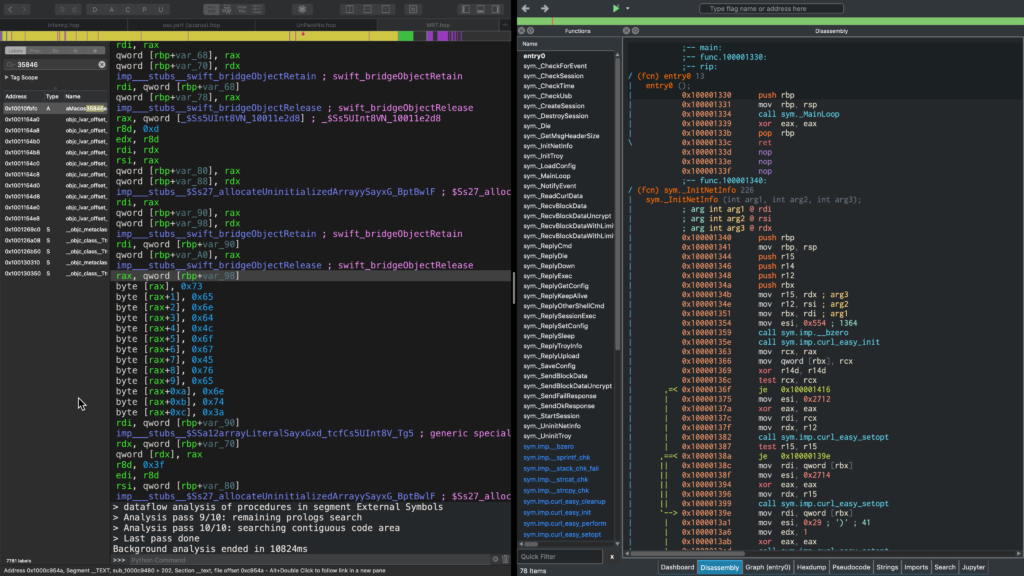
We’ll mention some of those during this series and at the end, but we’re not going to need them at this stage. Why not? Because as learners, we want to understand the basic concepts of what we’re doing. Professional tools are great for saving time and making you more productive, but in a learning context they can easily confuse or hide important details.
How To Find Malware Samples For macOS
There’s just one thing missing before we can get started on macOS malware analysis and reverse engineering: some macOS malware!
Let’s set up a working directory on our VM guest, where we’ll save our samples and do all our work. Something like:
$ mkdir ~/Malware
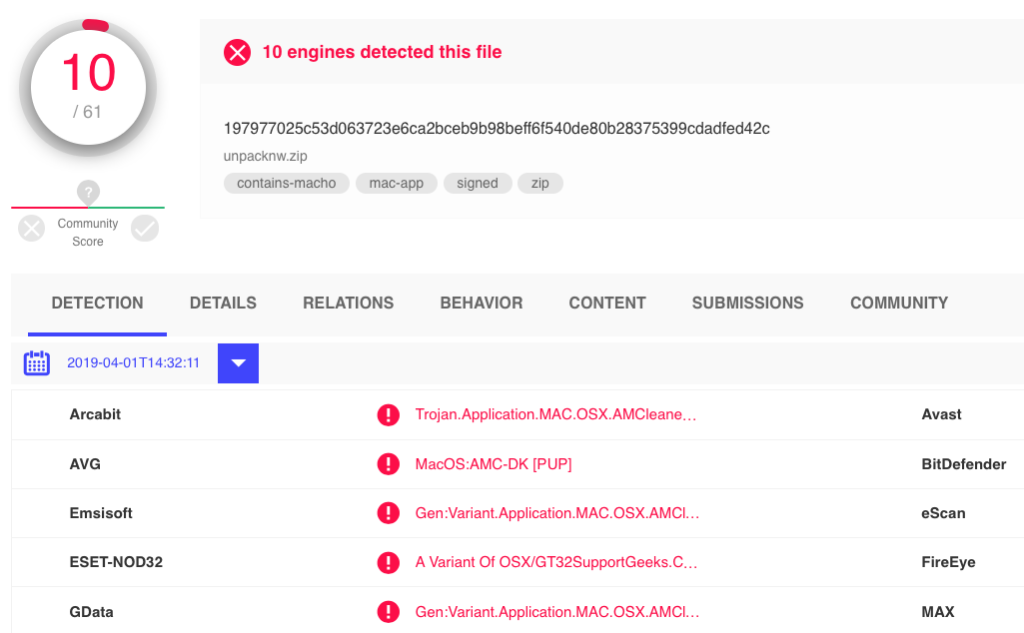
There’s a number of sources for getting sample malware. Probably one of the most popular is Virustotal, but you can only download samples from there if you have a paid account. Luckily, there are other public repositories like malpedia and malshare. The sample we’re going to use for this tutorial has the following hash and is available on all three:
197977025c53d063723e6ca2bceb9b98beff6f540de80b28375399cdadfed42c
It’s not the most dangerous malware in the world – good for us as we learn! – but it does have some unexpected behaviour, including dropping an instance of the mysterious malware Apple labelled MACOS.35846e4 as one of its consequences. It also has some tricky obfuscated code that we’ll need to figure out how to decrypt on the way.
macOS Malware File Analysis – First Steps
Download the sample and move it to your working directory. If you’re not already doing that in the Terminal, let’s switch to the command line now and rename the file to something more manageable:
$ mv 197977025c53d063723e6ca2bceb9b98beff6f540de80b28375399cdadfed42c.dms malware01
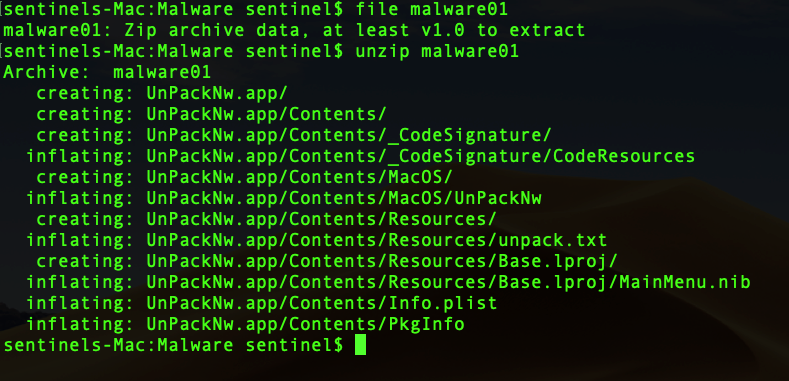
Let’s find out what kind of thing it is with the file utility:
$ file malware01
![]()
It’s a zip file, so lets inflate it and see what we have:
$ unzip malware01
The output from Terminal shows us that it’s a macOS application bundle with a regular hierarchy.
How To Check the CodeSignature
Interestingly, there’s a _CodeSignature folder, which only exists if a bundle has been codesigned by a developer. So let’s find out who the developer is.
$ codesign -dvvvv -r - UnpackNw.app/
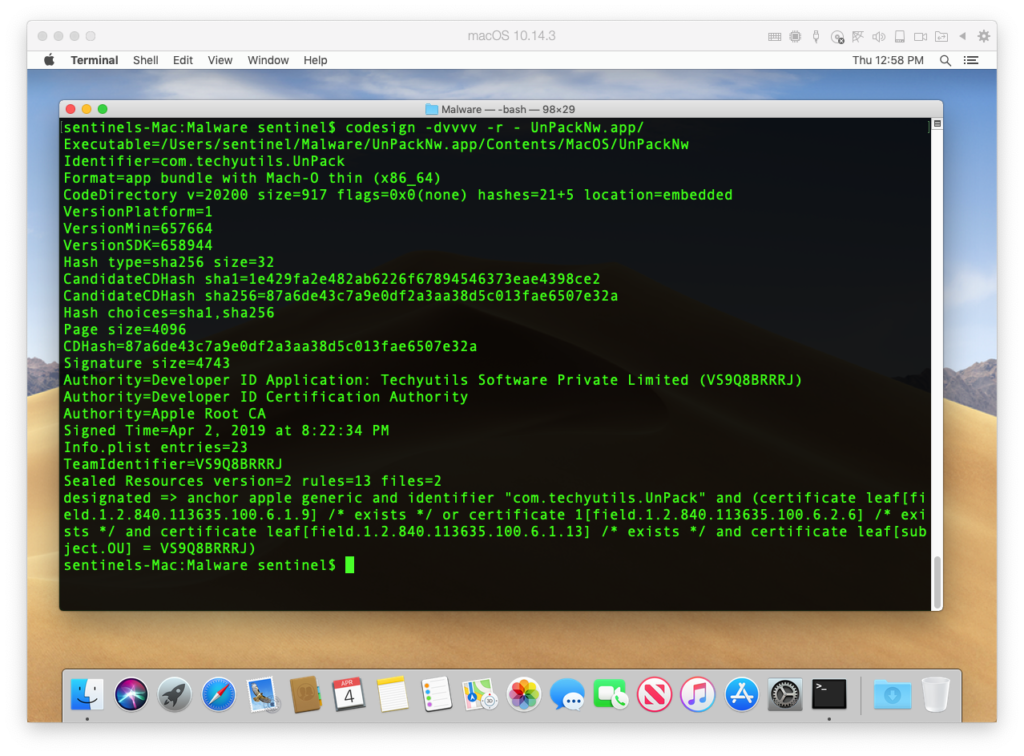
This tells us a number of useful things that we can use to build our list of IoCs. Both the bundle Identifier and the TeamIdentifier (aka Apple Developer Signing Certificate) can be used in detection software, so always make a note of those early in your analysis if they exist.
Let’s find out if the developer’s certificate is still valid or whether it’s been revoked by Apple:
$ spctl --verbose=4 --assess --type execute UnpackNw.app
If the file’s code signature is no longer accepted, you’ll see CSSMERR_TP_CERT_REVOKED in the output. In this case, the certificate is accepted.
A code signature doesn’t mean all that much. There’s plenty of fake and rogue developer accounts. What it does mean is that if the app is run, it should be subject to checks by Gatekeeper and XProtect unless we bypass them, which we’ll discuss further on when we do some dynamic analysis.
Application Bundle Structure
Let’s change directory into the bundle now so that we can more easily work with the contents.
$ cd UnpackNw.app/Contents
In Mac Application bundles, there’s a couple of things that are required. There must be an Info.plist, and there must be at least two other folders: a MacOS folder, which contains the bundle’s main executable, and a Resources folder, which can contain anything else the developer wants to package, including scripts and executables. You may also see other folders in other samples, such as Frameworks, Plugins and so on. Refer to Apple’s documentation to learn more about bundle structure.
The Info.plist can contain useful information about the application’s capabilities. We use plutil with the -p switch to read them on the command line.
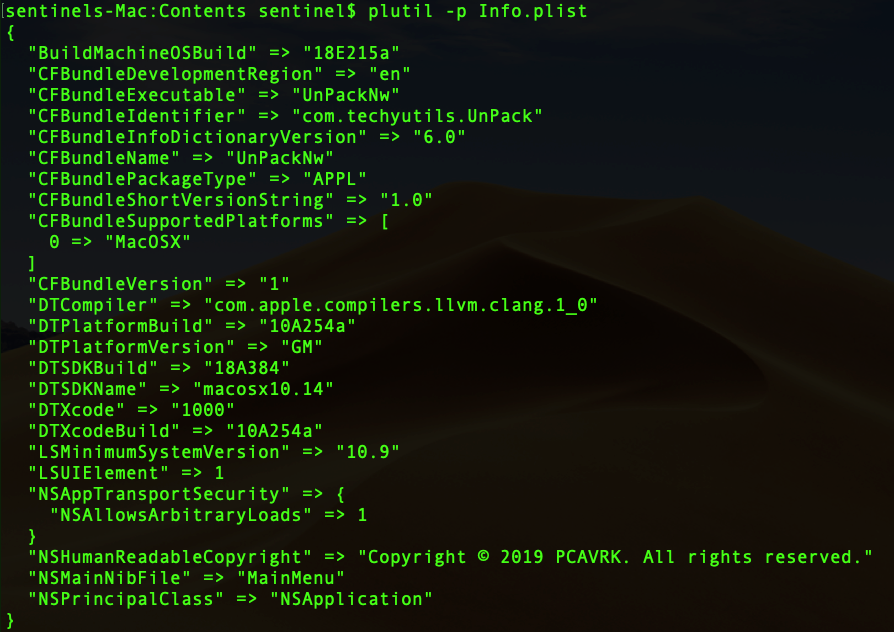
Note that it includes the bundle identifier from the codesign utility, so you can get that for your list of IoCs here if you are dealing with a sample that isn’t codesigned.
We can learn a number of useful things from an Info.plist such as the minimum macOS version the sample will run on, and even what macOS version and build number the malware author was using when they built it. These details can be useful both for attribution and analysis: knowing the developer’s build version may be an important clue if we’re trying to work out why some code was or wasn’t included, or why some versions of the malware run differently on different victims’ machines.
Let’s move on to the Resources folder. There’s something interesting in here I noticed when we decompressed the zip file earlier.
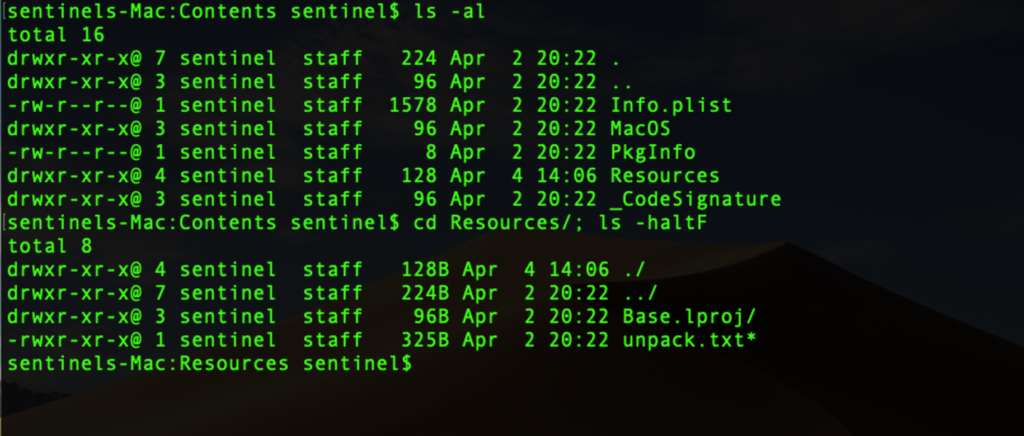
What’s that “unpack.txt” file, and why does it have an asterisk after it? Let’s collect more details about it before we peek inside.
How to Gather File Metadata
There’s a bunch of useful commands that you can use on any file on macOS to gather metadata about it, and it’s always a good idea to do that before opening an unknown file.
Let’s start with the file utility to see whether the item really is what its extension claims it is. In this case, it turns out to be a regular ASCII text file.
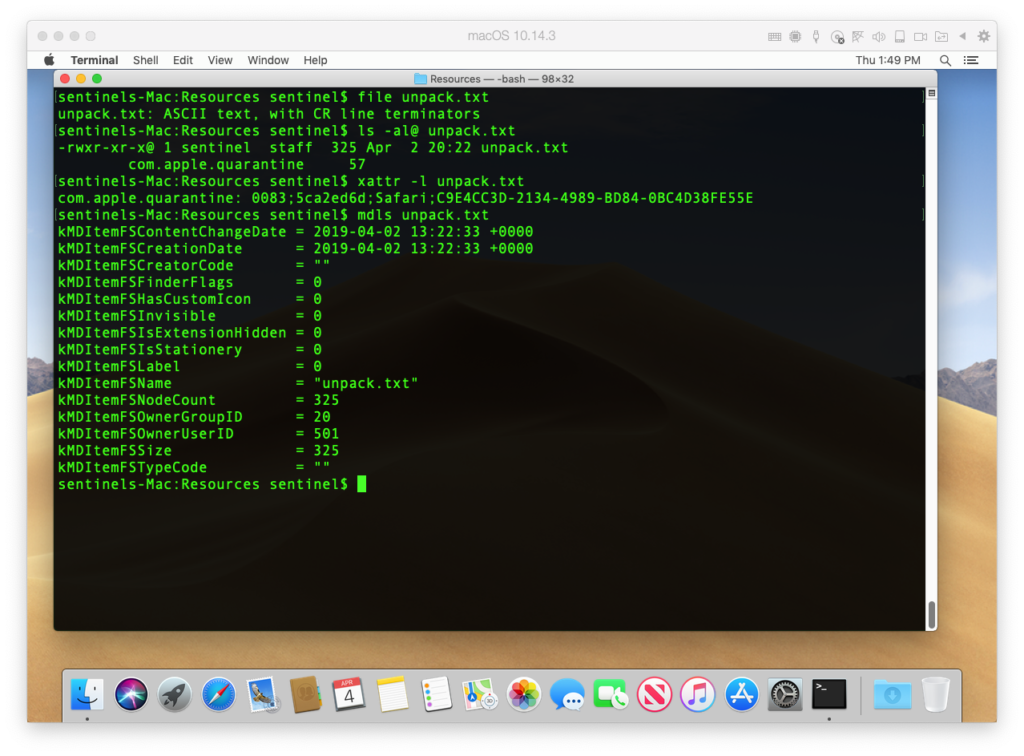
As the image above shows, we can use both xattr -l and ls -al@ to list a file’s extended attributes and permissions.
The mdls tool is a great utility that will also list metadata held by Spotlight and the Finder. As this metadata is persistent across file transfers, you can sometimes catch info about the source in here, too. The man pages of these utilities will tell you more about how to use them.
Look again at the output of ls -al@. Those three x characters in the permissions list indicate it has executable permissions, which is pretty odd for something that’s supposed to be a plain text file. That’s what the asterisk on the end of the filename was signalling as well: a file with executable permissions.
OK, let’s get cracking and see what’s inside it! You can use cat or a regular text editor in the GUI, but I prefer to use vi.
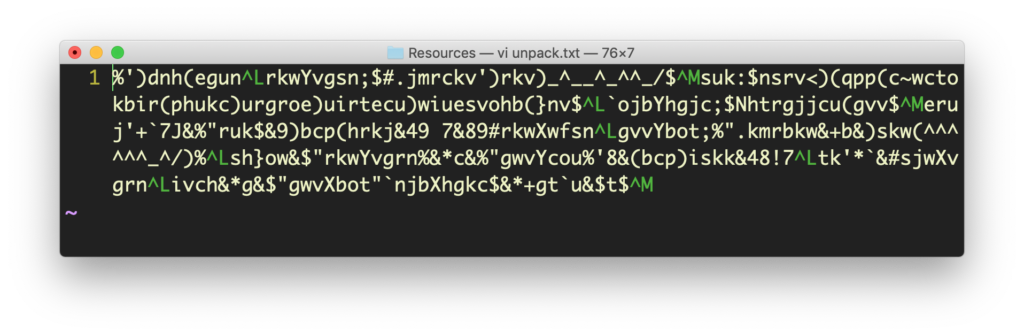
Woah, that’s interesting! We have a plain text file with executable permissions that’s full of obfuscated code. Suspicious, indeed! But what does all that obfuscated code mean? We’re going to need to dig into the main executable to find out. That’s coming next!
Conclusion
In this post, we’ve covered a lot of ground. We’ve seen the importance of setting up a safe testing environment and how to do that to test macOS malware. We’ve found out how and where to source malware samples from, and we’ve looked at ways to determine what an application bundle contains and how to read a file’s metadata. In our sample, we’ve found something interesting and obfuscated. But is it malicious, and how can we decode it? Subscribe to the blog and join us in Part 2 as we continue our exploration into macOS reverse engineering skills and dig into the static analysis of Mach-O executables, Mach-O disassembly and more!

