
In the first part of this series, I looked at how we can keep informed of when Apple make changes to their built-in security tools. In this and the following parts, we’ll look at how to determine what changes have occurred. Our primary methodology is to run diffs against the previous version of the tool and the new one. However, XProtect, Gatekeeper and MRT.app use a variety of formats (XML, SQL and machO binary, respectively) to store data, and they also use different forms of obfuscation within those formats. In this post, we’ll start with looking at how to extract data and run diffs on Apple’s Malware Removal Tool, aka the MRT.app. The only tools you’ll need to do this are Apple’s free Xcode Command Line tools.

Why the ‘strings’ Tool Won’t Show All Strings
If you’ve ever done any kind of file analysis you’re no doubt aware of the strings tool (and if not start here). While strings is fine for dumping constant strings in a binary, there are other ways of hiding strings that such tools are unable to extract. In a previous post I described how to run the strings tool on MRT.app’s binary and how to search for and decode other strings hidden in byte arrays using a disassembler. The problem with that approach, however, is two-fold. First, it’s labor intensive: you could literally spend hours (I have!) trying to manually find and decode the strings stored in byte arrays. Second, it requires some skill in knowing your way around a disassembler, extracting and cataloging what you find. Fortunately, as I’ll show below, there’s a better way that’s both fast and doesn’t require manually combing through disassembly.
Before we get to that, it’s also worth reminding ourselves that strings on macOS is not equivalent to the same tool on most Linux distros and lacks the --encoding option for dumping wide-character strings like Unicode UTF-16. For that reason, in general it’s better to use something like FireEye’s FLOSS tool for extracting strings, but that still won’t help us with those strings stored in byte arrays and only assembled in memory upon execution.
Just Enough Disassembly To Get the Idea!
When it comes to strings in MRT.app, the issue isn’t unicode or some other encoding but rather the fact that some strings are stored as single characters in an array. In order to understand the problem and the solution, let’s take a very quick look at what’s going on when we view the byte arrays in the MRT executable in a disassembler.
The following images were taken from Hopper – a commercial tool, simply because it’s prettier and cleaner for illustration purposes – and the open source radare2 (aka r2). However, you don’t need either to follow along, and indeed we’ll look at similar output from otool (which you will need and is included in the Xcode command line tools) a little further on.
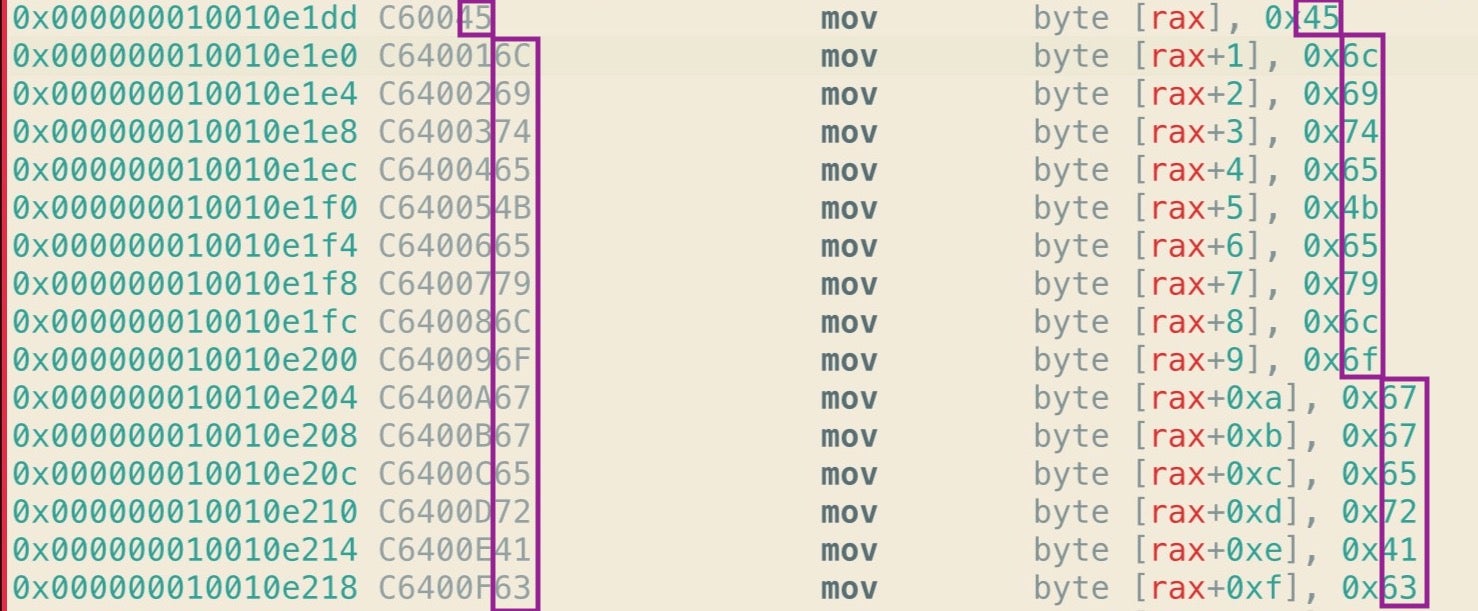
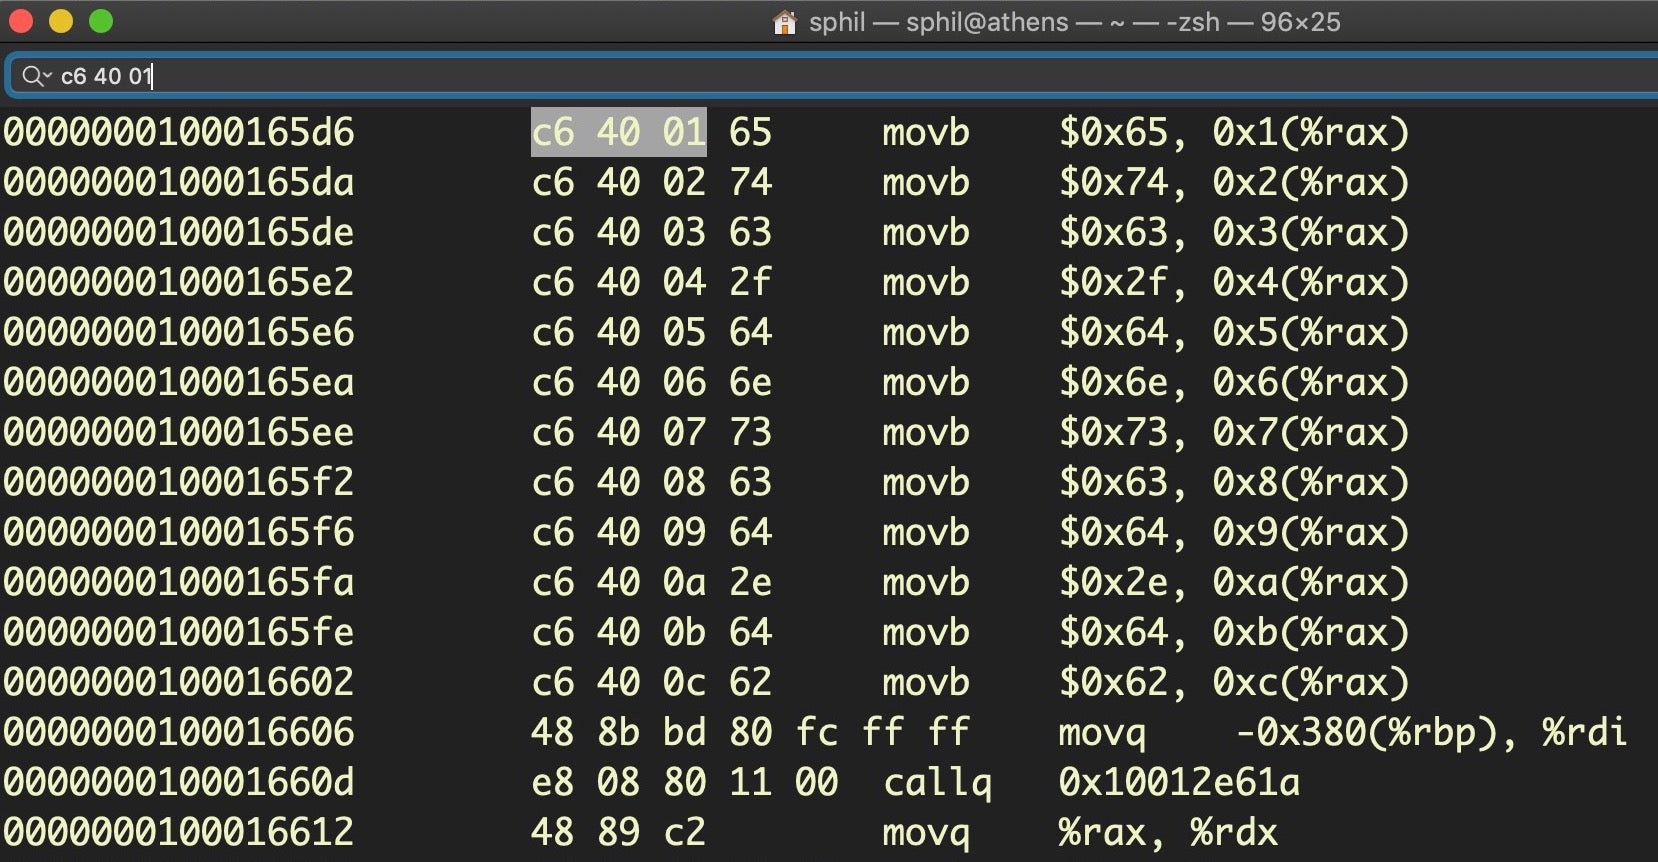
The first image below shows part of one of MRT app’s typical byte arrays. The first column represents the address of each line of code, but we won’t be needing that today. The second column of greyed text represents the op codes or machine instructions while everything else to the right of that is a sort-of human readable translation to help us make sense of what instructions and values the op codes represent. Note, in particular, that the last two places of each line of op code are mirrored in the rightmost column, where they are prefixed with 0x to indicate hexadecimal notation.
Importantly, those hex numbers are ASCII characters, which you can reveal in Hopper by control-clicking and choosing ‘Characters’.
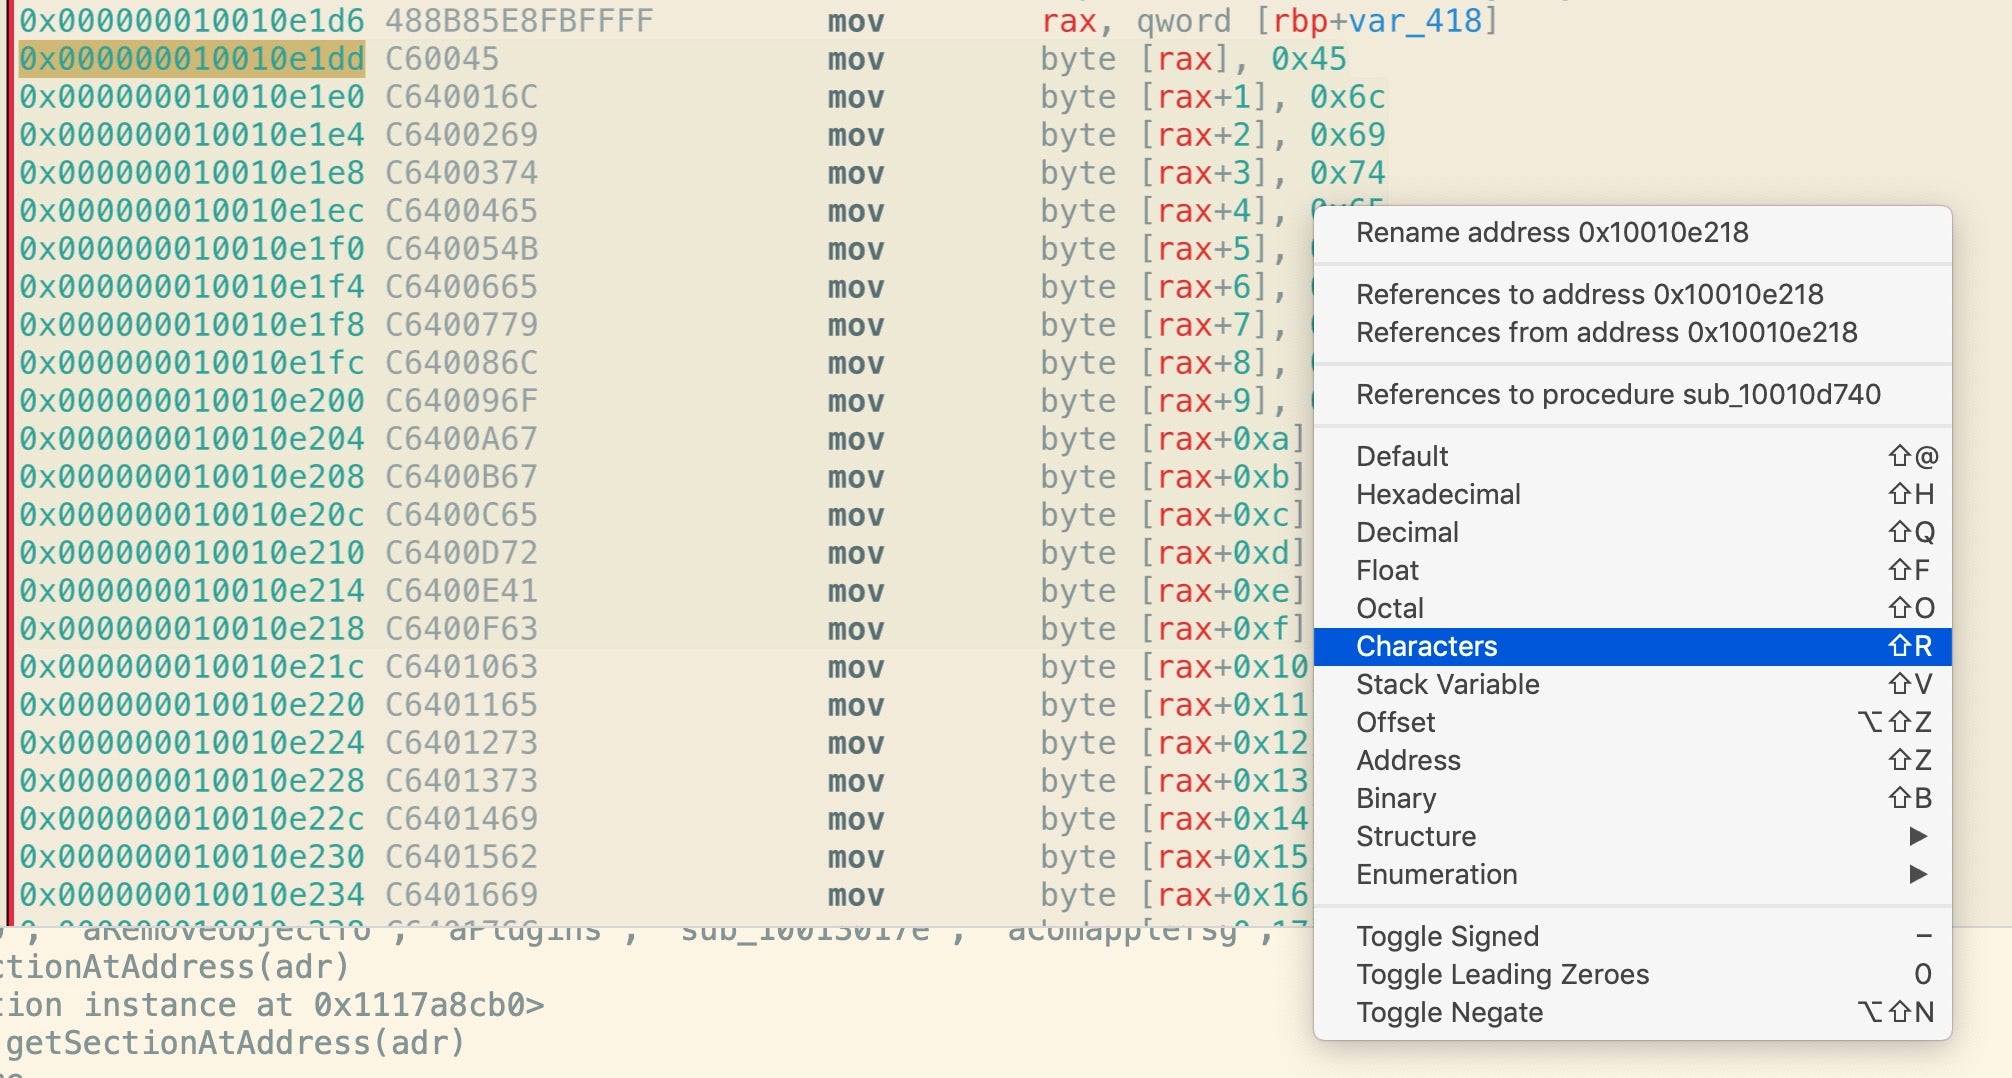
As we can clearly see below, that’s an array of characters that can be concatenated to form a string. When the particular function containing this array executes in memory, the string “EliteKeyloggerAccessibilityStatus” (among others) will be created.
For the sake of comparison, here’s the same in r2, which nicely renders the ASCII by default, and then in Hopper.
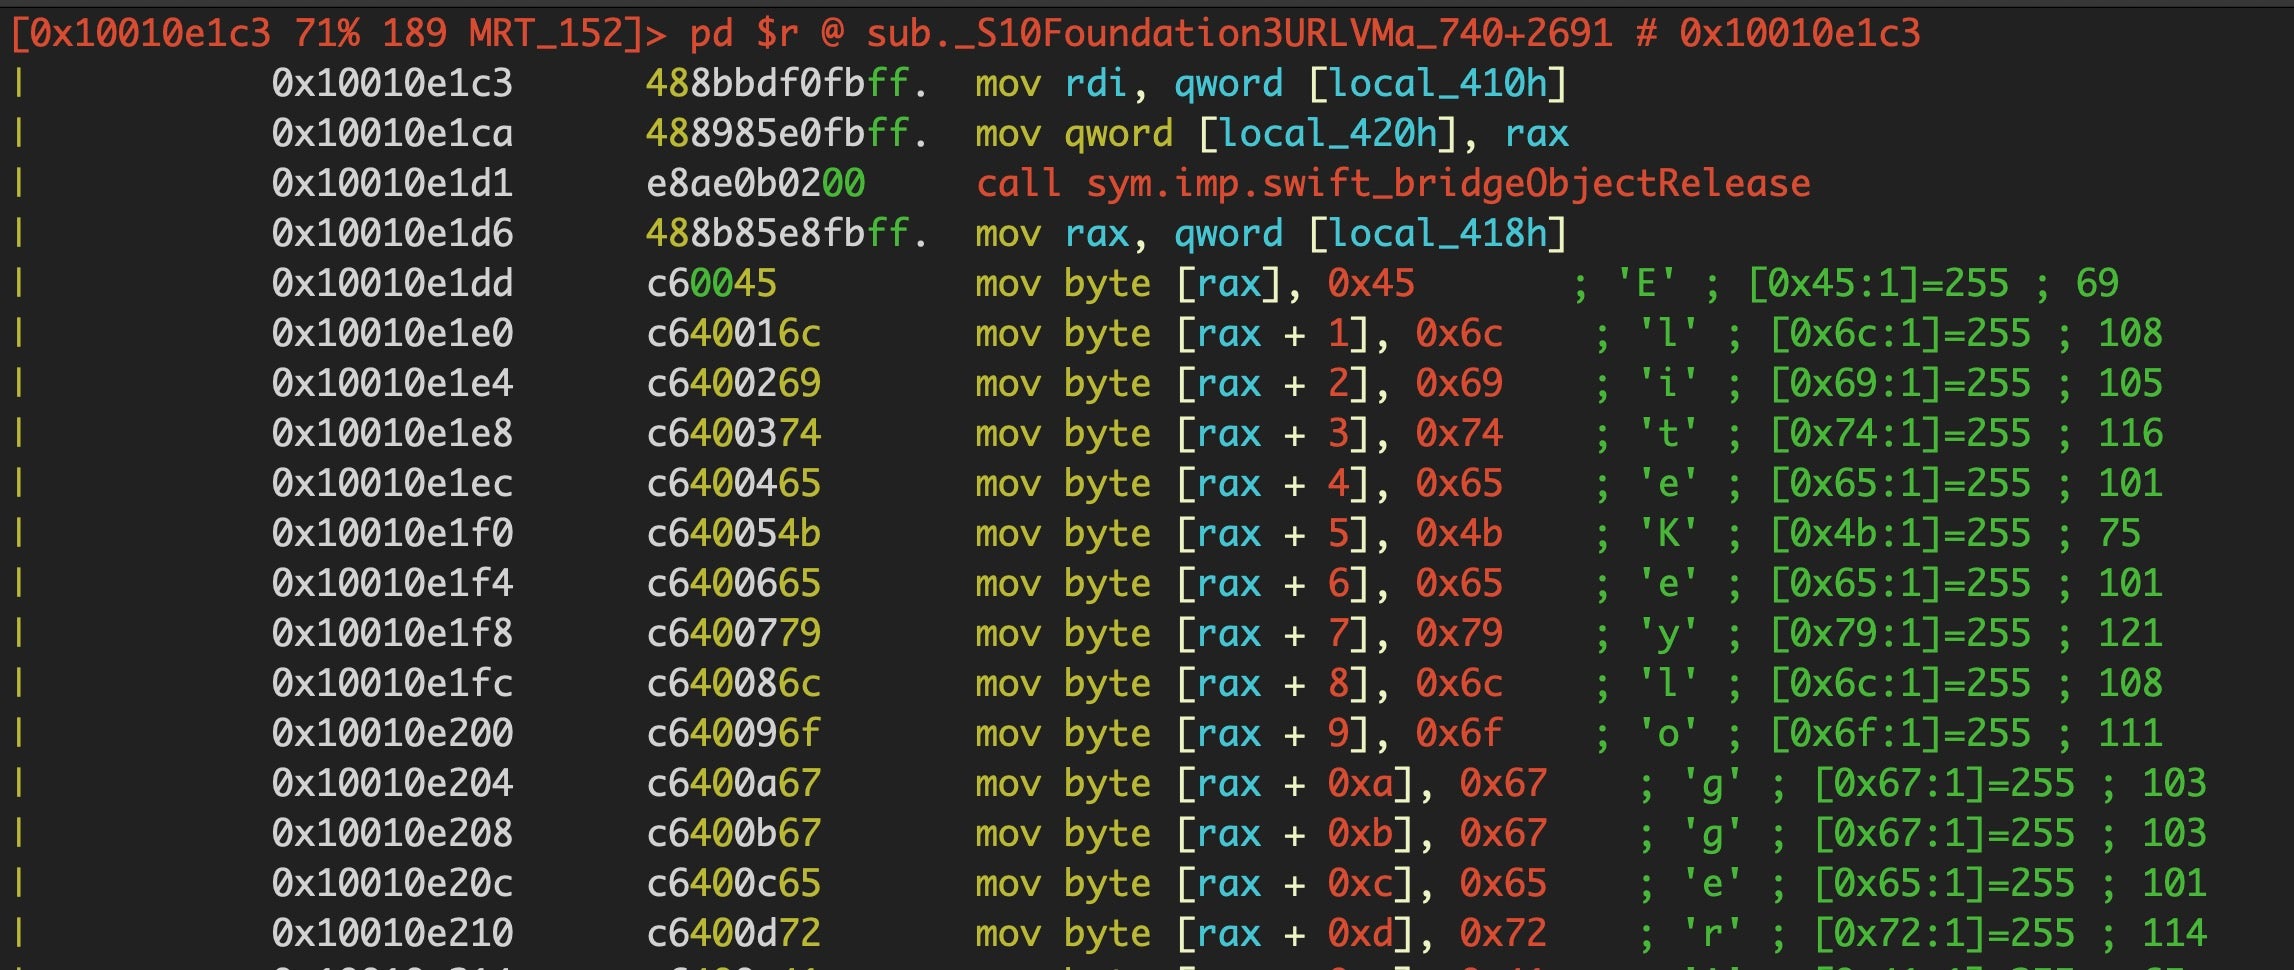

Let’s remain with the op codes in the greyed column for a moment because it’s these that are going to prove to be our salvation when trying to automate extracting these strings. You’ll notice that all the lines begin with C6, and all except the first are followed by 40. The byte C6 is an Intel assembly instruction that tells the processor to move some value into the RAX accumulator register. The following instruction simply says “move the hex number 45 into RAX”.
C6 00 45
The 00 in the middle means “with an offset of zero”; in other words, move the number 45 to exactly the address of the RAX register. All the subsequent lines have the C6 followed by 40, which is the assembly instruction for addition, and then an incrementing hexadecimal index, 1 through to the length of the array.
C6 40 01 45
C6 40 02 6C
C6 40 03 69
This tells the processor to move the number in the final two places (e.g., 45) to the address of (RAX + index number of bytes). So, for example, the op code
C6 40 09 6F
tells the processor to move the hexademical number 6F (which is the ASCII code for the lower case ‘o’ character) into an address that = (address of the RAX register + 9 bytes).
There’s only one other op code we need to take note of before we move on to the fun of extracting these strings, and that’s the op code for when a procedure (aka “function”) returns, C3.

The significance of this will come into play below.
Extracting Strings Hidden In Byte Arrays
If you already have the Xcode command line tools installed, we can make use of otool and some heavy piping through other provided utilities to dump all the strings contained in byte arrays in one go. For those eager to have a go, try this command, then we’ll go through it to explain how it works, make a few tweaks and suggest saving it as a script.
If you’re on Catalina, try this (triple-click the line below to select all of it):
otool -tvj /Library/Apple/System/Library/CoreServices/MRT.app/Contents/MacOS/MRT | grep movb | grep (%rax)$ | awk '{ print(NF==7)?"0x0a"$(NF-1):$(NF-1) }' | sed 's/$//g' | grep -v % | sed 's/{0x,,}//g' | grep -v '-' | awk 'length($0)>1' | awk 'length($0)!=3' | xxd -r -p
For Mojave and earlier (triple-click the line below to select all of it):
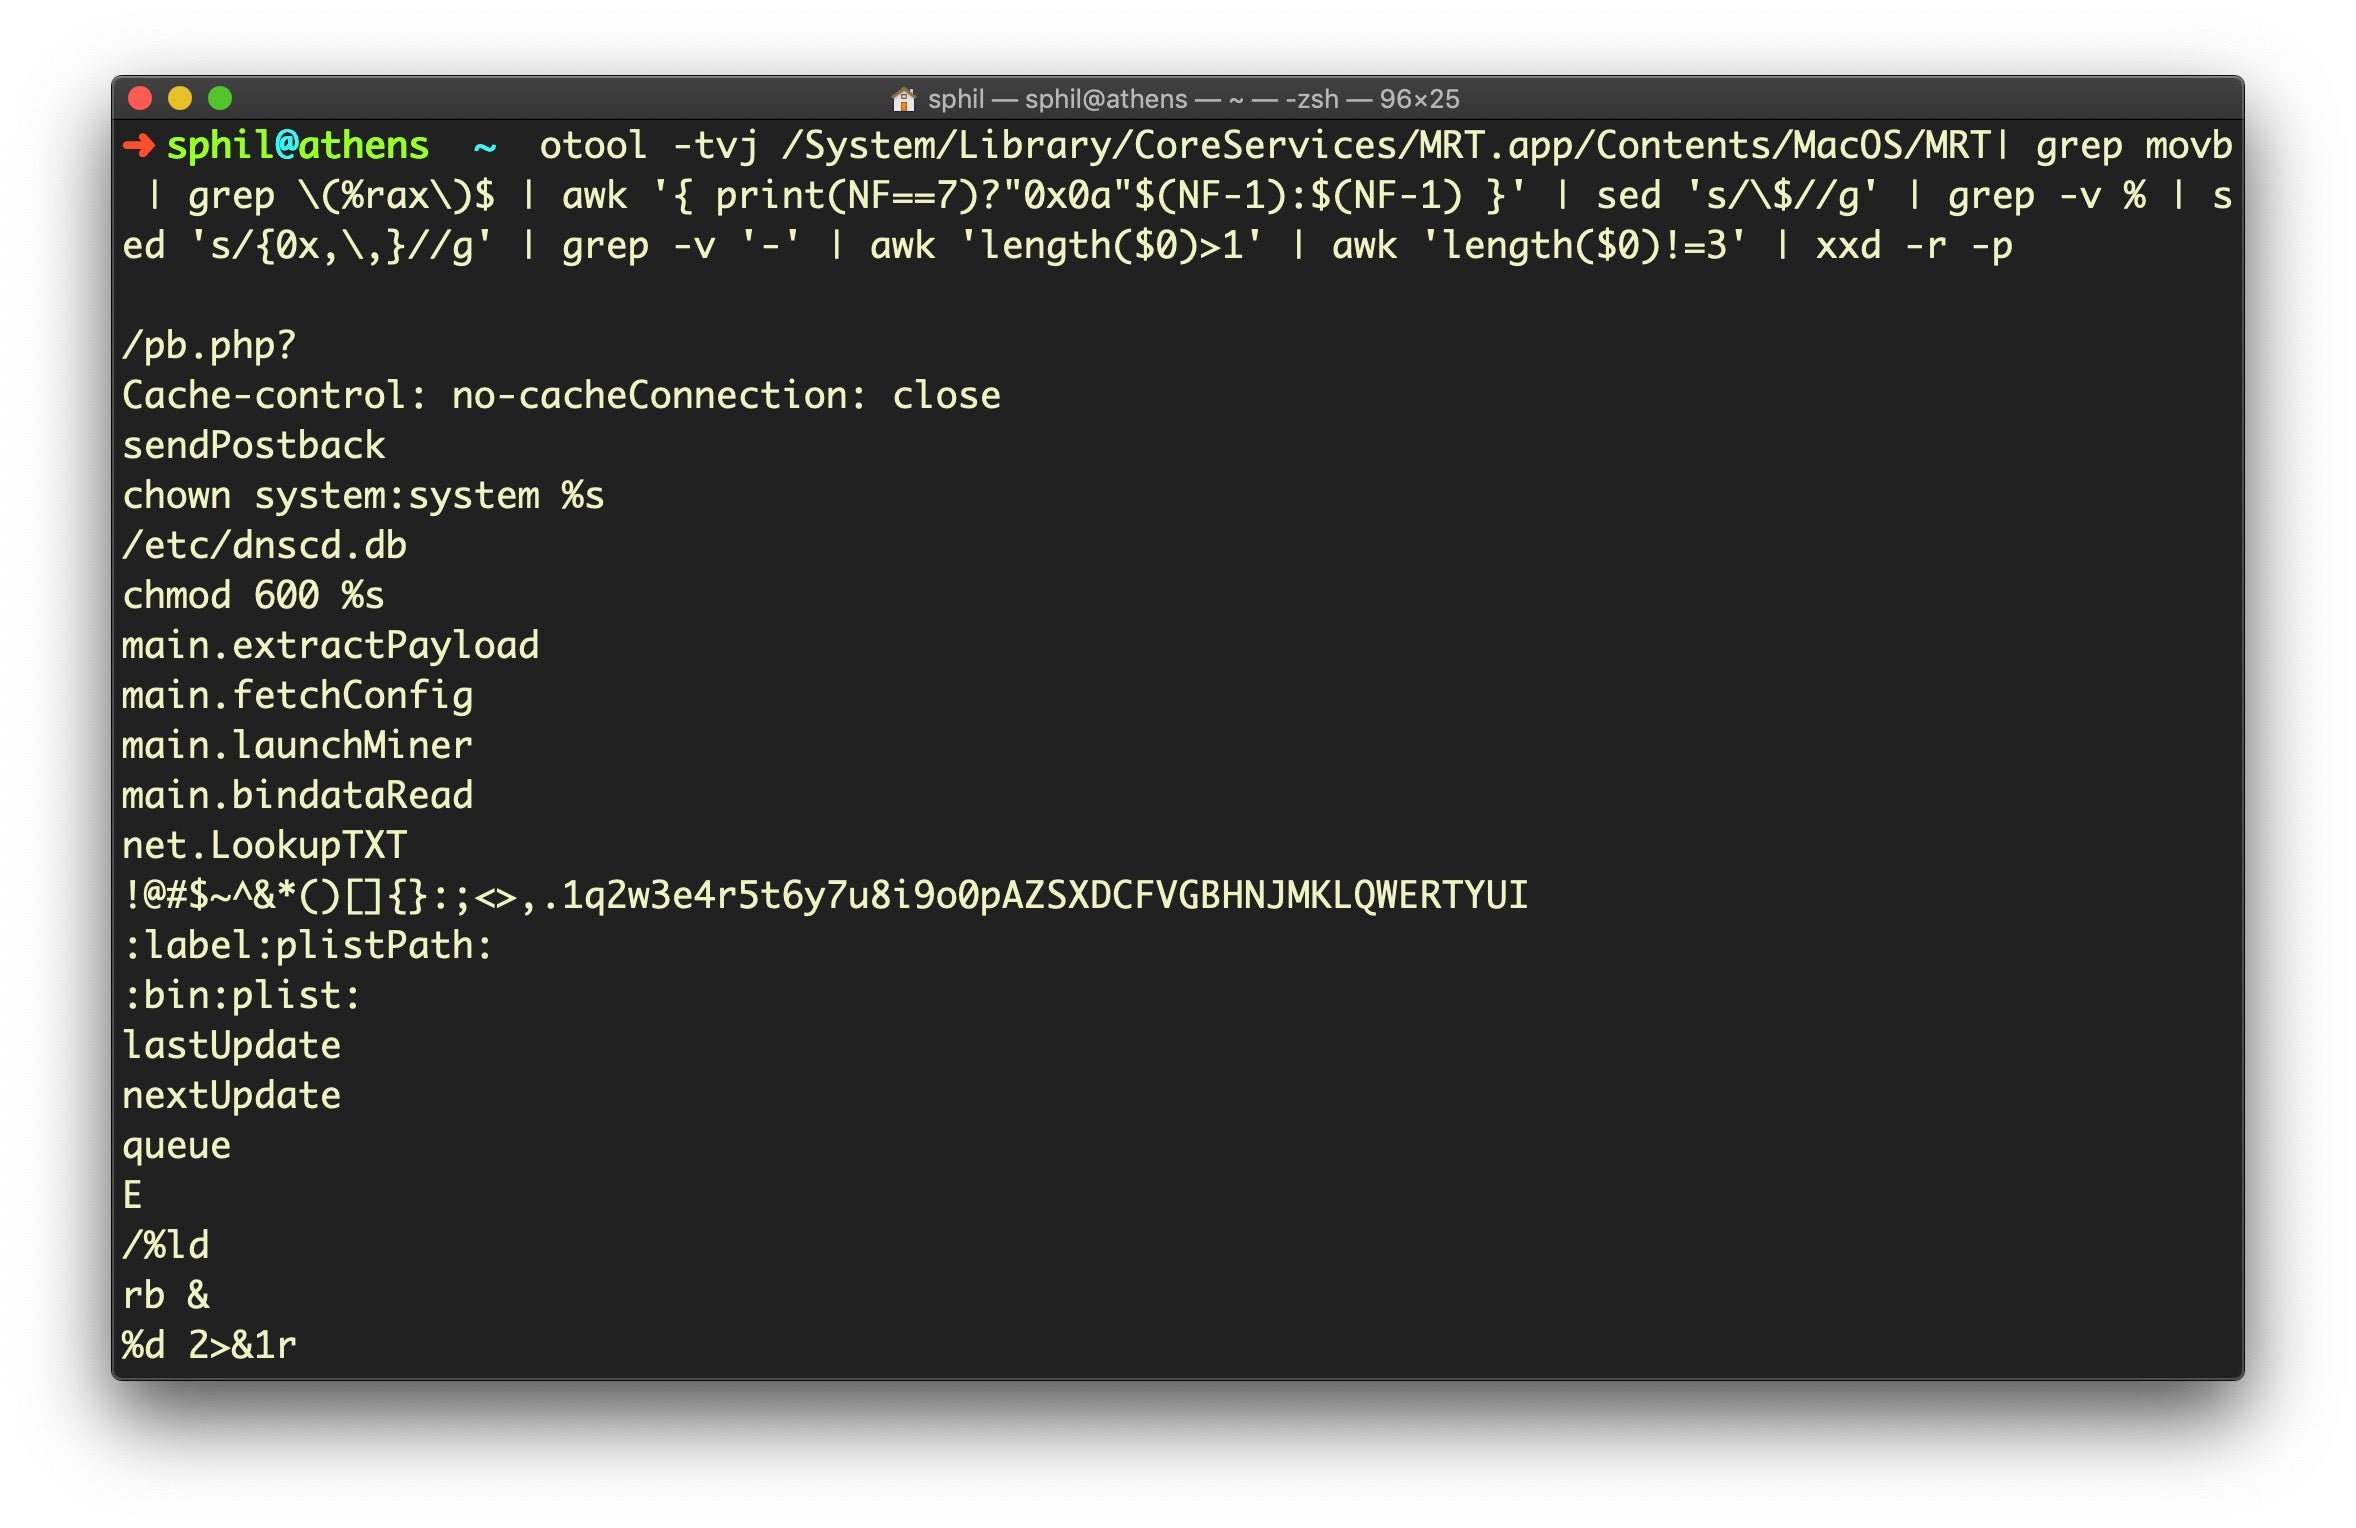
otool -tvj /System/Library/CoreServices/MRT.app/Contents/MacOS/MRT| grep movb | grep (%rax)$ | awk '{ print(NF==7)?"0x0a"$(NF-1):$(NF-1) }' | sed 's/$//g' | grep -v % | sed 's/{0x,,}//g' | grep -v '-' | awk 'length($0)>1' | awk 'length($0)!=3' | xxd -r -p
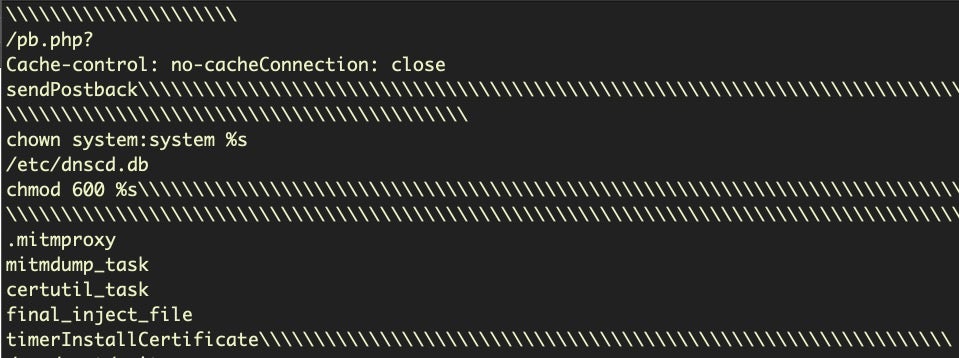
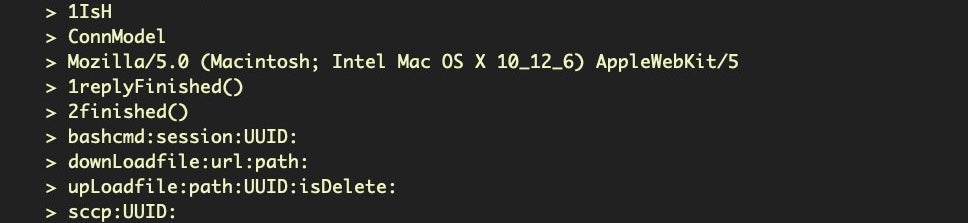
Yes, those are some mammoth one-liners! But if all is well, you should get an output that looks like the image below. I’m running Mojave, so I used the second of the two code blocks above (if you get an error, check you’re using the right code for your version of macOS).
On the current version of MRT.app, which is v1.52 at the time of writing, if I repeat that command (arrow up to recall last command, for those who are not regular command line users) and append
| wc -l
to get a line count, that returns 169 lines.
Here’s an explanation of how the code works. First, otool -tvj essentially produces an output similar to what we saw in Hopper and r2, but with a slightly different format. If we ran that alone in Terminal and gave it the path to the MRT binary, using what we learned in the last section, we could easily manually find the byte arrays just by searching for c6 40 01 (that would bring us to index 1; remember, the beginning of the array starts the line above at index 0).
Note that otool uses the mnemonic movb – move byte – rather than just mov, which makes it a bit more transparent. Thus, our first grep after dumping the disassembly is to pull out every line that contains a movb instruction. Second, every line in a byte array will end with (%rax), so that’s our second grep.

Recall that every array starts with C6 00 XX. Because there’s no need to add an index to store the first character, there’s only three bytes in the instruction; in contrast, the remaining lines in the array all have four (review the previous section if you’re not clear why). For this reason, we now use a bit of awk and a ternary operator to test how many columns there are in the line.

If the line has exactly 7 columns, we know this could be the start of a byte array, so we prepend 0x0a – the new line character – to our output, and then print the character’s ASCII code (prepending 0a is what produces new lines for each decoded string in our output) sitting in the penultimate column (NF -1). If the line has more or less than 7 columns, then we output whatever is in the penultimate column (NF -1), which mostly (see below) will give us values with the pattern “0xXX,”.
From here on, each line is piped through a few grep, sed and awk commands to remove everything but the actual stripped hex number. We also exclude lines that only output a length of 1 or 3, as our hex output needs to be divisible by two for the next and final stage.

That final stage involves piping the output into xxd and using the -r and -p switches (you can also use rax2 -s as an alternative to xxd -r -p for you radare2 fans!) to turn the hex encoded ASCII back into human-readable language. That process requires each valid hex numeral to have a length of two characters (XX) to produce one printable ASCII character (hence, no piping anything of length 1 or 3 into it or else you’ll be treated to a few error beeps!).

If you’re only interested in finding out what’s new in MRT, our script should be fine as is for doing diffs (see the next section), but for other uses, it needs a tweak. In particular, for threat hunting, it would be useful to see which strings belong together as part of a single detection. This may help us to find samples in public malware repositories like VirusTotal or across our own data collected from endpoints.
At the end of the previous section, I pointed out that the op code for the “end of procedure” instruction was C3. We can now use that to demarcate groups of strings with some nominal delimiter. Here’s a version of the extraction code given above, but which inserts a delimiter character between strings from different functions (note you need to substitute the actual path to MRT binary when you paste this one):
otool -tvj <path to MRT binary> | egrep 'movb|retq' | egrep '(%rax)$|retq' | awk '{ print(NF==7)?"0x0a"$(NF-1):$(NF-1) }' | sed 's/^c3/5c/' | sed 's/$//g' | grep -v % | sed 's/{0x,,}//g' | grep -v '-' | awk 'length($0)>1' | awk 'length($0)!=3' | xxd -r -p

As you can see, the primary difference is we’ve now included a grep for lines containing the mnemonic retq (again, note the difference between otool and Hopper). Later, after the first bunch of awk commands, we substitute the opcode c3 with 5c, which represents the backslash character. In the disassembly, when we encounter this line, the instruction will actually be at the column position NF-1, so it is already captured by the earlier piping. The result of the entire command now helps us to visually see the difference between strings contained in one procedure and another.
There’s a couple of “ToDos” remaining. One, note that because the grep and sed search and replace for c3 is fairly crude, you’ll sometimes get only one forward slash between strings from different functions and sometimes multiple slashes. It would be nice to have a more consistent “end of procedure” marker. Two, we would do well to put these alternative versions (Mojave, Catalina, show/hide “end of procedure” markings) in a script with arguments. This isn’t the place to go into general bash scripting and we’re running out of space, so I’ll deploy the “leave it as an exercise for the reader” evasion here! If you need help with bash scripting, there’s no better place to start than here.
Running Diffs On MRT.app
In order to do diffs you’re going to need two versions of the MRT binary, so I suggest copying the current one now to a dedicated folder for this kind of work so that when the next iteration arrives, you have the older version safely tucked away for testing. I use a simple nomenclature, MRT_151, MRT_152, for version 1.51, 1.52, etc.
$ cp /System/Library/CoreServices/MRT.app/Contents/MacOS/MRT ~/<target folder>/MRT_152
Note: For Catalina, remember to prepend /Library/Apple to that path.
From our discussion above, we now have two kinds of string differences we can run on the MRT.app executable: the ordinary strings with strings or FLOSS and what I’ll call a “byteStrings” command or script using the code detailed above.
Aside from strings, it’s also good to know what classes have changed in a machO binary, what new symbols may have been imported from libraries and so on. The built-in tools nm and otool have some useful options you can check out in the man pages. I also tend to make heavy use of rabin2 (part of the r2 toolset) for binary analysis as some of the examples below show.
In order to do a fast diff on two MRT binaries, we can make use of a shell feature called process substitution, which allows us to treat the result of commands like a file, and thus pipe them into the diff utility.
Using this syntax,
$ diff -y <([commands] path to older file) <([commands] path to newer file)
the -y switch allows us to view the diff side-by-side for convenience. The process substitutions occur inside <().
Let’s try it:
$ diff -y <(strings -a MRT_151) <(strings -a MRT_152)
There’s three possible outcomes for each line, shown between the two columns. A > indicates the entry to the right has been added at that position in the newer file; a < indicates the entry to the left is missing at that position in the newer file, and a | indicates the line at that position has changed.
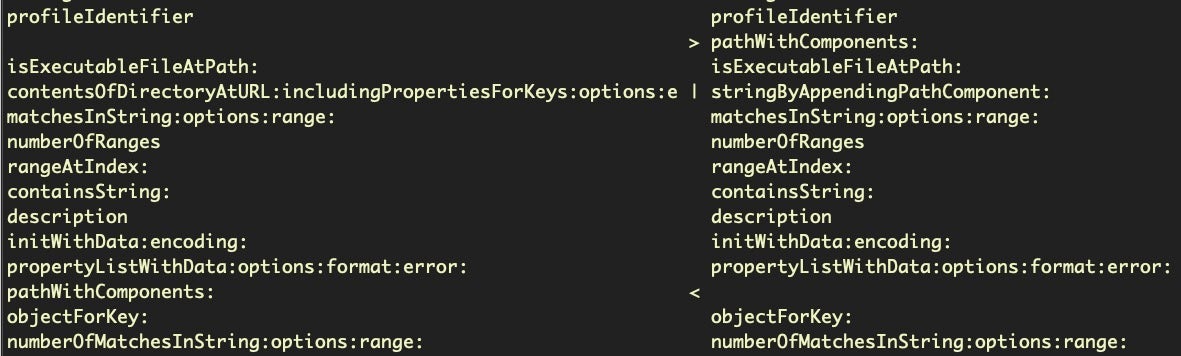
However, in practice interpretation is a little more nuanced than that because, due to code refactoring, many lines that may look like they’re missing will appear as added at another point in the diff. The above image shows a good example. Note how the pathWithComponents: line has shifted in MRT v152 (on the right) compared to MRT v151 (on the left).
There’s a couple of ways you can deal with this in general. If the output is short, a manual inspection will usually do. If there’s a lot of output, a bit more grepping should tell you how much content you’re looking for, but you’ll find it easier to manipulate the results in text files. The following two commands sort the additions and omissions into two separate text files, “added.txt” and “missing.txt”, respectively.
$ diff <(strings -a MRT_151) <(strings -a MRT_152) | grep > | sort -u | sed 's/>//g' > added.txt
$ diff <(strings -a MRT_151) <(strings -a MRT_152) | grep '<' | sort -u | sed 's/<//g' > missing.txt
The sed command serves to remove the “greater than” and “less than” symbols, which we need to do so that we can then diff those two files against each other:
$ diff missing.txt added.txt | grep > | sort -u
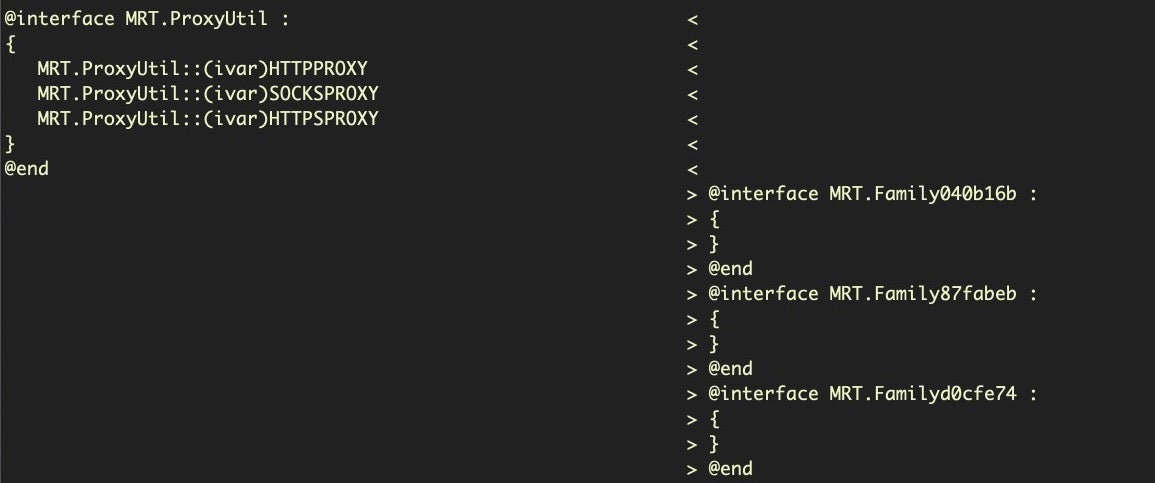
Aside from strings, another important change to look at is the class names. My favorite tool for class dumping is rabin2. We’ll use the -cc option and grep out the additions and omissions, once again making good use of process substitution.
$ diff -y <(rabin2 -cc MRT_151) <(rabin2 -cc MRT_152) | egrep '<|>'
You can also play with other rabin2 options in the same pattern, such as -l instead of -cc to do a diff on the linked libraries (no change between MRT v1.51 and MRT v.152, in this instance). Likewise, diffing the two binaries with nm using process substitution can also sometimes turn up subtle changes.

Finally, of course, don’t forget to do a side-by-side diff with our new byteStrings tool!
$ diff -y <(./byteStrings MRT_151) <(./byteStrings MRT_152)
Conclusion
In this post, we’ve looked at ways to run diffs using different tools that can help us to understand what changes have occurred from one version of a program to another. Along the way, we’ve taken a tour through the basics of disassembly to understand how we can create our own tool to automate part of the process.
Of course, Apple may well decide to chose another method for obfuscating some of their strings in some future version of MRT.app, and then we’ll have to find another way to decode them. I certainly hope not, not only because Apple’s security team know better than anyone that in the end, you simply can’t prevent code being read on macOS, but more importantly because sharing threat intel with other security researchers and exposing threat actor techniques serves to make everyone safer. That, of course, would involve an admission that threat actors are actively targeting macOS, something that history suggests Apple are disinclined to admit.
However that may be, if nothing else, I hope you enjoyed this tour through diffing and disassembling machO binaries! In the next post, we’ll be looking at how to do diffs on XProtect and Gatekeeper, so sign up to our blog newsletter (form to the left) or follow us on social media (links below the line) to be notified when that’s live.

