
Swift logging is the next entry in our getting started series. After all, we’ve covered how to log in seven different languages so far: C#, Java, Python, Ruby, Go, JavaScript, and PHP.
We’ve also included a few libraries and platforms, like Log4J, Node.js, Spring Boot, and Rails. Now, it’s time to talk about Apple’s Swift. It’s been slowly gaining in popularity, especially with since its open source release.
I’ll start with a quick example of manual logging. Then I’ll discuss details of how and why logging matters.
Finally, I’ll move on to using Apple’s Unified Logger in a Swift application and how it can improve your ability to monitor applications and track down issues
The code example will be for MacOS, but you can quickly adapt it for any Apple platform.

The Simplest Swift Logging That Could Possibly Work
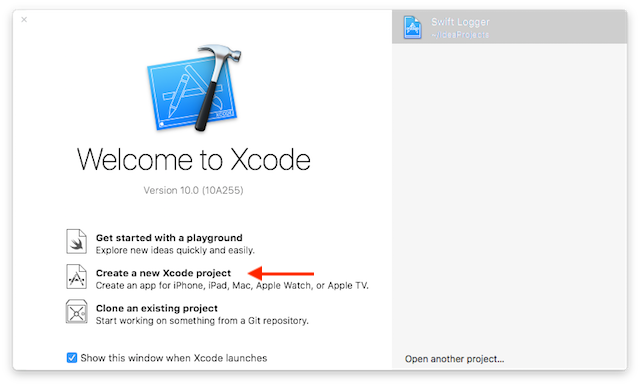
Let’s start by creating a new project in Xcode. If you don’t already have it installed, go to the App Store and install it from there.
Next, start Xcode and select Create a new Xcode Project from the first dialog window.
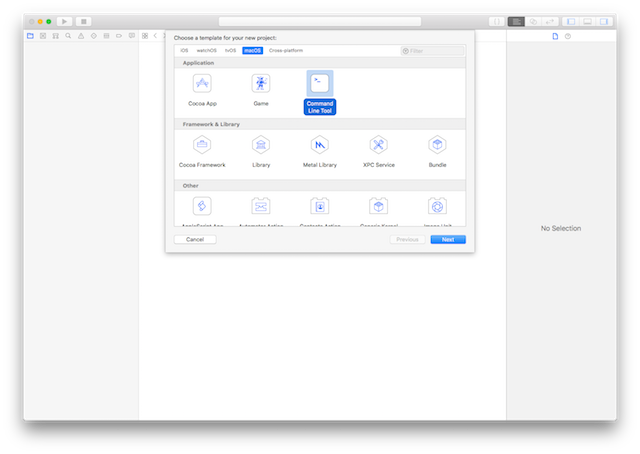
We’re going to keep the code as simple as we can in this tutorial, so select MacOS and Command Line Tool and then click Next.
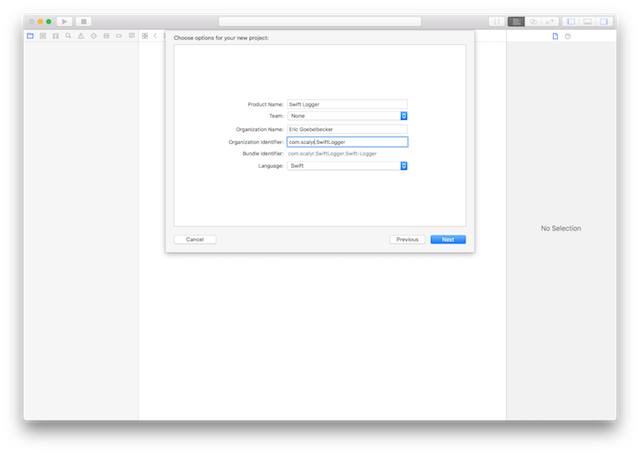
Now, you can give your project a name. These values are not critical, but make sure that you set Swift is set as the project language.
Finally, we have a project.

Select main.swift in IDE, and you can see the code Xcode added for us.
import Foundation

print ("Hello, World!")
Rather than print to the console, we want to save the Swift logging information to a text file.
Swift works differently from many of the other languages we’ve worked with before. There are several ways to write a string to a file. But since the purpose here is to demonstrate the easiest way to, here it is.
let file = "/logs/application.log"
let fileURL = URL(fileURLWithPath: file)

let text = "I am a log message!"
try text.write(to: fileURL, atomically: false, encoding: .utf8)
Set the file name to somewhere you can quickly locate it. Keep in mind that the working directory for Xcode projects is buried somewhere deep in your Library directory, so you may want to set the log file location to your home directory.
When you’ve picked a place for the file, build and run the project. Then find the file and open it with any editor you wish. You’ll see your log message.
We started with declaring where our log file will be. As we’ll see below, this is important and something all components have to know—unless there’s a framework that manages log locations for us.
Next, we converted that file name to a URL. All Swift strings can write themselves to a URL, so we’re taking advantage of that.
Finally, we created a string and wrote it to the URL.
While this is a workable solution for Swift logging, it wouldn’t necessarily work well. What’s the cost of having every log message open a URL and write itself to it?
I doubt it scales well for hundreds or thousands of log messages, and it’s worth asking:
- What would happen when more than one message wanted to log itself at the same time?
- Is this mechanism threadsafe?
- Would it block the entire program?
Let’s look at a better way.
What Is Application Logging?
First, let’s take a look at what logging is.
You’ve probably dealt with logging before and have an idea of what it means, but it’s still worth defining it so we can evaluate a logging framework in terms of what we need.
Back in the first article in this series, we defined application logging like this:
Application logging involves recording information about your application’s runtime behavior to a more persistent medium.
Let’s break that down.
Logging means recording runtime behavior. We’re documenting events about an application. The time factor implies in chronological order.
Second, we store logs in a more persistent medium. Application events occur quickly, and we want to be able to go back and review them.
Maybe we’re trying to track down an error, or perhaps we have to maintain an audit trail. A persistent medium can be a disk, a relational database, or a search engine.

So, that’s what logging is. How can you do more effective Swift logging, and why would you want to? These are important questions. Let’s get back to work.
Apple’s Unified Logging System
With MacOS Sierra and iOS 10, Apple introduced the new unified logging system. While they haven’t deprecated the legacy logging system yet, the unified logger is the direction they’re going in.
The unified logger has built-in security and performance features that make it desirable, even though it does have an idiosyncrasy that many developers dislike: it stores messages in memory and a proprietary data store.
There are no clear-text log files, and Swift logging messages (as well as Objective-C) can only be read with Console.app or the command line log tool.
Let’s add the unified logger to our application and see how it works.
Let’s start by removing the code for manipulating files and just replacing it with os_log(), the unified logger. We need to import the os package, and add the call to os_log.
import os

let text = "I am a log message!"
os_log(text)
This program doesn’t build.
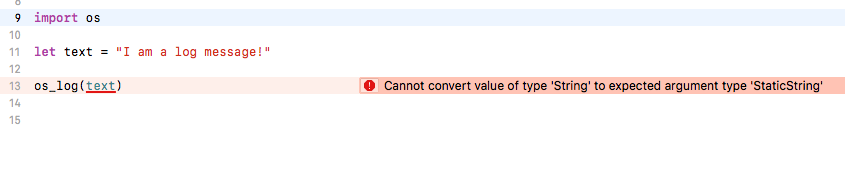
We can only pass static strings to os_log. So, we’ll change how our string is defined.
import os

let text: StaticString = "I am a log message!"
os_log(text)
Build and run this version, and everything looks fine.
But where’s the log message?
Run the Console application. You can find it in Applications/Utilities or by opening Spotlight and searching for it.
Search for the text Process: Swift in the search bar, as shown below. (Click on the image for a larger version.)
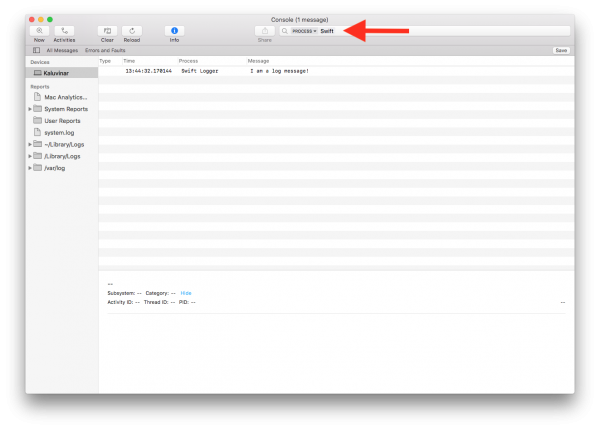
There’s our log message.
The unified logger takes care of the log file location by storing all logs in the same system and indexing them. We don’t have to worry about where they belong, how to open them, and when to close them.
So what do we need to concern ourselves with when it comes to Swift logging?
Why Log?
Someday you’ll write that perfect application. You know which one—the one that has no bugs, reacts correctly to unexpected events, and anticipates your customers’ every need. But until then, you’ll need a way to keep an eye on things.

Here in the real world, even well-constructed applications have bugs and other shortcomings, and we need to monitor what’s going on inside them.
We can find and fix problems quickly when we’re developing code. We have the debugger, we can add print statements, and yes, we even use logs as we’re coding. We’re watching our application in captivity, in a sterile environment where we have control.
But our application is going to leave the tender embrace of our development environment eventually. It will be used in ways we didn’t anticipate, and it will encounter conditions we never imagined. And then, when it fails, we’ll need a way to figure out what happened.
This is where logs come in.

Isolating bugs isn’t the only use for logs, either. They’re useful for watching an application that works and finding opportunities for improvement.
We can use them to detect patterns of behavior that can be improved upon. We might be able to discover a resource that should be cached in memory instead of a file or a feature that’s never used.
And, of course, the usefulness of logs doesn’t stop there. Sometimes we need an “extra copy” of transactional data, such as credit card charges or other financial transactions.
We need visibility into our application’s runtime behavior, and we get it with logging.
How Should You Log?
We took a quick look at Apple’s Unified Logging System. It fulfills the requirement for persistently storing logs in a central location. We can find them with a text search via the console application or a command line tool.
But it would be nice if the logs were easier to find inside the system and had a bit more context.
This leads to a more general question: what information should be logged?
Most logging systems include at least the following information in each log entry:
- Timestamp: when the event described in the log entry happened. The unified logger takes care of this for us.
- Event context: useful information about the event. “It worked” or “It’s broken” might be useful or entertaining during a debugging session. “Failed to connect to database at 192.9.168.3:5000” is more useful in production.
- Severity level: logs tend to have a level that puts them in context compared to other entries. The unified logger defines default, info, debug, error, and fault. We’ll take a closer look at logging levels below.
So the unified logger takes care of two out of three essential aspects of logging for us. But it’s up to us to manage the content of our messages effectively.
These are only the basics when it comes to logging best practices. Scalyr has an article about logging best practices here. There’s also an excellent cheat sheet here.
Customizing the Unified Logging System
Adding a Log Level
So, let’s make our use of the unified logger more effective. We can already log information to persistent storage with a single line of code. What more can we do?
First, let’s add some additional context to our logs with log levels. Change the call to os_log by adding a few more arguments, and the log message text.
import os

let text: StaticString = "This is an ERROR!"
os_log(text, log: OSLog.default, type: .error)
Build and run and take a look at the console application.
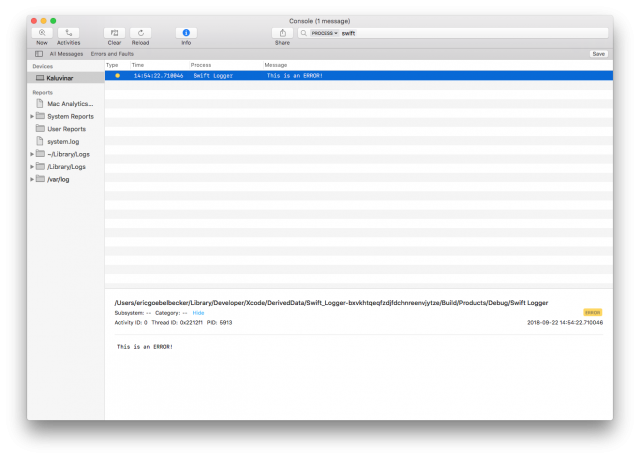
The logger tagged the message as an error for us because we passed .error for the type: argument. We can also pass in .info, .debug, or .fatal. if we omit the type: argument, the message is logged as default.
To do this, we had to pass the call to os_log the log message, an instance of a logger, along with the log message type.
Let’s take a closer look at the notion of a log instance before continuing to customize our messages.
Swift Logging Instances
We’d been calling os_log with a single call to log messages up until the previous exercise. This is a convenience function.
When we called it with only a message, it used a default logger instance. When we called it with an instance and a log type, we were calling a different function that manipulated the instance we passed in.
Let’s take a closer look at our log message in the console application.
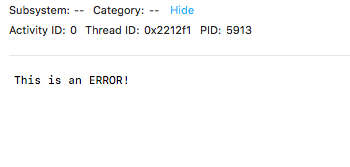
Because we used the default logger instance, the message doesn’t have subsystem or category information.
If we want to populate these fields, we need a logger instance—one that’s initialized with information about our application. Let’s create one.
The first step is to create a plist with logging configuration information.
In Xcode, create a new file. Select the property list type.
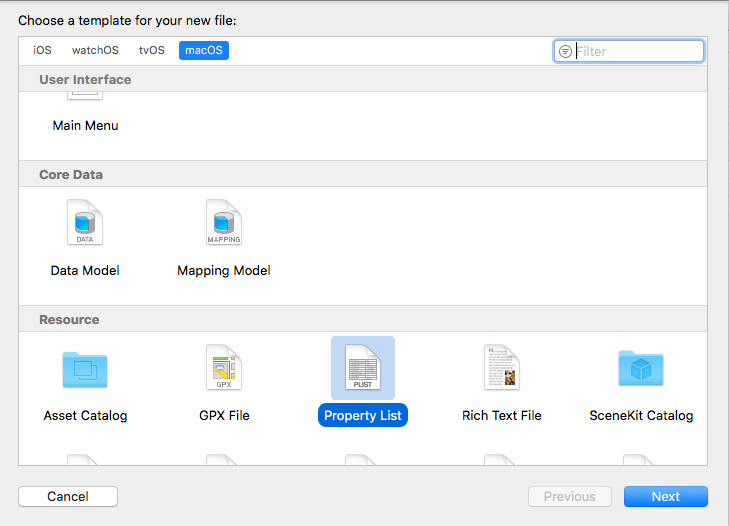
Name it com.scalyr.SwiftLogger and save the file.
The file will open in the property editor. Life is too short for that. Right click on the file name in the project navigator, and select open as and then source code.

Enter this text.
<?xml version="1.0" encoding="UTF-8"?>
<!DOCTYPE plist PUBLIC "-//Apple//DTD PLIST 1.0//EN" "http://www.apple.com/DTDs/PropertyList-1.0.dtd">
<plist version="1.0">
<dict>
    <key>DEFAULT-OPTIONS</key>
    <dict>
        <key>Level</key>
        <dict>
            <key>Enable</key>
            <string>Info</string>
            <key>Persist</key>
            <string>Inherit</string>
        </dict>
    </dict>
</dict>
</plist>
This property list defines a logger system with directives on how info level messages are handled. We’ll go over this after this example.
Copy this file over to the /Library area of your system
You’ll need to be in the working directory of your project and have root access.
$ sudo cp com.scalyr.SwiftLogger.plist /Library/Preferences/Logging/Subsystems/
This property list defines a logging subsystem named com.scalyr.SwiftLogger that we can refer to when we create a new instance.
So, let’s update the code.
let text: StaticString = "This is a unified log message"

let log = OSLog.init(subsystem: "com.scalyr.SwiftLogger", category: "Logging Tutorial")
os_log(text, log: log)
We’re creating a logger instance with OSLog.init. We pass it the name of our subsystem and then a logging category. A category is an arbitrary name for group log messages.
Next, we pass the logger instance to os_log.
Run the code, and you’ll find a log message, set to the default level, in the console app. Click on it to see the details.

Let’s send this message as a fault.
os_log(text, log: log, type: .fault)
Run this version, and check the console application.

We see the details and the fault log level.
Swift Logging Message Storage
In the plist, you can see this section toward the middle.
<key>Level</key>
 <dict>
        <key>Enable</key>
        <string>Info</string>
        <key>Persist</key>
        <string>Inherit</string>
  </dict>
This defines the storage options for the info log level. It tells the system to inherit the default. We only needed to establish a log system to get past the step of creating a named logger.
But it’s useful to understand the default rules for storing logs.
The unified logger stores Default log messages are stored in memory buffers. The system will compress and move them to the data store as memory buffers fill.
At the same time, the logger stores Info log messages in memory buffers, too. The system won’t move them to the data store. It purges them as memory buffers fill.
Debug messages are only captured in memory when debug logging is enabled through a configuration change. The system will never write them to disk.
Unified logging always saves error and fatal messages to the data store.
Controlling Swift Log Contents
We can set up a log with a subsystem and category, and we can control the level messages we send with it. That leaves managing our Swift logging messages. How can you control their contents?
Even though you’re limited to passing static strings in the log message, you can still use C-style formatting with those strings.
So we can use log strings as a formatter.
let message = "foobar"
os_log("This is my string: %@", log: log, type: .error, message)
Run this from Xcode, and you’ll see the log message.
We can log scalar values too.
let message = 42
os_log("The answer is: %d", log: log, type: .error, message)
But what we see from inside Xcode is not what happens in production.
Let’s change the code back to printing a string in the log message.
import os
import Foundation

let log = OSLog.init(subsystem: "com.scalyr.SwiftLogger", category: "Logging Tutorial")

let message = "a secret"
os_log("The answer is: %@", log: log, type: .error, message)
Run this in Xcode, and you’ll see “The answer is a secret” in the console application.
Now, let’s build the application and run it from the command line.
Open a shell and move to the project directory. Run xcodebuild and then run the application.
$ xcodebuild -configuration release (Lots of output) $ build/Release/SwiftLogger
Check the log message in console.
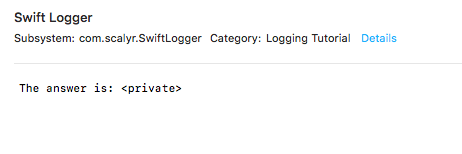
The unified logger redacted the string. This is the default behavior for string messages. It isn’t for scalar values.
If you do not want a string to be redacted use the {public} notation.
os_log("The answer is: %{public}@", log: log, type: .error, message)
If you want a scalar value redacted, use the {private} notation.
os_log("The answer is: %{private}d", log: log, type: .error, 42)
The unified logging system’s redact capabilities are built-in security features that help protect critical information. As tempting as it might be to mark everything public, resist the urge.
What Now?
We’ve covered the hows and the whys of Swift logging on an Apple platform with the unified logger. The unified logging system is comprehensive and makes logging easy for an application developer.
Even though we covered a lot of ground, there’s more to know about logging. Start here, and don’t forget the cheat sheet.
The Apple unified logger documentation is here for developers.
Scalyr’s log aggregation tools help you aggregate, process, search and visualize your logs. This makes it easier to find what you need in the vast ocean of log entries produced by your growing applications.
So, now that you know the fundamentals, get started with logging in your Swift applications today!

