
We’ve previously covered AWS Lambda using Java. Today, we’ll take a look at Python.
If you’re unfamiliar with AWS Lambda, it’s not about the language feature in Python called lambda (anonymous functions). AWS Lambda is what we call a Function-as-a-Service offering from Amazon. A FaaS system hides all the infrastructure details from you, even more so than Platform-as-a-Service (PaaS).
Whenever you need to scale a PaaS application, you typically add extra server processes. In a FaaS system, you just add more executions.
That’s all quite abstract, isn’t it? For you as a developer, it just means you write code that has a single entry point, and you return a result. This is the “function” in “Function-as-a-Service.”
A “function” can be an extremely simple piece of code that does just one thing, or it can be a complex application that handles all kinds of inputs.

After you’ve uploaded your code, you can configure different “triggers” to execute your function. Typically, you might think about an external call to some public API. But you can also configure triggers from certain events in other parts of the AWS ecosystem. Some examples are:
- a file has been uploaded to S3, the AWS cloud storage service
- a cron job triggering your function at regular intervals
- a message has been published to an SNS topic (a publish-subscribe service)
Whenever concurrent executions are required, AWS will just create new instances of your function and execute those. It can scale quite transparently.
You don’t have to worry about servers, virtual machines or containers. Just upload the code with the correct configuration and AWS Lambda will host it for you.
Costs
Though the automatic scaling can come with some unexpected costs. You pay for execution time, meaning you are billed for every second your code runs. This is nice, because you only pay for what you use. But if you use a very high amount, you’ll pay accordingly.
For our tests, this won’t be an issue. You can use many different AWS services for free for the first 12 months of your account. So if you don’t have an account yet, go to aws.amazon.com and sign up:

Setting Up Our Python Project in AWS Lambda
We need an application to invoke first. To make our lives easier, we’ll use the excellent Serverless framework. This framework will make it easy for us to configure, package, deploy and debug our Lambda function. It also works for other cloud providers than AWS.

To install Serverless, make sure you have Node.js installed and run this command at the command-line:
npm i -g serverless
Then initialize your project by running:
serverless
You’ll have to answer some simple questions and then you can you’ll have a folder with two files that are of importance:
- handler.py
- serverless.yml
The handler.py file is where our code goes. The serverless.yml file is where we configure our Lambda function and everything else in AWS that relates to our function.
Implementing a Lambda Function
The Serverless framework will create some boilerplate code for us. The important part is that there is a single function with the following signature:
def hello(event, context):
    # return an object with a statusCode and body
There is an event and a context parameter. The event contains the body that was passed to our Lambda function, as well as other possible details like HTTP headers. It really depends on how your Lambda function is invoked.
The context has interesting information about the invocation and environment. You can read about it in the official documentation.
Let’s change the code to something more realistic. Let’s validate an email address:
import json
import re


def validate(event, context):
    event_body = json.loads(event['body'])
    email_regex = re.compile('^(([^<>()\[\]\\.,;:\s@"]+(\.[^<>()\[\]\\.,;:\s@"]+)*)|(".+"))@((\[[0-9]{1,3}\.[0-9]{1,3}\.[0-9]{1,3}\.[0-9]{1,3}])|(([a-zA-Z\-0-9]+\.)+[a-zA-Z]{2,}))$')
    matches = email_regex.match(event_body['email']) != None

    response = {
        'statusCode': 200,
        'body': json.dumps({ 'result': matches })
    }

    return response
Incidentally, validating email addresses is hard and there are many regular expression out there. This particular regex is taken from emailregex.com where they claim it works in 99.99% of the cases.
As you can see, we’re parsing the body from our event (we’ll be using JSON) and then checking if it’s an email address. At the end we return a dict with a statusCode and body.
Because we’ve also changed our function name, we need to make some changes in the serverless.yml file as well.
Configuring Our Lambda Function
If you look at the serverless.yml file, you’ll see many helpful comments. But if you take that all away, you’ll see there’s not much to it:
service: email-validator

provider:
  name: aws
  runtime: python3.8

functions:
  hello:
    handler: handler.hello
Depending on the version of the serverless framework you installed, the contents of serverless.yml might differ slightly. But in here you’ll see we give our service a name, specify which runtime to use, give our functions a name and specify which Python function to execute.
Let’s change the function part to:
functions:
  main:
    handler: handler.validate
We’re now ready to test our function.
Testing Locally
Without the Serverless framework, it’s not always easy to test a Lambda function locally. This is because you might need to provide the event and context parameters. Serverless can do all this for you.
Just run this command to invoke the function:
serverless invoke local --data '{"body": "{\"email\": \"[email protected]\"}"}' --function main
You’ll see the result:
{
    "statusCode": 200,
    "body": "{\"result\": true}"
}
Try it out with an invalid email address and you’ll see the result is false.
Now that we’re happy with our code, let’s get it running on AWS.
Deploying to AWS
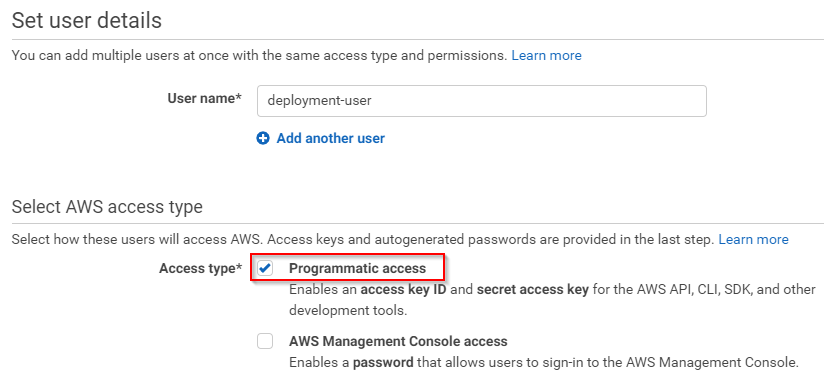
First we need to give Serverless access to our AWS account. In the AWS Console (the web UI of AWS), go to Identity and Access Management (IAM) and select the Users section. Click on the Add user button at the top of the page to create a new user:

You’ll have to give the user a name and Programmatic access:
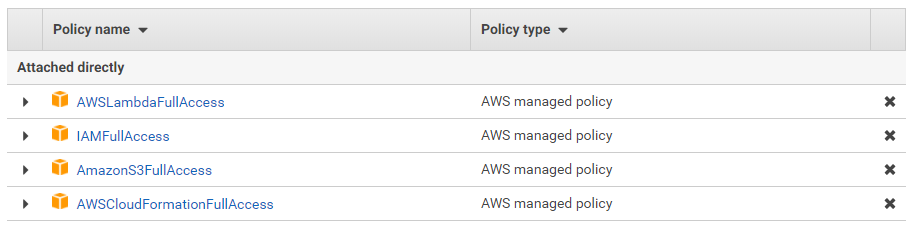
Proceed to the next page, click on the button labeled “Attach existing policies directly,” and be sure to give your user access to the following AWS services:
- Lambda
- IAM
- S3 (to store the Lambda code)
- CloudFormation
Don’t worry if many of these terms and services are new to you. Your permissions should look like this:
Then continue and confirm to create your user. You’ll see an overview where you can see the access key and the secret:

Take note of the ID and secret, because we’ll use it later as well. We can now configure serverless to use these credentials:
serverless config credentials --provider aws --key AKIA52XT4ILHYF5UR54E --secret xxxxxxxxx
Now all you need to do is run:
serverless deploy
Depending on your location, you may have to add –region eu-west-1 (or another region) to that.
Our Lambda function is now up in the cloud, but it can’t be triggered yet. You can test it from inside the AWS Console, but it needs some trigger events to be invoked outside of our testing. Let’s expose it via the API Gateway that AWS offers.
AWS API Gateway is a service that allows you to configure HTTP API’s and point certain endpoints to other pieces of AWS. We’ll point an API to our Lambda function.
Invoking Your Lambda Function
Before we do this, we’ll need to go back to the IAM section in the AWS Console and give our user access to AmazonAPIGatewayAdministrator (to create the API Gateway) and AmazonAPIGatewayInvokeFullAccess (to invoke the endpoint):
Now that the Serverless framework can also configure the API Gateway service, we can add a trigger to our serverless.yml:
service: email-validator

provider:
  name: aws
  runtime: python3.8

functions:
  main:
    handler: handler.validate
    events:
      - http: POST /email/validate
See those last two lines? That means we’ll create an API Gateway with a single endpoint. Whenever a HTTP call is made to that endpoint, AWS will route it through to our Lambda function.
After deploying again, we can go to the API Gateway section in the AWS Console, select our new API Gateway, and select Dashboard in the left menu. There you’ll see the public URL that you can use to invoke the Lambda function:
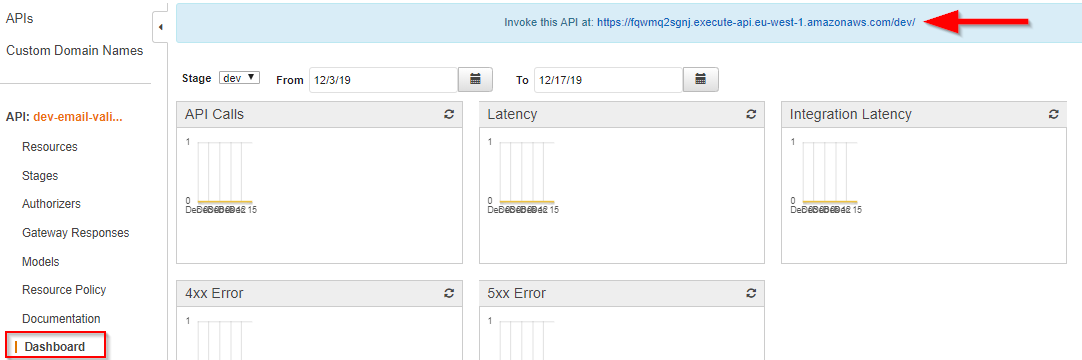
Be sure to add our endpoint to this URL. So add “/email/validate” and then you can make a request using a tool like Postman:
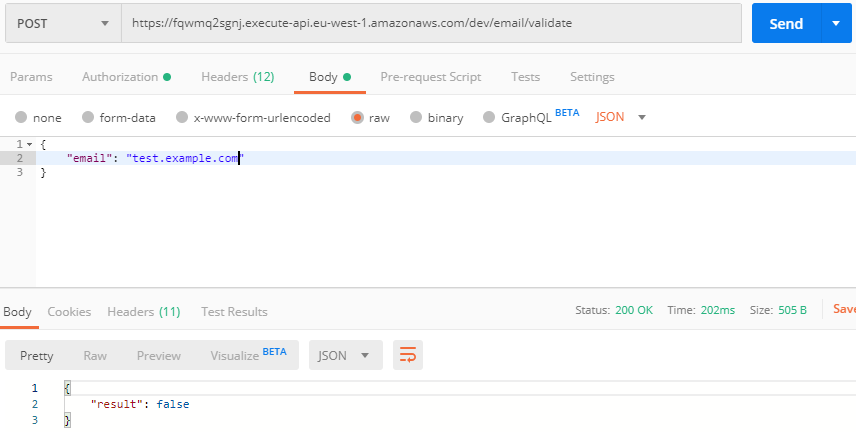
When you do, you will have to authorize yourself. If you’re using Postman, you can select the “AWS Signature” option in the Authorization tab. There, you can enter the key and secret that was created with your user. You might also have to specify the AWS region (“eu-west-1” in my case).

Logging and Monitoring Your AWS Lambda Function
Monitoring and logging are useful techniques in many facets of software development. AWS Lambda is no exception to the rule. It automatically monitors your Lambda function for you, using Amazon CloudWatch to report metrics.
Additionally, AWS Lambda can help you troubleshoot issues in your function. It does that by logging the requests received by your function. It also stores logs that your code generates through Amazon CloudWatch Logs.

AWS Lambda will log the start and end of your Lambda function invocation, and include a report. But you can add your own log lines. Let’s add this piece of Python code to our function:
print(f'Result for {event_body["email"]}: {matches}')
After invoking our function again, we now see our log lines:

But once you have many Lambda functions, checking the logs for each one individually becomes quite cumbersome. Even more so if they’re related. CloudWatch offers Insights, which enables you to combine logs from multiple functions, but what if you have other applications, running in virtual machines, containers, or outside the AWS ecosystem?
That’s why a centralized log management solution is so interesting. It collects and aggregates log data from a variety of sources, bringing it all together for your easy consumption.
Speaking of log management tools, you might want to give Scalyr’s solution a try. Scalyr can import CloudWatch logs and metrics, allowing you to have a centralized view of all your data. It also offers powerful search capabilities, alerts, and many other features.
Building an Application With Python and AWS Lambda
You’ve now set up a simple Lambda function using Python. We used the Serverless framework because it makes our life easier and allows you to adhere to the infrastructure as code principle: everything we configured can be put in source control.
We’ve made our function accessible via HTTP request, but what we really did, is add a trigger that invokes the function. This trigger happens to be linked to the API Gateway service. But you could also trigger your Lambda function by one of the many other services that AWS offers.
In case you do use API Gateway, you’ll probably want to look into custom domain names and other authorization mechanisms.
There so much more you can do with Lambda functions. Indeed, there are entire suites of applications that run on AWS Lambda and its sibling services. With this article, you’ll be off to a good start.

