
Since we published the article Get Started Quickly With Python Logging, we’ve been working on a couple of C++ projects where we’ve found a need for more robust logging solutions than a simple time stamp and message written to a file. Since we also have articles on logging for C# and Java, continuing the series with an article on C++ logging with Boost.Log made sense. Specifically, in this article, we are going to:
- Create a simple Visual Studio 2019 project.
- Install the Boost libraries using the NuGet package manager.
- Learn how to configure log output formatting.
- Add custom attributes to our logger.
This article is big, so strap in and let’s get started.

Why Use Boost?
There are many C++ logging frameworks out there to choose from. There’s log4cplus, log4cxx from Apache, as well as Pantheios. However, these are very rarely updated, and some are no longer maintained. Including dependencies in any project shouldn’t be taken lightly, but using third-party dependencies that are stale or not receiving updates will bring maintenance and potential security risks into your project.
The Boost C++ Libraries project has included a logging framework since version 1.54. Boost receives regular updates, and chances are that Boost is already a part of your project. If not, adding it to your project isn’t difficult; it does include additional dependencies, but so do the frameworks previously mentioned. In this article, we will be looking at getting up and running with the Boost.Log library in Visual Studio 2019.
If you don’t have access to a Windows environment, Microsoft has kindly been providing Windows 10 virtual machines that are limited to 45-day trials. These come with Visual Studio and other development tools already installed. You can download one of these virtual machines for free directly from the Microsoft developer page here.
Creating a Project To Start Experimenting
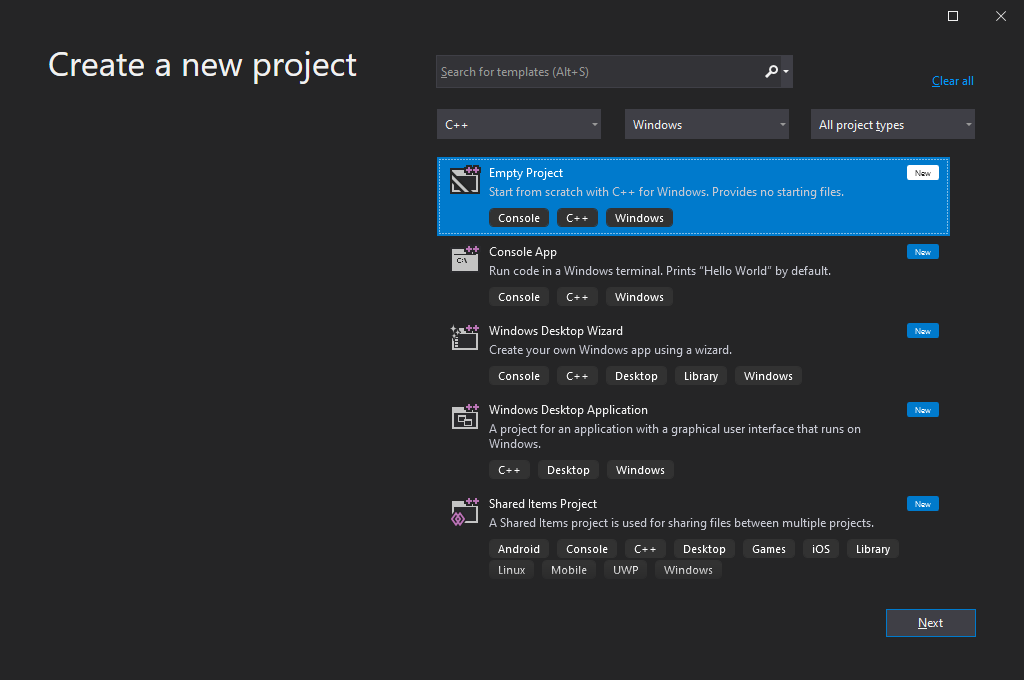
To get started, create a simple Empty C++ Project in Visual Studio. This can be done in Visual Studio once it’s open by selecting “New Project” from the file menu. Then, click on Next.
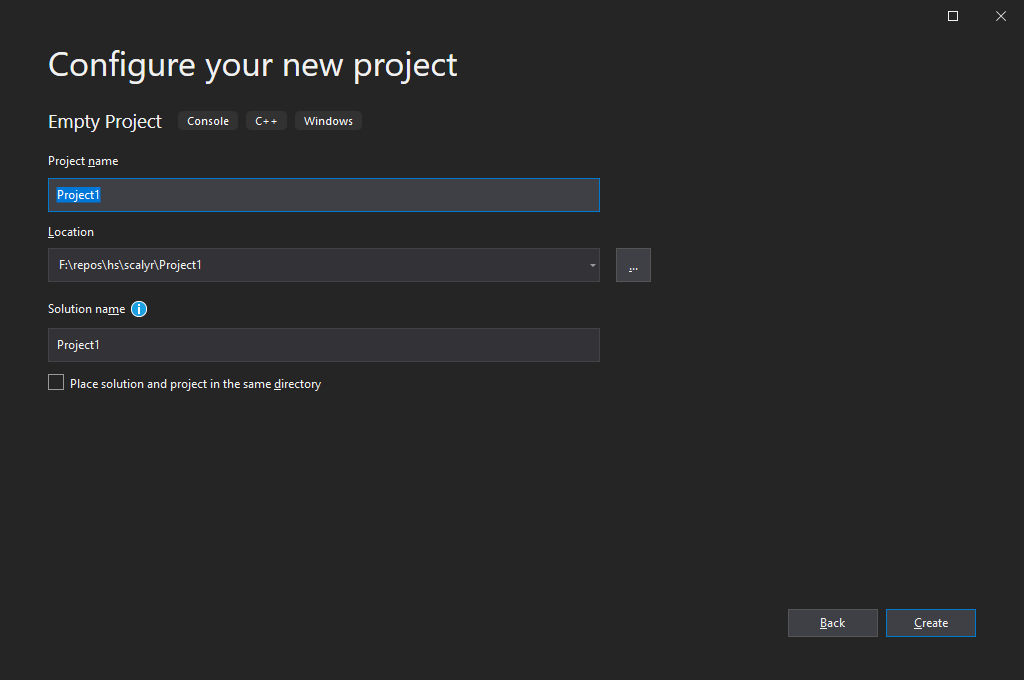
You’ll be taken to a new screen. There, you’ll be prompted for the name and location of your project. I’ll go with “Project1”, but feel free to give your project a more creative name. After you’re done naming your killer project, click on Create.
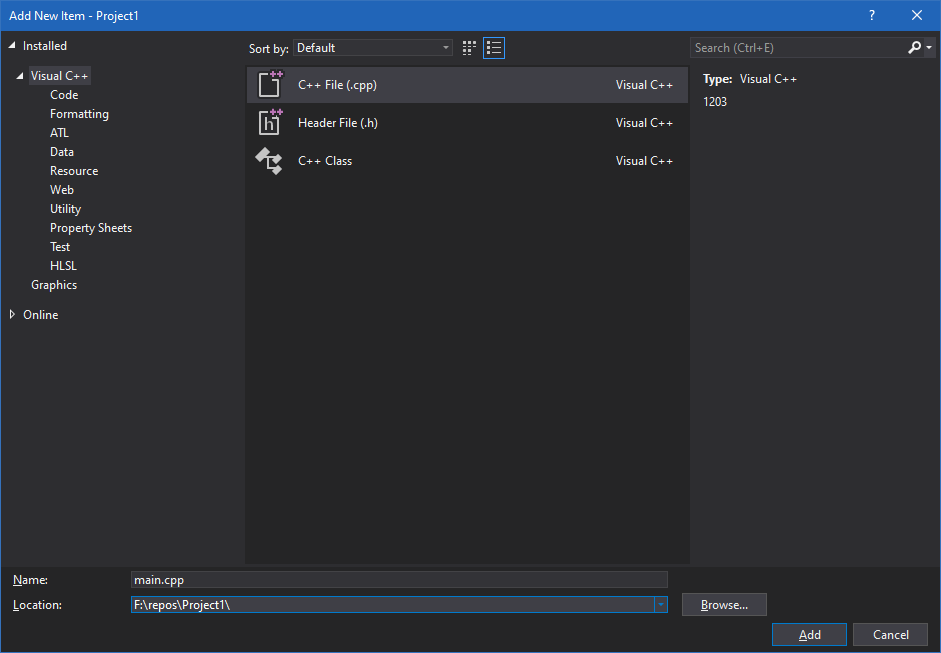
Once the project is created, you will have an empty solution. Add a main.cpp file by right-clicking on the Source Files folder in the Solution Explorer window to the right of the Visual Studio environment. From the “Add” drop-down menu, select the “Add New Item” option. In the “Add New Item” window, select the C++ File (cpp) option. I chose to call my new file main.cpp, but go with whatever you want and then press OK to add the file to the project.
Once this has been added, you will have a new blank file open in the code editor. Now let’s add a bit of starter code to test our setup. Add the following code to the cpp file you just created:
#include <iostream>
int main(int, char*[])
{
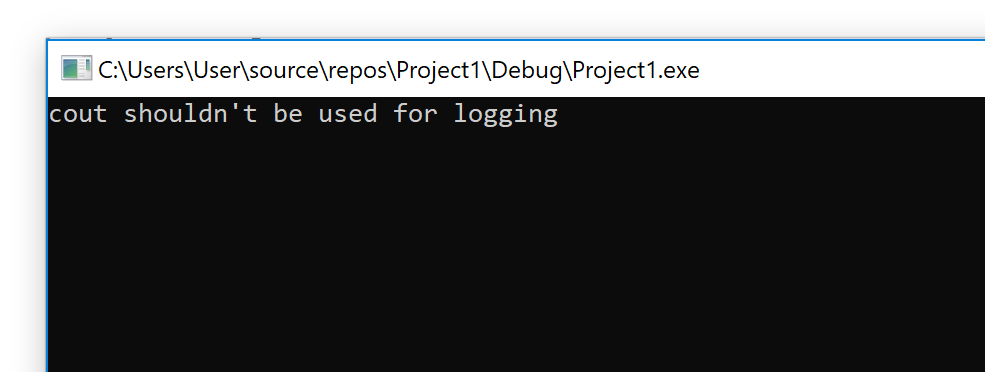
std::cout << “cout shouldn’t be used for logging” << std::endl;
std::cin.get();
return 0;
}
Go ahead and run that by hitting F5 or selecting “Debug -> Start Debugging” from the menu. This will open a console window with our message and wait for us to hit a key. The only reason for the “std::cin.get()” here is to keep the console window open during our runs. There are other ways to do this, but they involve changing linker settings, so this was the easiest way for the purposes of this article.
This is only meant to test our build and to make sure we have a working project to start from. In the next section, we will use the NuGet package manager to install the Boost libraries we need and really get started working with an actual logging framework.
Installing Boost With NuGet
If you are unfamiliar with it, NuGet is the package manager for the Microsoft development platform. While typically used for .NET development, many C++ libraries, including the Boost libraries, are available via NuGet. Boost can also be installed separately and added to the Visual Studio project manually, but that’s outside the scope of this article. If you’d prefer to do that, take a look at the Getting Started on Windows guide from the Boost site.
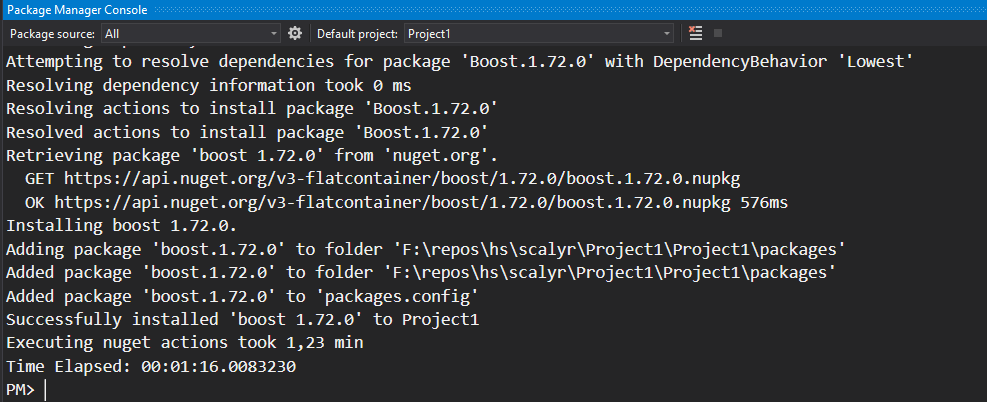
We first need to open the NuGet Package Manager console to install Boost via NuGet. Open the console by going to the “Tools” menu and selecting the “Package Manager Console” menu item from the “NuGet Package Manager” drop-down menu. This will open a new console window at the bottom of the Visual Studio development environment waiting for a command to be entered.
To use Boost.Log, we will need to install the following libraries:
- boost
- boost_date_time-vc141
- boost_filesystem-vc141
- boost_log-vc141
- boost_system-vc141
- boost_thread-vc141
- boost_log_setup-vc141
- boost_chrono-vc141
- boost_atomic-vc141
Packages are installed in NuGet using the “Install-Package” command. Unfortunately, at this time, NuGet only allows us to install one package at a time, so we will need to run the command for all the above packages.
#include <iostream>
#include <boost/log/trivial.hpp>

int main(int, char*[])
{
    BOOST_LOG_TRIVIAL(info) << “This is an informational severity message”;
    std::cin.get();
    return 0;
}
These are the most current Visual Studio 2019 packages, indicated by the -vc141 suffix. If you are using another version of Visual Studio, check the NuGet site for the correct packages to use.
Go ahead and run the above commands to install everything we need. It will take a few minutes, and after each package is installed, you will see that it has completed successfully:
Keep in mind that your version of Boost might be different. At the time of writing, the current version of Boost is 1.67.
Front-end and Back-ends: Understanding a Bit More About Boost.Log’s Architecture
We’re now ready to start using Boost.Log to add logging to our C++ project. But instead of jumping right into it, let’s take a step back and understand a little bit more about Boost.Log itself. How is this library structured? That’s what we’ll briefly cover now.

The essential components of Boost.Log are front-ends, back-ends, the core, and loggers.
The core is the central component, where all log entries are routed. It’s implemented as a singleton. The back-ends are the components that decide the destination of log entries. The front-ends are the components that link back-ends to the core. They implement functions that would be out of place in the individual back-ends.
Finally, the logger is the missing link of the puzzle. It is the component of Boost.Log that the final user interacts with more often since they need to call it every time they write a log entry.
Taking Our First Logging Steps
Now that we have Boost.Log and all requisite dependencies installed, let’s create a simple example program using a preconfigured logger that Boost.Log provides called the trivial logger. We’ll look at additional configuration in the following sections.
Update our existing source file with the below:
#include <iostream>
#include <boost/log/trivial.hpp>

int main(int, char*[])
{
    BOOST_LOG_TRIVIAL(info) << “This is an informational severity message”;
    std::cin.get();
    return 0;
}
The “BOOST_LOG_TRIVIAL” is a pre-defined macro that makes using the trivial logger easy. The only parameter we are passing in is the severity level of the log message. If we run this, we will see the log message and other information written to the standard output stream as in the following screenshot.
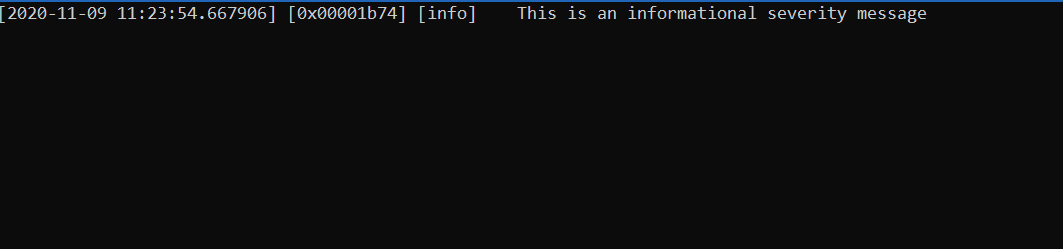
The above output is an example of the default log record format. The first piece of information is the timestamp, followed by the current thread identifier. After that comes the severity level, in this case informational, followed by our actual message. We can add additional information or attributes to the log record and change the message’s formatting. Before getting into that, though, let’s take a quick look at the included severity levels that the trivial logger uses.
Trivial Logger Severity Levels
We can configure the Boost Logger with whatever severity levels we deem appropriate. The trivial logger comes out of the box with a set of common severity levels already defined for us. From lowest precedence to highest, these severity levels are:
- trace
- debug
- info
- warning
- error
- fatal
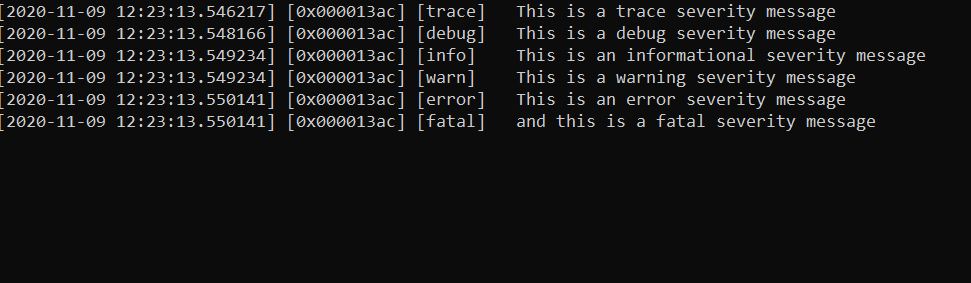
Let’s update our code example to output messages for all of these severity levels. This will also allow us to have additional log messages with which to learn how to apply filters. Go ahead and update your code example to match the following:
#include <iostream>
#include <boost/log/trivial.hpp>

int main(int, char*[])
{
    BOOST_LOG_TRIVIAL(trace) << "This is a trace severity message";
    BOOST_LOG_TRIVIAL(debug) << "This is a debug severity message";
    BOOST_LOG_TRIVIAL(info) << "This is an informational severity message";
    BOOST_LOG_TRIVIAL(warning) << "This is a warning severity message";
    BOOST_LOG_TRIVIAL(error) << "This is an error severity message";
    BOOST_LOG_TRIVIAL(fatal) << "and this is a fatal severity message";
    std::cin.get();
    return 0;
}
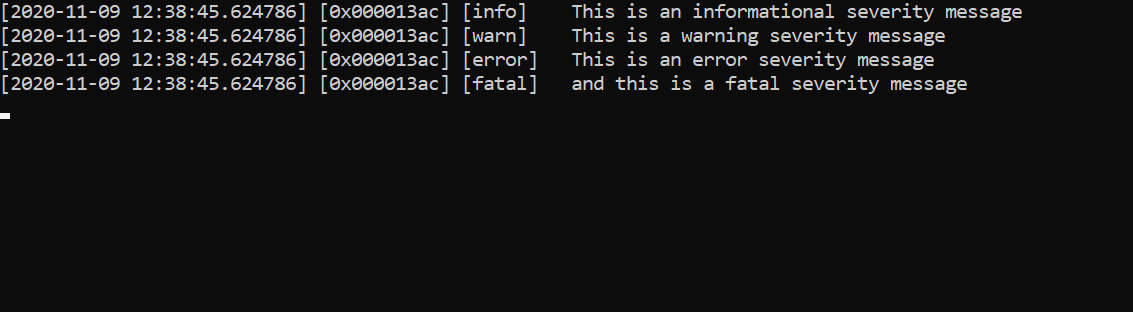
Running the above will give us output that includes all of the messages above.
It’s common that throughout development and on release, we will need to change the granularity of what we are logging. For example, during development we may want to see messages at the trace and debug severity levels, but on release, we may only want to log from info and above. Boost.Log provides the ability to filter log events based on the severity of the log record. We can apply a filter to a specific logger or set the filter on the core global logger. For our introduction, we will stick to using the global logger.
We can do this with “TRIVIAL_LOGGER” by setting a filter on the root global logger. Apply the following changes to your existing code and give it another run:
#include <iostream>

#include <boost/log/core.hpp>
#include <boost/log/trivial.hpp>
#include <boost/log/expressions.hpp>

namespace logging = boost::log;

void init_logging() {
   logging::core::get()->set_filter     (
      logging::trivial::severity >= logging::trivial::info
   );
}

int main(int, char*[]) {
    init_logging();

    BOOST_LOG_TRIVIAL(trace) << "This is a trace severity message";
    BOOST_LOG_TRIVIAL(debug) << "This is a debug severity message";
    BOOST_LOG_TRIVIAL(info) << "This is an informational severity message";
    BOOST_LOG_TRIVIAL(warning) << "This is a warning severity message";
    BOOST_LOG_TRIVIAL(error) << "This is an error severity message";
    BOOST_LOG_TRIVIAL(fatal) << "and this is a fatal severity message";
    std::cin.get();
    return 0;
}
We are using a lambda expression as the argument to the “set_filter” property. More specifically, this is a Boost.Phoenix lambda expression. This configures the filter to only emit log messages where the severity is greater than or equal to the info severity, which includes the warning, error, and fatal severities. Running this will result in the following output:
As you can see, the trace and debug severity messages are not included in the output. The “set_filter” property allows us to define more complex filters by combining logical predicates or providing our own filter function.
Writing Log Messages To a File
At this point, we have seen how to write log messages to the console and how to filter messages. This may work for simple programs, or while we are experimenting, but we will quickly outgrow this solution. We will at some point need to write our log messages to a file.
Fortunately, this is not a problem with Boost.Log. Writing log messages to a file is just a matter of calling “add_file_log” with the name of our log file. We will need to add a few additional headers, so let’s go:
#include <iostream>

#include <boost/log/trivial.hpp>
#include <boost/log/utility/setup/file.hpp>
#include <boost/log/expressions.hpp>

namespace logging = boost::log;

void init_logging()
{
    logging::add_file_log("sample.log");

    logging::core::get()->set_filter
    (
        logging::trivial::severity >= logging::trivial::info
    );
}

int main(int, char*[])
{
    init_logging();

    BOOST_LOG_TRIVIAL(trace) << "This is a trace severity message";
    BOOST_LOG_TRIVIAL(debug) << "This is a debug severity message";
    BOOST_LOG_TRIVIAL(info) << "This is an informational severity message";
    BOOST_LOG_TRIVIAL(warning) << "This is a warning severity message";
    BOOST_LOG_TRIVIAL(error) << "This is an error severity message";
    BOOST_LOG_TRIVIAL(fatal) << "and this is a fatal severity message";
    std::cin.get();
    return 0;
}
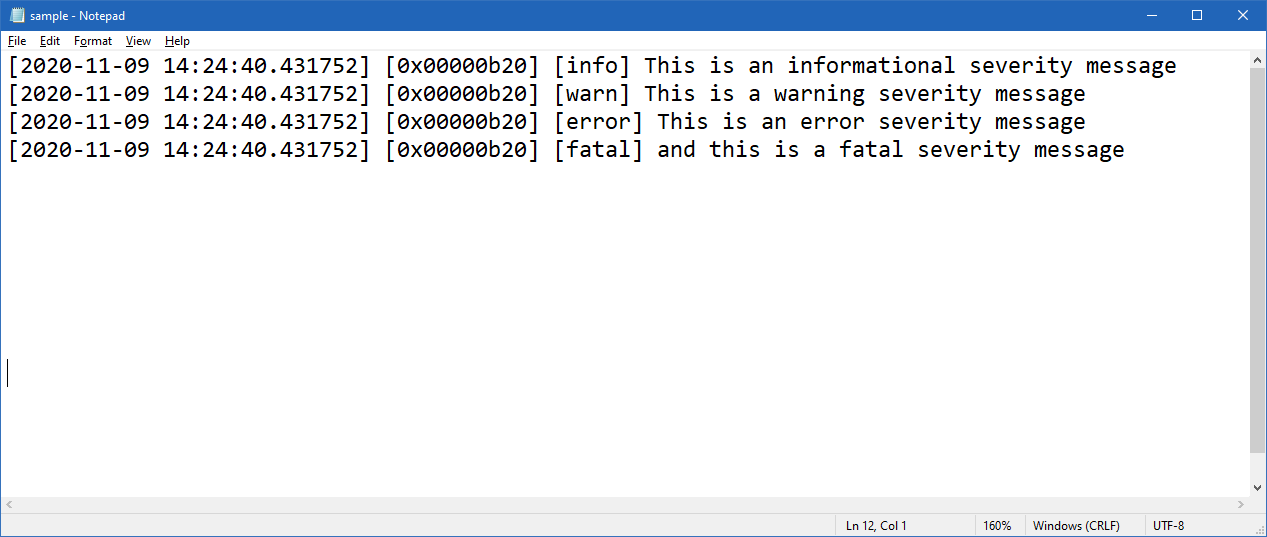
Compile that; when we run it, we’ll no longer have log output in our console window. Our log messages are now written to the sample.log file that Visual Studio creates in the same location as our project each time the application is executed. If we open our sample.log, we see something a little unexpected:

It looks like the logger has only written the log messages to the log file. Where’s the rest of our data? What happened here is that when adding the file log, we ended up using its default formatter. Let’s take a look at configuring the formatter so that it results in the same message format that we saw in our previous console logging adventure. Update your code to the following:
<
#include <iostream>

#include <boost/log/core.hpp>
#include <boost/log/trivial.hpp>
#include <boost/log/expressions.hpp>
#include <boost/log/utility/setup/file.hpp>
#include <boost/log/utility/setup/common_attributes.hpp>

namespace logging = boost::log;
namespace keywords = boost::log::keywords;

void init_logging()
{
    logging::register_simple_formatter_factory<logging::trivial::severity_level, char>("Severity");

    logging::add_file_log
    (
        keywords::file_name = "sample.log",
        keywords::format = "[%TimeStamp%] [%ThreadID%] [%Severity%] %Message%"
    );

    logging::core::get()->set_filter
    (
        logging::trivial::severity >= logging::trivial::info
    );

    logging::add_common_attributes();
}

int main(int, char*[])
{
    init_logging();

    BOOST_LOG_TRIVIAL(trace) << "This is a trace severity message";
    BOOST_LOG_TRIVIAL(debug) << "This is a debug severity message";
    BOOST_LOG_TRIVIAL(info) << "This is an informational severity message";
    BOOST_LOG_TRIVIAL(warning) << "This is a warning severity message";
    BOOST_LOG_TRIVIAL(error) << "This is an error severity message";
    BOOST_LOG_TRIVIAL(fatal) << "and this is a fatal severity message";

    std::cin.get();
    return 0;
}
The biggest change here is the line “add_file_log”. Instead of specifying just the file name, we also specify the format to use for writing the log record to the file. The other change is the addition of “register_simple_format_factory” to include the “Severity” attribute so that we can use it in the log record format string. The call to “add_common_attributes” is a helper function provided by Boost.Log that adds attributes such as “Timestamp” and “ThreadID” along with a few other attributes for us. Why “Severity” isn’t included in this list I have no idea, but it isn’t, so we have to register it ourselves.
Now when we run the above and check our log file again, what we see is the same as when we log to the console.
Formatting Log Records
We’ve seen how to create a simple format for a log record, but let’s dig into the formatting options just a bit more. The call to “add_common_attributes” is a helper function that will add the following attributes so that we can use them in the log format string:
- LineID – Auto-incremented counter that specifies the log line number
- TimeStamp – Posix time stamp of the local time the log record is written
- ProcessID – Current process identifier
- ThreadID – Current thread identifier in multi-threaded applications
Let’s update our format string to include “ProcessID”, “LineID”, and “ThreadID” since we are already using “TimeStamp”:
<
#include <iostream>

#include <boost/log/core.hpp>
#include <boost/log/trivial.hpp>
#include <boost/log/expressions.hpp>
#include <boost/log/utility/setup/file.hpp>
#include <boost/log/utility/setup/common_attributes.hpp>

namespace logging = boost::log;
namespace keywords = boost::log::keywords;

void init_logging()
{
    logging::register_simple_formatter_factory<logging::trivial::severity_level, char>("Severity");

    logging::add_file_log(
        keywords::file_name = "sample.log",
        keywords::format = "[%TimeStamp%] [%ThreadID%] [%Severity%] [%ProcessID%] [%LineID%] %Message%"
    );

    logging::core::get()->set_filter
    (
        logging::trivial::severity >= logging::trivial::info
    );

    logging::add_common_attributes();
}

int main(int, char*[])
{
    init_logging();

    BOOST_LOG_TRIVIAL(trace) << "This is a trace severity message";
    BOOST_LOG_TRIVIAL(debug) << "This is a debug severity message";
    BOOST_LOG_TRIVIAL(info) << "This is an informational severity message";
    BOOST_LOG_TRIVIAL(warning) << "This is a warning severity message";
    BOOST_LOG_TRIVIAL(error) << "This is an error severity message";
    BOOST_LOG_TRIVIAL(fatal) << "and this is a fatal severity message";

    std::cin.get();
    return 0;
}
Go ahead and update your code and rerun the application. Our log file should now look like this:

Adding Custom Attributes
We can add additional attributes to the log record through the “add_attribute” or “add_global_attribute” functions. Since we are currently using the core global logger, we will need to use the “add_global_attribute” function.
<
#include <iostream>

#include <boost/log/core.hpp>
#include <boost/log/trivial.hpp>
#include <boost/log/expressions.hpp>
#include <boost/log/utility/setup/file.hpp>
#include <boost/log/utility/setup/common_attributes.hpp>

namespace logging = boost::log;
namespace keywords = boost::log::keywords;
namespace attrs = boost::log::attributes;

void init_logging()
{
    logging::register_simple_formatter_factory<logging::trivial::severity_level, char>("Severity");

    logging::add_file_log(
        keywords::file_name = "sample.log",
        keywords::format = "[%TimeStamp%] [%ThreadID%] [%Severity%] [%ProcessID%] [%LineID%] [%MyAttr%] [%CountDown%] %Message%"
    );

    logging::core::get()->set_filter
    (
        logging::trivial::severity >= logging::trivial::info
    );

    logging::core::get()->add_global_attribute("MyAttr", attrs::constant<int>(42));
    logging::core::get()->add_global_attribute("CountDown", attrs::counter<int>(100, -1));

    logging::add_common_attributes();
}

int main(int, char*[])
{
    init_logging();

    BOOST_LOG_TRIVIAL(trace) << "This is a trace severity message";
    BOOST_LOG_TRIVIAL(debug) << "This is a debug severity message";
    BOOST_LOG_TRIVIAL(info) << "This is an informational severity message";
    BOOST_LOG_TRIVIAL(warning) << "This is a warning severity message";
    BOOST_LOG_TRIVIAL(error) << "This is an error severity message";
    BOOST_LOG_TRIVIAL(fatal) << "and this is a fatal severity message";

    std::cin.get();
    return 0;
}
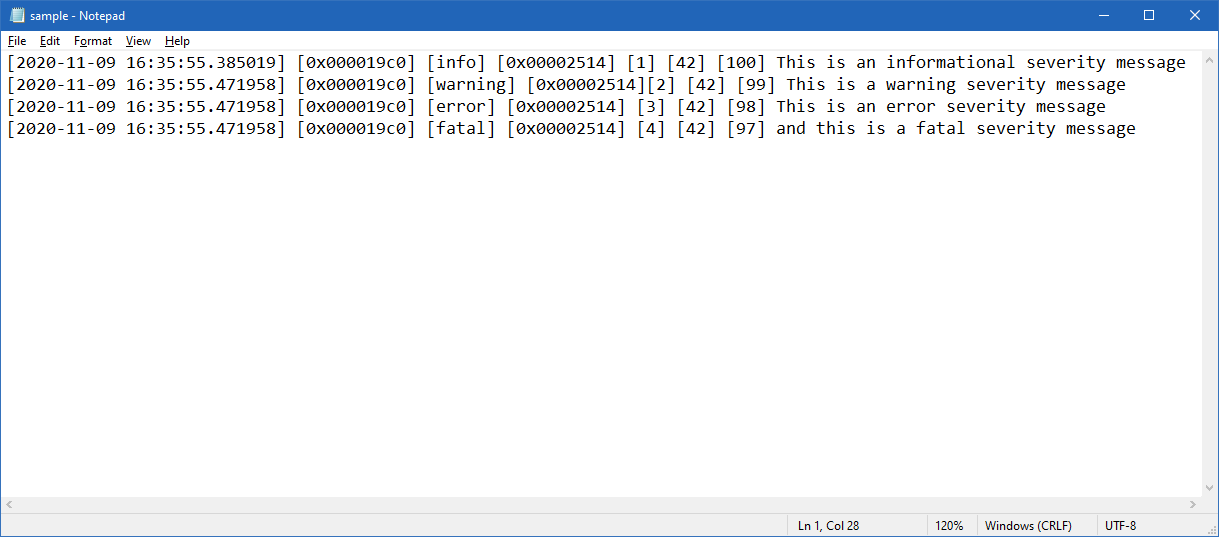
We’ve added two new attributes to our log records: a constant integer named “MyAttr” and a counter named “CountDown” that, you guessed it, counts down. These are accessible to any logger that we are using since we added them to the global logger. The format string has also been modified to include our new custom attributes. Running our application now will result in a log file that includes our new attributes as part of each record:
There’s a lot more we can do with custom attributes that we don’t have room for here, so definitely take a look at the Boost.Log attributes documentation if you want to dive in deeper.
Conclusion
This was a whirlwind tour of the Boost.Log logging framework. The Boost.Log library is extremely powerful and extensible, but it can be a bit daunting and overwhelming when you’re just starting out. This is definitely not the only way to use the framework and is only a small sampling of what it provides. If you want to build off our simple examples here, next steps would include creating custom loggers and using them in different parts of our application. Each custom logger can use different format strings and severity filters. I’d recommend working through the official tutorial to learn these additional features and more advanced usages.

Where should you go from here? Well, logging is a wide subject, so we suggest you continue educating yourself on the topic. And, as luck would have it, you’re in the right place for that since the Scalyr Blog often publishes posts on various logging-related topics. For instance, after the introduction in this post, you might want to learn more about logging levels. Or maybe you want to know more about logging best practices that might improve your logging approaches not only in C++ but also in different languages.
After you become well-versed in the basics of logging, the next step is to look into more advanced topics. By leveraging techniques such as log analytics, for instance, you have the opportunity to up your logging game and stop using logging only as a mere troubleshooting aid. Rather, your logging approach can be a way to obtain business insights that can help your decision-making process.
Finally, you might want to take a look at the tools at your disposal. Many tools are available that can make your life easier when logging. More specifically, we invite you to take a look at DataSet. It’s a comprehensive log management solution, complete with super-fast log analytics made possible by DataSet’s Event Data Cloud. Try DataSet today.

