

The Zero2Hero malware course continues with Daniel Bunce demonstrating how to write a custom tool to load, execute and debug malicious shellcode in memory.

Recently, FireEye posted a blog post detailing malware used by APT 41, specifically the DEADEYE initial first stage, capable of downloading, dropping or loading payloads on an infected system, and the LOWKEY backdoor. Additionally, they described an additional “RC4 Layer”, which is Position Independent Code (PIC) that RC4 decrypts an embedded payload and loads it into memory using it’s reflective DLL loader capabilities.
Unlike Windows executables, shellcode doesn’t have any headers, meaning the Windows loader cannot execute standalone shellcode. As a result, debugging is impossible without an external tool to load and execute shellcode for you. Therefore, in this blog post, we will cover how to write a tool in C to load shellcode into memory and wait until a debugger is attached before executing it. But first, why do we need to debug shellcode?
Why Debugging Position Independent Shellcode is Useful
Position Independent Code can be executed anywhere inside memory, without any issues. This means there are no hardcoded addresses and no calls to APIs such as GetProcAddress or LoadLibrary, not to mention a few other complications.
As a result, static analysis of the shellcode can take a while to fully understand as the shellcode is forced to manually lookup addresses that may not be known without debugging. Furthermore, plenty of malware utilizes hashing when looking up APIs, so a hash will be passed into a function that will hash each export of the DLL in question, until a matching pair is found. Whilst the hashing routine can be replicated so that the correct API is found without static analysis, there are many hashing algorithms out there, from CRC hashing up to custom hashing algorithms. This means there will be plenty of situations where you will have to update the script to include an additional algorithm, slowing down analysis further. So why not just load it into memory yourself and execute when a debugger is attached?
Well, you can. The guys at OALabs have created an extremely helpful tool called BlobRunner to do exactly that. However, rather than simply use a pre-existing tool, in this post we’re going to be focusing on writing our own, as it’s not too difficult to do so, and shellcode execution isn’t uncommon inside malware, so knowing the internals of how it works will help when it comes to recognizing it inside of a sample.
Overview of the ShellCode Analysis Tool’s Routine
So, the tool we’re writing needs to be able to read the shellcode from a file, allocate a region of memory large enough to accomodate the shellcode, write the shellcode into said region of memory, wait until a debugger has been attached, and then execute it. As it is for debugging and not behavioural analysis, we need to wait until a debugger has been attached, to prevent it running before attaching to it. The shellcode is also 64 bit, and as Visual C++ compiler does not support inline assembly for 64 bit applications, we’ll have to use CreateThread() to execute the shellcode, rather than using a jmp. Anyway, with that covered, let’s take a look at what the main() function will look like.
Writing the main() Function
This function is setup to accept two arguments: the filename, and the entry point offset.
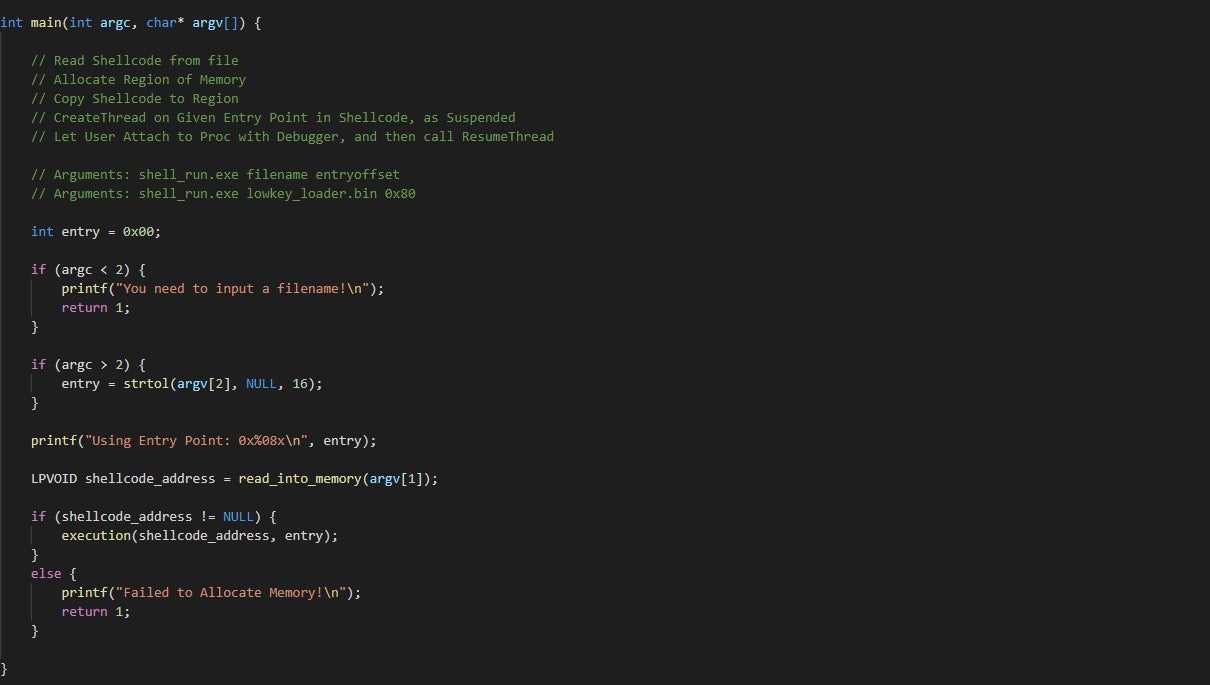
In the case of the loader, without analyzing what executes it, the entry point seems to be at the offset 0x80. If we don’t pass in a second argument (the offset), the program will attempt to execute it from the offset 0x00. The offset is converted to an integer using strtol(), and then the function read_into_memory() is called, which, as the name suggests, reads the shellcode into process memory. This returns the base address of the shellcode, which is then passed into the function execution(), along with the entry point offset. As you can see, the layout is fairly simple – unlike loading an executable in process memory, we don’t need to map the sections of shellcode into memory, and can simply execute it once it has been copied into memory. With that said, let’s move on to the other functions that we need.
Writing the read_into_memory() Function
This function is responsible for loading the shellcode from a file into an allocated region of memory.

To do this, we first need the size of the shellcode, which we can get using fseek() and ftell(). This is then passed into VirtualAlloc(), along with PAGE_EXECUTE_READWRITE, allowing us to execute that region of memory without calling VirtualProtect(). The return address is put into the buffer variable, which is then passed into fread(), along with the handle to the open file. After the shellcode has been read into memory, we return the address in buffer back to the calling function, for use in the execution() function, which we will move onto now.
Writing the execution() Function
The execution() function is the most important part of the entire tool, as without it we’d still only have static shellcode.
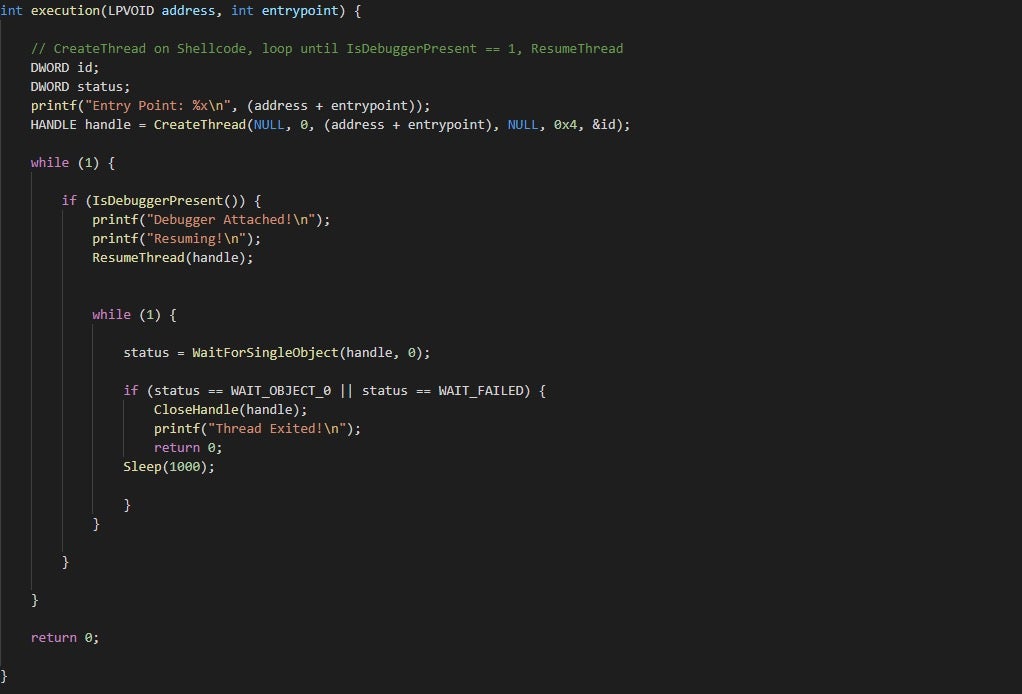
To begin with, we add the entry point offset to the base address of the shellcode, so if the allocated region of memory was at 0x20000, the actual entry point would be 0x20080 for our LOWKEY reflective DLL loader. We then pass this into a call to CreateThread(), along with the value 0x4, which indicates we want to create the thread in a suspended state. This is done to prevent execution of the shellcode whatsoever, and we only resume the thread once a debugger is attached. This is done through a pretty simple while() loop that constantly calls IsDebuggerPresent() until one is detected. From there, the thread is resumed with a call to ResumeThread(), and then we enter another loop that will call WaitForSingleObject() every second to check if the thread has exited. If so, we close the handle and return from the function!
Compile Time!
That pretty much wraps up the tool, so let’s go ahead and compile it to test it out!
As you can see, everything runs smoothly and we’re able to see which API each hash represents, a lot faster than if we were writing a script to calculate it!
So, now we know how to read and execute shellcode in memory, recognizing it in malware should be fairly easy! In this case, the DEADEYE payload that executes the shellcode is packed and protected with VMProtect, making it very difficult to locate the function responsible for loading and executing the payload; however, the unpacked payloads can be found on Malpedia here for those that have an account.

