
Today, Apple releases the next iteration of its desktop operating system, now rebranded as macOS 11. In this post, we take a tour of what’s new and how it affects security in the enterprise. While we covered some of these in our beta preview post back in June, we’ll also cover today some of the important changes since then.

1. Adjust Your Scripts for the New Version Number
This is the third time Apple have re-branded their desktop operating system in recent years, from OS X to macOS 10 and now we arrive at macOS 11. As the last version of macOS was 10.15, it’s not surprising that you’ll also see references to macOS as 10.16, even in some official documentation.
However, if you’re running admin or security scripts that are checking the version number via the sw_vers command line tool your output should be like this:
ProductName: macOS
ProductVersion: 11.0.1
2. Kexts Still Live – With Your Approval
Kexts are not quite dead and buried and even live on in Apple’s own system software; however, for 3rd party developers, the push to abandon kernel extensions from both Apple and users has been strong, and most vendors, including SentinelOne, are moving to the new System Extensions as replacement for kexts. You can find out more about SentinelOne’s kextless agent and support for Big Sur here.
In Big Sur, all kernel extensions need user approval, including updated versions of existing kexts. Interestingly, Apple have not exempted themselves from that rule either, so you may see alerts for approving updates to kexts that live in /Library/Apple/System/Library/Extensions, too, like this:
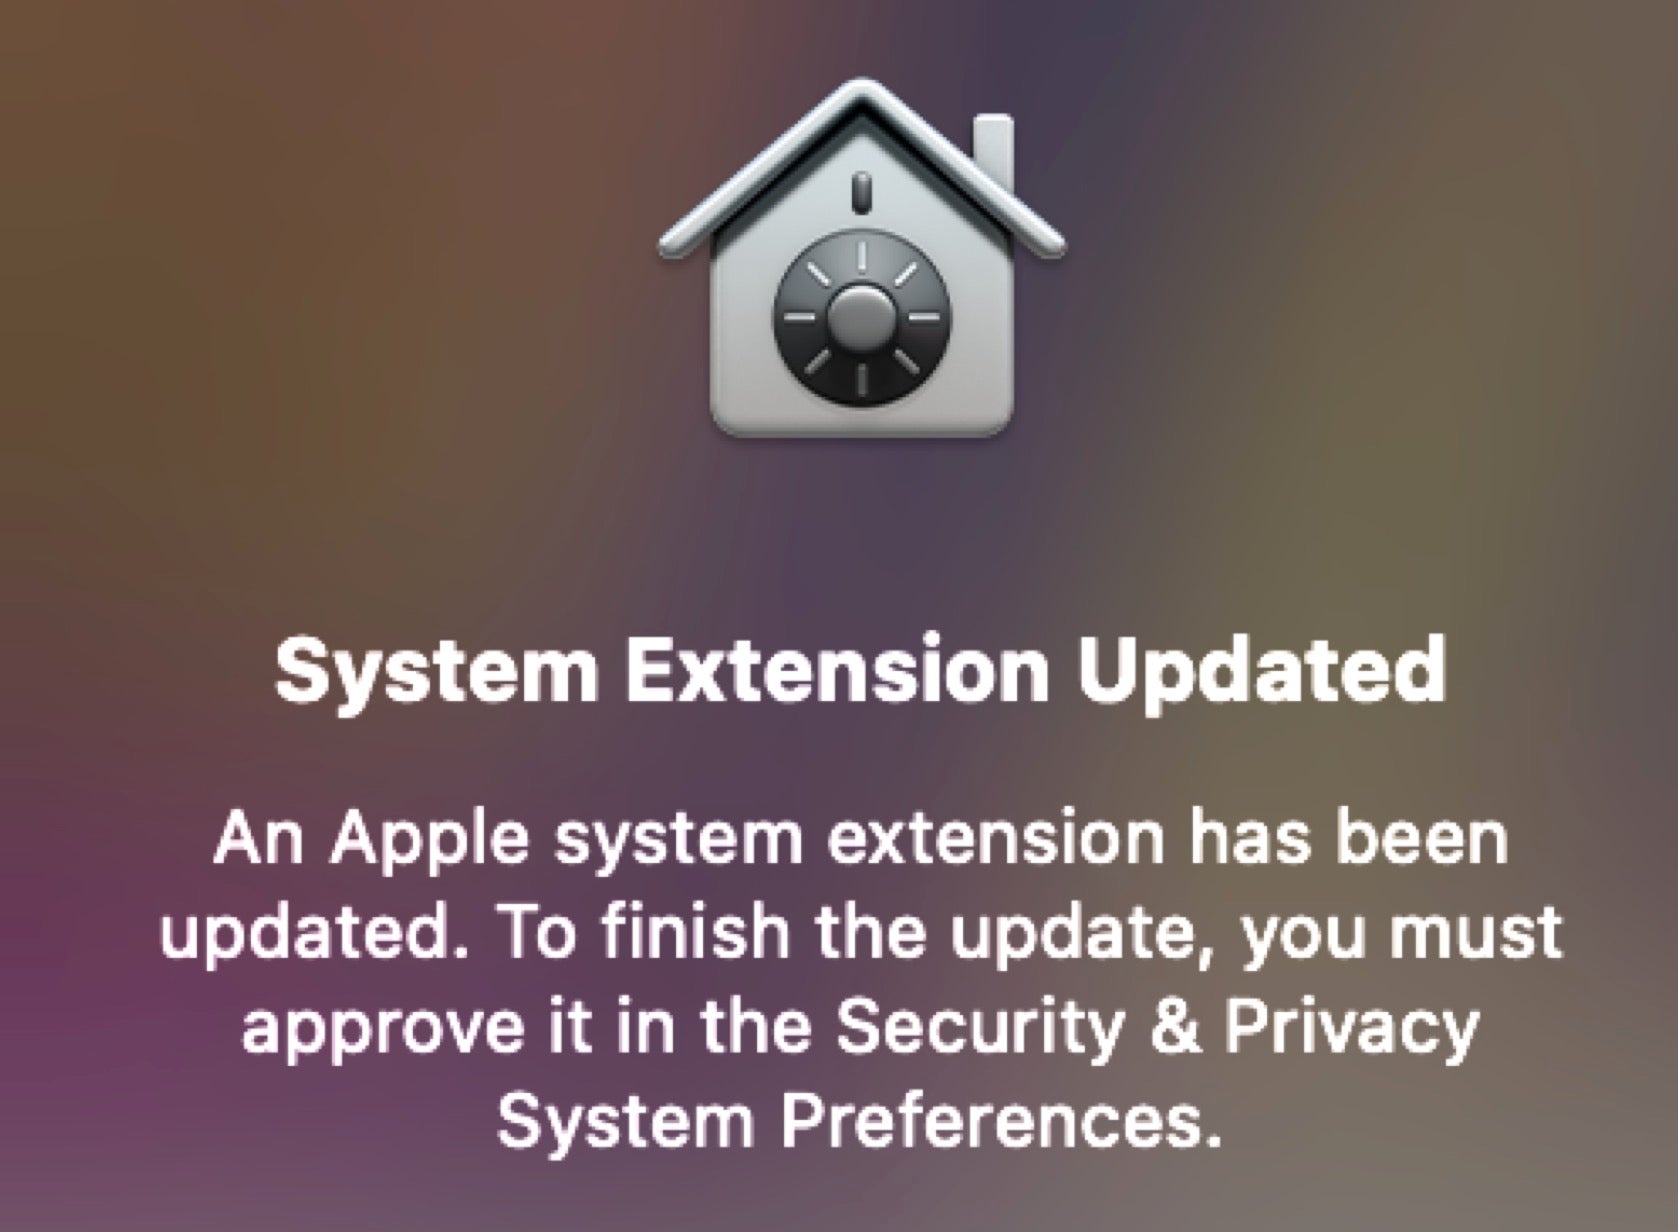
Yes, that’s a UI alert for a kernel extension update, now slightly confusingly referred to in macOS Big Sur as a “System Extension”, too.
3. Screen Recording is an Admin Privilege
If you’re supporting users remotely with software like TeamViewer or similar, be aware that Screen Recording on macOS 11 now requires Administrator approval. Using Zoom or other tele-conferencing software? That’s right, you’ll need to authenticate those applications for screen recording, too.
And here’s a little tip for anyone making screencasts on Big Sur: after you’ve approved your 3rd party recording app, you might want to go into System Preferences “General” tab and set the status bar to automatically hide. That’s the only way you’re going to be able to hide the system clock, which might otherwise give away large intervals between frames that you edit out.
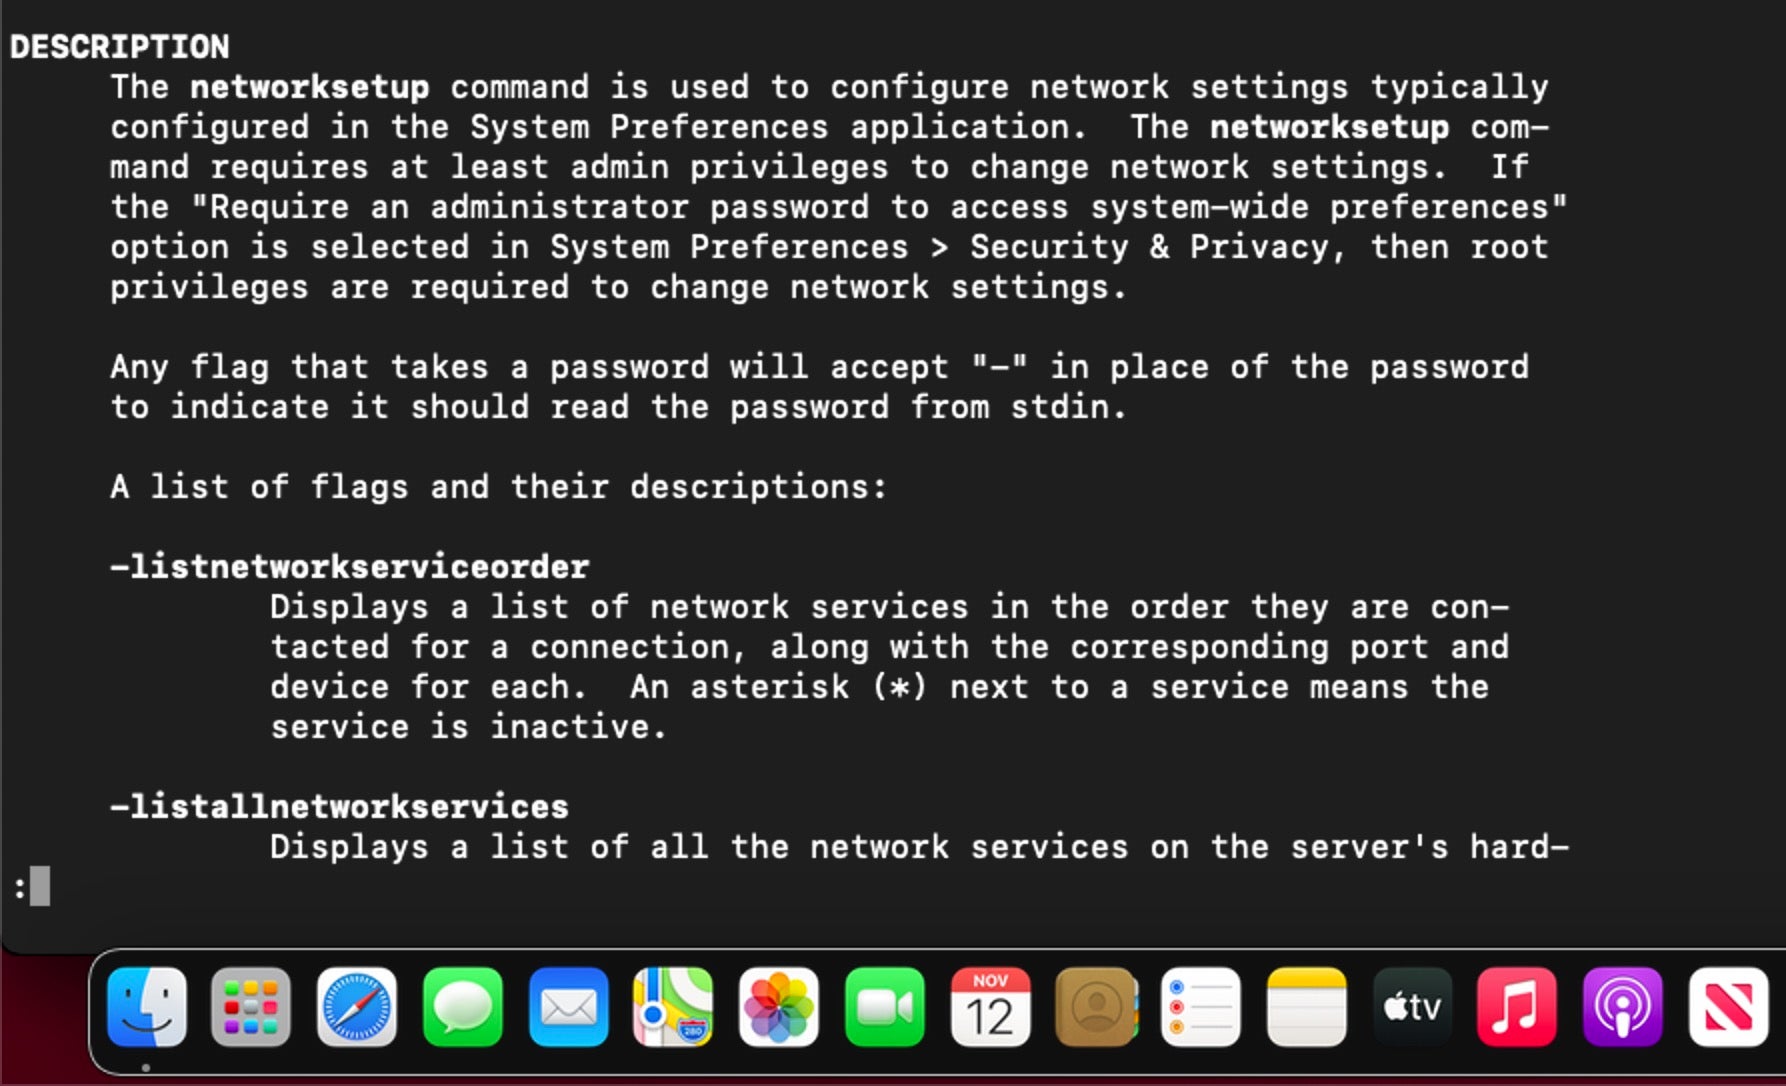
4. Limitations for Standard User with networksetup
The networksetup utility on Big Sur also requires authorization for all functions except reading the network settings, turning Wi-Fi power on or off and changing the Wi-Fi access point. Essentially, if it requires unlocking a padlock in the System Preferences GUI, it’ll require a password from the CLI utility now as well.
5. Adjust Your Scripts for TCC.db
For admins or developers using scripts to access the TCC.db, note that there’s been some changes in the schema also, so you’ll need to consider whether you need to adjust for that. Whereas on 10.15 you could use something like this to list applications with Full Disk Access permissions:

That will now fail on Big Sur because the allowed column no longer exists in the schema for the access table, and you’ll be met with an Error: no such column: allowed message if you try.
To achieve the same effect on Big Sur, replace allowed with auth_value and 1 with 2 in the grep command:
sudo sqlite3 TCC.db "SELECT client,auth_value FROM access WHERE service=='kTCCServiceSystemPolicyAllFiles'" | grep '2'$
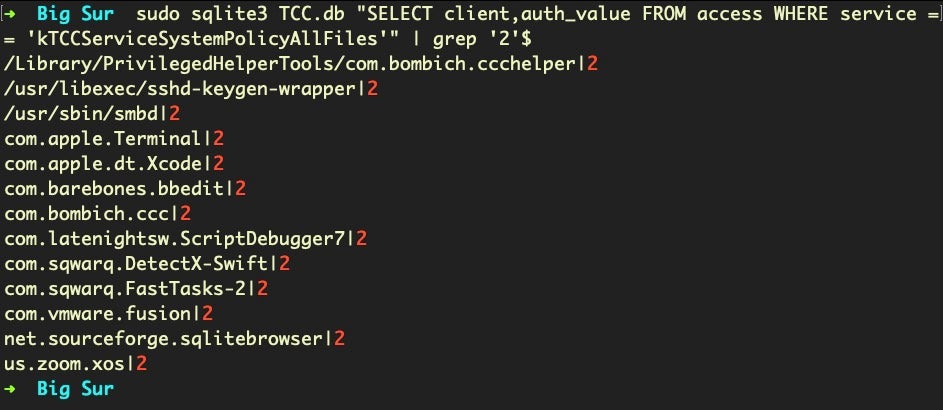
Other changes in the access table scheme are the addition of auth_reason and auth_version columns, the removal of the prompt_count column, and a new default NOT NULL value for the indirect_object_identifier column.
6. More Trust Needed for Certificate Trust Settings
Outside of TCC itself but still regarding consent, there have also been changes to certificate trust settings. These now require administrator approval and/or confirmation through supplying the user’s password for non-admin trust domains. If you are running scripts that call /usr/bin/security add-trusted-cert -d as root, or leveraging the SecTrustSettingsSetTrustSettings API, you will need to take these changes into account.
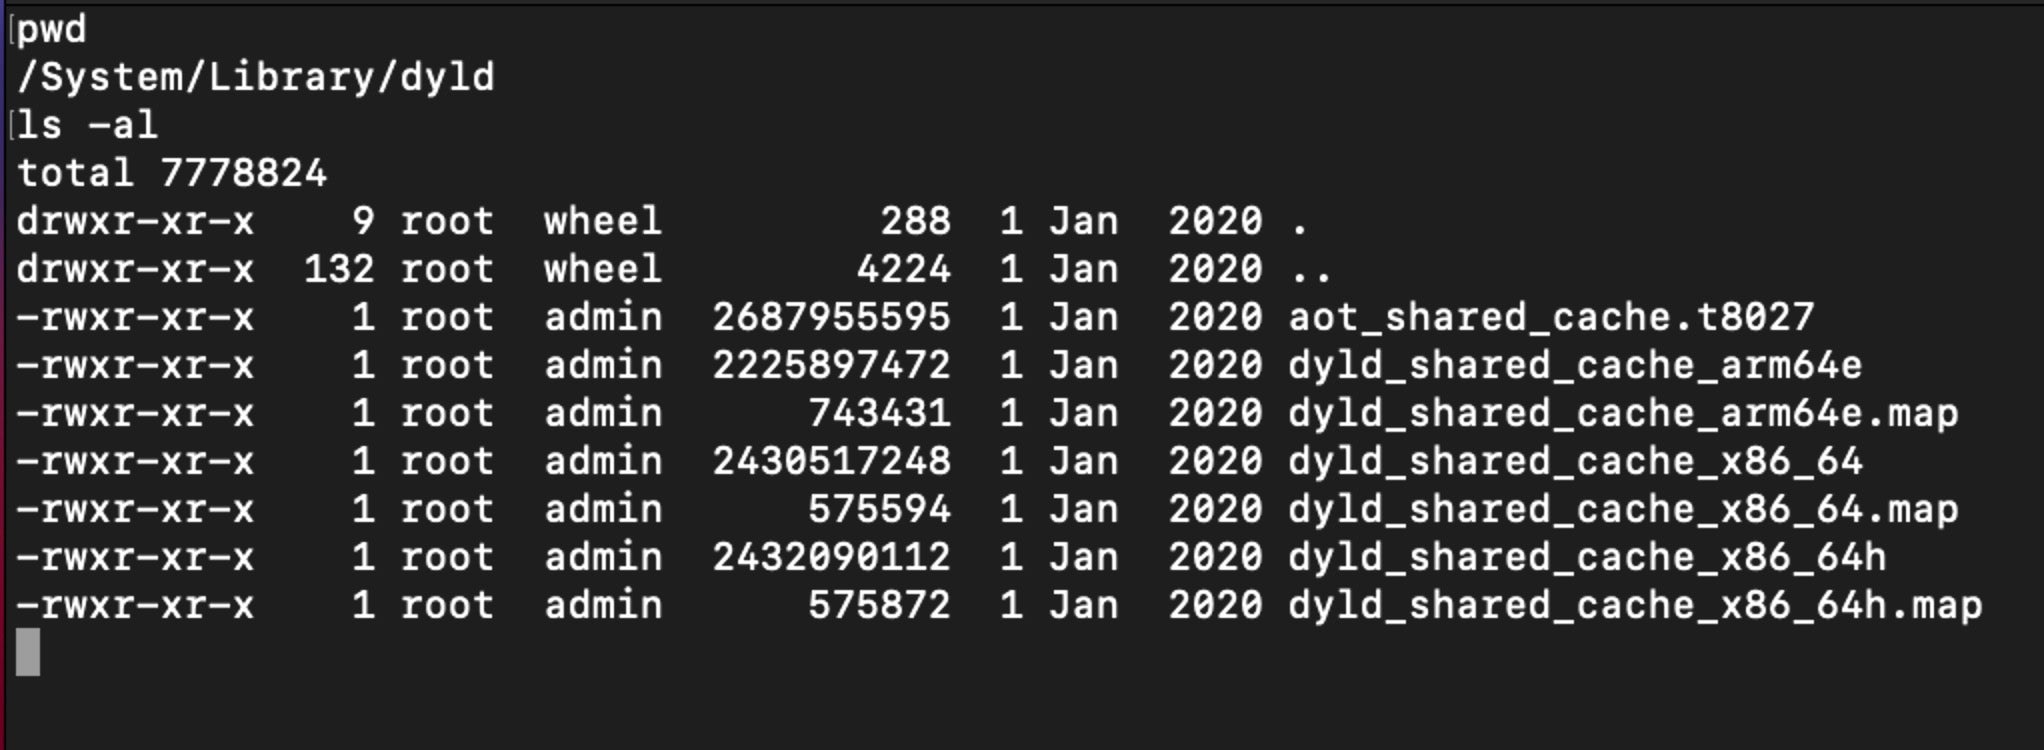
7. No More On-Board System Libraries
When Apple announced the first beta of macOS Big Sur, they mentioned that copies of system libraries would no longer be present on the file system. Instead, Apple are shipping a “built-in dynamic linker cache of all system-provided libraries”. What that means, essentially, is that all system-provided libraries are tamper-proof, even if you turn off System Integrity Protection. Code attempting to check for the presence of a dynamic library at a particular path will fail; instead use the dlopen() function and pass the library’s expected path to check for and return the relevant library from the cache.
As Jeff Johnson pointed out soon after this was announced, it appears that it is possible to extract the libraries from the cache for purposes of disassembly and security research.
8. New Signed System Volume – Watch Your Backups
More lock down arrives in Big Sur with the implementation of the signed system volume (SSV) feature. SSV extends the read-only system volume that Apple introduced in macOS 10.15 Catalina. Now, the system volume is cryptographically signed, which means the integrity of the system volume is checked at runtime. Any data on the volume that doesn’t have a valid cryptographic signature from Apple is rejected.
Apple claim that adding strong cryptographic protection to the system volume not only hardens the OS against tampering but also improves the speed and reliability of software updates.
For users, the main upshot is to ensure that your backup software is compliant with Apple’s new SSV format, as SSV means that an ordinary copy of the system volume will not be bootable. Apple have provided developers with a tool (ASR) to copy the system volume, but that tool reportedly only became fully functional with the release of 11.0.1 beta last week. Be sure to consult with your backup software provider to find out more if you need to create backups of your system volume.
9. Install Profile Configurations – in 8 Minutes or Less
If you’re installing Profile configurations to manage various user settings and you’re not using an MDM solution, these are also going to require the user to manually take a trip to System Preferences to complete the installation. And for reasons best known to Apple, this manual step needs to happen within 8 minutes of the installation beginning or macOS Big Sur will remove the Profile.
10. Check Your Hardware Specifications
To run Big Sur on your devices, you’ll need a minimum 4GB of RAM and a minimum 80GB drive. While Apple doesn’t ship any devices with less than 4GB RAM any longer, it’s still worth bearing these specs in mind for virtualization efforts.
The official list of supported hardware devices is as follows:
- MacBook (2015 and newer)
- MacBook Air (2013 and newer)
- MacBook Pro (Late-2013 and newer)
- iMac (2014 and newer)
- iMac Pro (2017 and newer)
- Mac Pro (2013 and newer)
- Mac mini (2014 and newer)
And, of course, any of the newly released Apple Silicon models, MacBook Air with M1, MacBook Pro with M1, Mac mini with M1 will come with Big Sur as the default installation.
Conclusion
The latest version of macOS is billed as the biggest change to Apple’s desktop operating system ever, with increased lock down of both system and user data, along with support for two different kinds of hardware (Intel and ARM). Arguably, the biggest change for vendors is the move from kernel extensions to system extensions. You can learn more about that and SentinelOne’s support for Big Sur here.

