
Today we announced a new feature for SentinelOne Linux agent, Shadow SUID Protection. In this post, we begin the first of a two-part series explaining how this feature came about and why it is needed.
Obtaining root privileges in Linux, in most cases, isn’t something easy to do. Security updates are usually published on a daily basis, and when a new zero-day or exploit is revealed in the wild, in most cases it will be patched within hours. Thanks to the packaging distribution systems (aka “repositories”), the patched program will also find its way to the endpoints relatively quickly. Therefore, once an attacker gains elevated privileges on a machine, the very first thing he would probably want to do is to maintain those privileges. One of the most common methods attackers use for this purpose is to utilize the setuid (i.e. suid) mechanism.
What is SUID?
As many readers will know, Linux has three basic permissions: read, write and execute. But beyond that, Linux has some other permissions that are used for specific cases. Among those you can find setuid and setgid, which are meant for occasions when you have a program which must run as a specific user or group (usually root), but you don’t want to give elevated privileges to every user of the program. When a program with setuid/setgid bit is executed, the program can ask the operating system to gain the privileges of the owner (or group) of the process.
Take for example the ping command. In order to send an ICMP packet, ping needs to use a raw socket, which in Linux requires root privileges. However, ping is an essential command in frequent use, and we can’t allow every “ping-user” to have elevated privileges. What’s the solution then? That’s right – SUID permissions. When ping is executed, it actually runs as root, no matter which user executes it.
As an attacker, it would be very easy once we gained elevated privileges to write a simple program that does nothing other than open a shell and acquire suid permissions. Having done that, we can return to the machine from a low-privileged webshell or any other low-privileged back door and use our dropped suid-shell to regain root privileges.
Fortunately, that suid shell is extremely easy to locate. Because of the risk of having such executables on the machine, most Linux distributions come with very few suid binaries. Sysadmins might regularly look for those binaries on the machine and can easily be alerted for any new, unwanted, suid binaries being created. A common “solution” for that, as an attacker, would be to simply replace the legitimate suid binary with a malicious one; however, again, this is often closely monitored and there are many ways to make sure the suid files have not been changed. It is even possible to use the built in dpkg --verify or rpm -Va commands for that purpose.
What is Shadow SUID?
Shadow SUID is the same as a regular suid file, only it doesn’t have the setuid bit, which makes it very hard to find or notice.
The way shadow SUID works is by inheriting the setuid bit from an existing setuid binary using the binfmt_misc mechanism, which is part of the Linux kernel.
The inheritance takes effect when executing a targeted setuid binary which was set for that purpose prior to execution. The important thing to understand is that you do not need to modify the original suid file in order to target it. In order to make a Shadow suid, all you need is at least one suid binary on the machine, no matter what it does. For more technical details, see our part 2 post Shadow SUID for Privilege Persistence: Part 2.
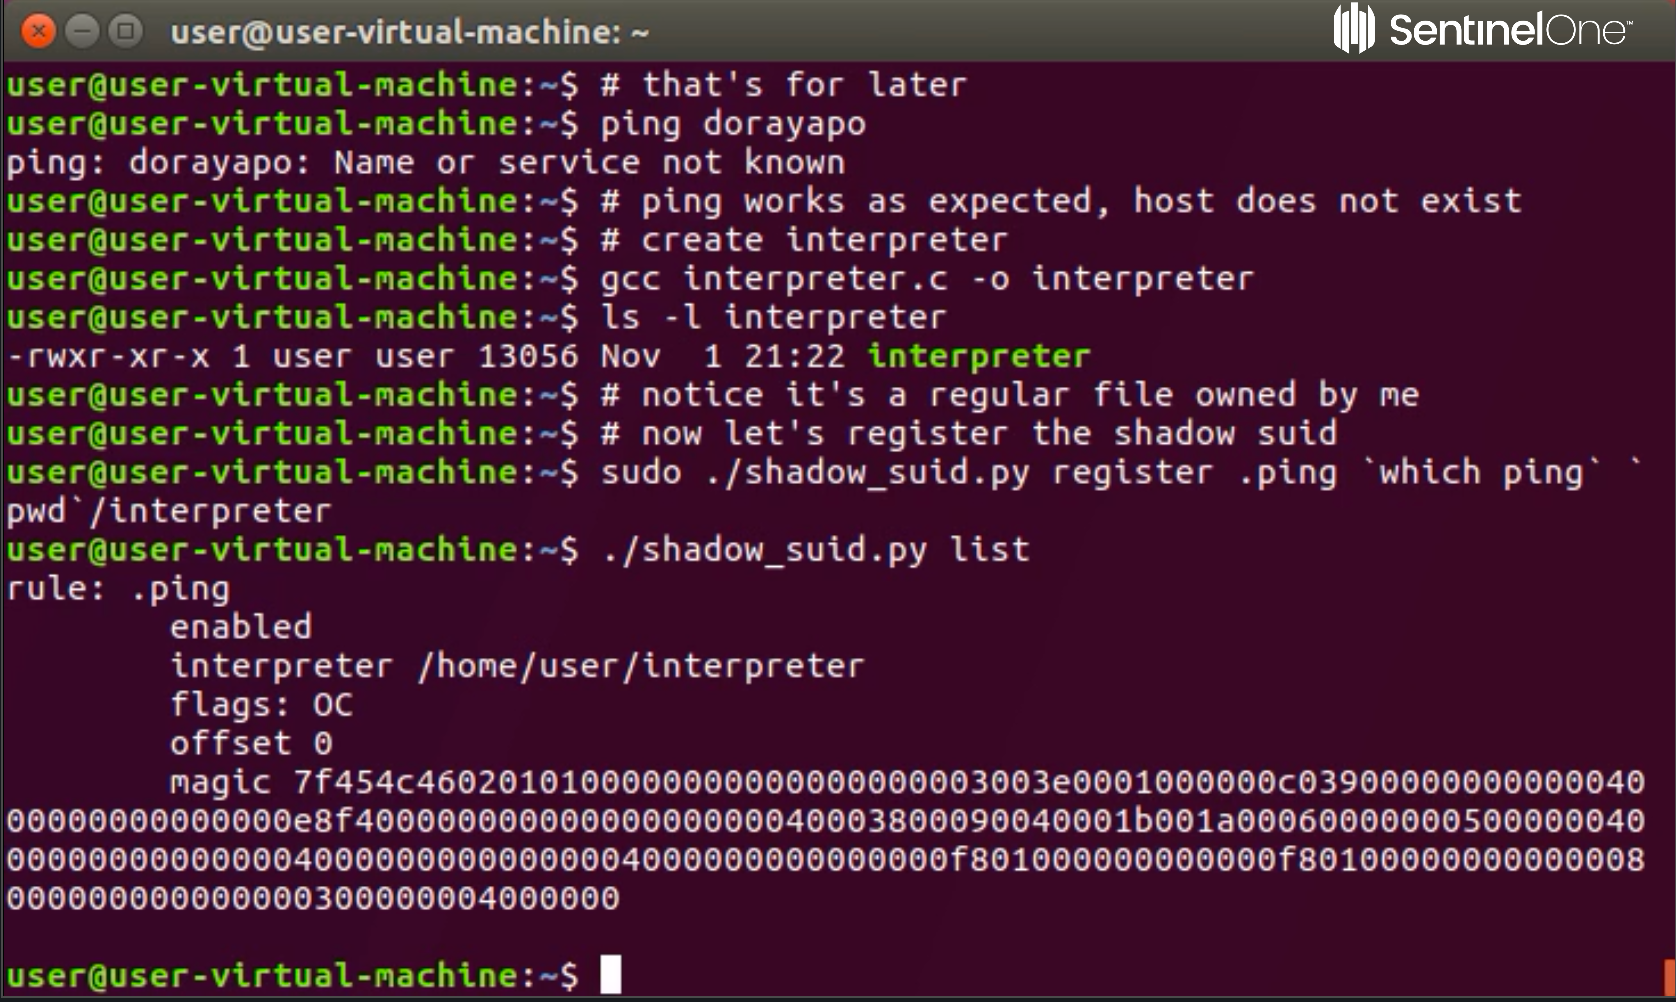
Demo
Am I vulnerable?
As this has been a part of the Linux Kernel since 2004, the likelihood is that you are. However, you can check if your kernel came with the binfmt module by executing the following code on the command line:
$ grep 'BINFMT_MISC' /boot/config-`uname -r`
Am I affected?
First check if binfmt_misc filesystem is mounted using:
$ mount | grep binfmt_misc
Then check the relevant path (most commonly as below):
$ ls -la /proc/sys/fs/binfmt_misc
That should result in something like this:
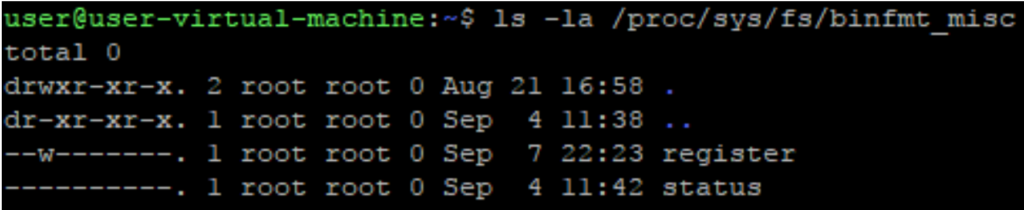
Any file other than “register” and “status” should be inspected closely.
If it looks more like this:

Print the extra file, and see if it has “C” on the “flags” field as seen below:

To remove the binfmt_misc rule, simply write “-1” into the file.
Please note that it might be a legitimate file, too, so if you are unsure seek further advice before proceeding.

How can I protect myself?
For endpoints without SentinelOne protection, there is no easy answer here since it’s possible for any remedial step to be bypassed. However, the best simple solution that, again, should be undertaken with caution, would be to delete the relevant .ko file:
# modinfo -n binfmt_misc
/lib/modules/4.10.0-42-generic/kernel/fs/binfmt_misc.ko
# rm $(modinfo -n binfmt_misc)
Please note that you probably want to delete the .ko for all of the kernel versions installed.
How can SentinelOne help me?
With the latest Linux agent (v2.6.4), you are fully protected from Shadow SUID execution. The agent constantly monitors any process execution and once a Shadow SUID is detected, the process is blocked, so damage is prevented. Moreover, since the agent knows exactly how the operating system works, users are able to see the attack storyline behind the execution and understand how the infection came about.
Click here for Part 2: Shadow SUID for Privilege Persistense

