
In the same vein as Get Started Quickly With Kotlin Logging and Getting Started Quickly With C# Logging articles, we’re headed across the coffee shop to look at logging in the context of the Java Spring Boot framework. We’re going to get started quickly with Spring Boot Logging.
While we’ve written already on the topic of Java logging in Get Started Quickly With Java Logging, the Spring Boot framework simplifies a lot of the plumbing involved in getting up and running. In this article we’ll learn how to:
- Create a Spring Boot starter/blog/get-started-quickly-with-java-logging/ project
- Use Gradle to build our application
- Configure the default Spring Boot logger
- Use Log4j2 with Spring Boot
- Customize the logging configurations
Grab your Venti red-eye triple espresso with almond milk, and let’s get started!

Create a Spring Boot Test Project
Before we delve into logging and Spring Boot, we need a demo project to experiment with. The easiest way to get going with Spring Boot is to use the online Spring Initializr project generator.
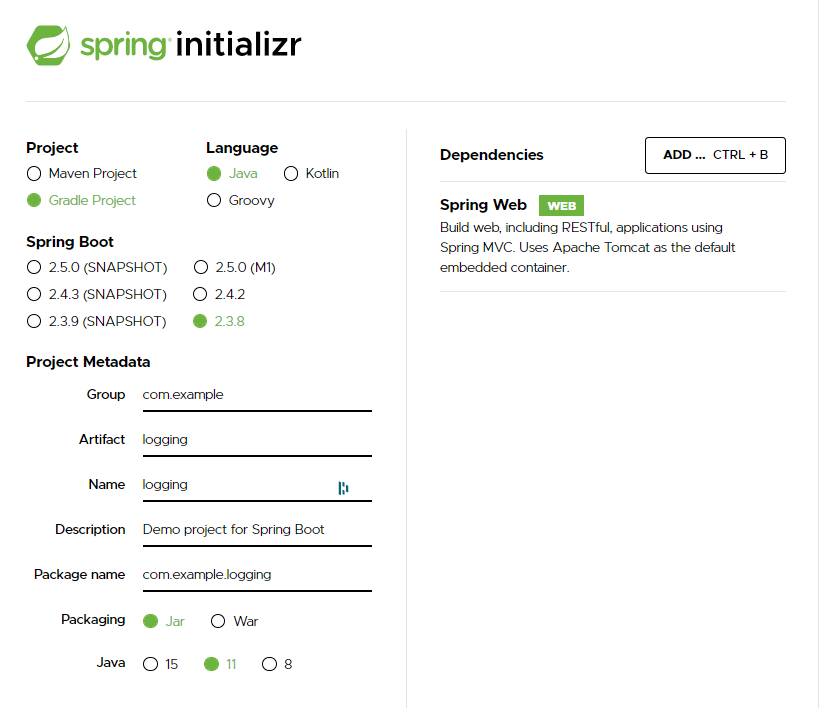
Spring Initializr will give us a great UI for picking and choosing exactly what Spring components we want, as well as some other options.
For this article we’ll use Gradle for dependency management and to build our application. If you want to import the project into Eclipse or IntelliJ, feel free.
The Spring Initializr website defaults to Maven for dependency management. Let’s change the “Project” choice from “Maven Project” to “Gradle Project.”

Now there are just a couple more tweaks we need to make to be consistent with this article:
- Choose “Java” as our “language.” Kotlin is also great but has a learning curve if you are unfamiliar with it.
- In the “Dependencies” search box, enter Web and select the “Full-stack web development” option.
- Next, change the “Artifact” text input from “demo” to “logging.” Now we’re good to go!
Check out the below screenshot to see all of the changes to make:
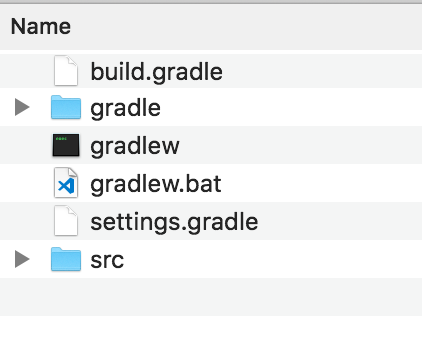
Once you’ve made the changes, click the “Generate Project” button to download an archive containing our project. After extracting the downloaded archive, you’ll have the following files:
Building the Spring Boot Starter Project
If you’ve never used Gradle before, I highly recommend reading up on it as an alternative to Maven. It uses the same repositories as Maven, but its own domain-specific language (DSL) based on Groovy.
This results in shorter and clearer build scripts than the verbose XML configurations Maven uses. Life is too short to deal with XML if we don’t have to. We also don’t have to worry about installing anything. The gradlew command will take care of downloading everything that’s required. It’s also already included in our project source.
Let’s test our current setup by building and running our application. In the console, run the following command from the root of our project folder:
$ ./gradlew bootRun

The initial build and project execution will take a few minutes while Gradle downloads dependencies. Once that finishes, the compilation and execution phase will kick in. After a couple of minutes you'll see the message that the embedded Tomcat server is listening on port 8080:
2021-02-04 13:35:25.265  INFO 3744 --- [           main] o.a.c.c.C.[Tomcat].[localhost].[/]       : Initializing Spring embedded WebApplicationContext
2021-02-04 13:35:25.266  INFO 3744 --- [           main] o.s.web.context.ContextLoader            : Root WebApplicationContext: initialization completed in 1181 ms
2021-02-04 13:35:25.475  INFO 3744 --- [           main] o.s.s.concurrent.ThreadPoolTaskExecutor  : Initializing ExecutorService 'applicationTaskExecutor'
2021-02-04 13:35:25.660  INFO 3744 --- [           main] o.s.b.w.embedded.tomcat.TomcatWebServer  : Tomcat started on port(s): 8080 (http) with context path ''
2021-02-04 13:35:25.663  INFO 3744 --- [           main] com.example.logging.LoggingApplication   : Started LoggingApplication in 1.985 seconds (JVM running for 2.349)
Open a browser and enter http://localhost:8080 to see our application:
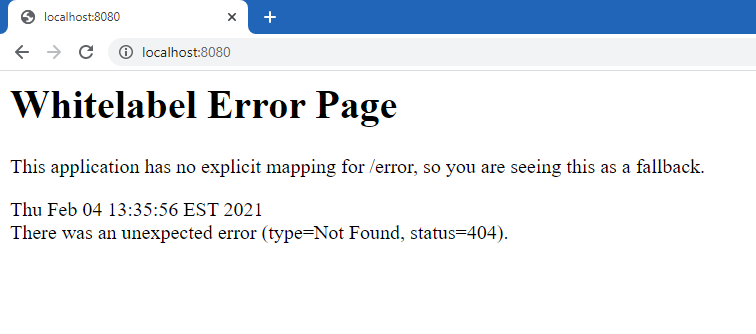
It is an error, but don’t worry, that is expected. For whatever reason, the projects created with Spring Initializr don’t include a default controller. This means Spring Boot has no idea how to handle our request.
Let’s fix that by adding a controller.
Fixing the Spring Boot Starter Project
To create a controller, under the src/main/java/com/example/logging folder, create a new file and name it LoggingController.java and insert the following into it:
package com.example.logging;

import org.springframework.web.bind.annotation.RequestMapping;
import org.springframework.web.bind.annotation.RestController;

@RestController
public class LoggingController {

  @RequestMapping("/")
  public String index() {
    return "Welcome to Spring Logging!";
  }
}
If the application is still running, kill it by pressing Ctrl-C back in the console.
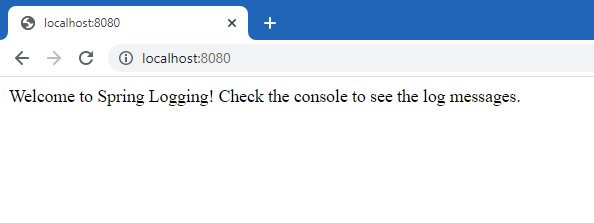
There isn’t any automatic reloading, so to see the result of our changes we need to stop and rerun the application. Once the application finishes restarting, refresh the page in the browser.
You’ll see our welcome message indicating that we have a working project:

We now have a working controller to add our logging statements to. With our base setup done, let’s get to the heart of the article: adding logging.
Using the Default Spring Boot Logger
Spring Boot comes with a preconfigured default logger based on the Logback framework. We can use this logging setup out of the box without any additional configuration since the spring-web-starter package we built our project on includes this dependency already. That’s what we call zero-configuration logging.
The default logger is great for quick prototyping or experimenting. However, we’ll inevitably want a bit more configuration, which we’ll get to in later sections.
First, to update our logging controller to use this built-in logger, update LoggingController.java to the following:
package com.example.logging;

import org.slf4j.Logger;
import org.slf4j.LoggerFactory;
import org.springframework.web.bind.annotation.RequestMapping;
import org.springframework.web.bind.annotation.RestController;

@RestController
public class LoggingController {

  Logger logger = LoggerFactory.getLogger(LoggingController.class);

  @RequestMapping("/")
  public String index() {
    logger.trace("This is a TRACE message.");
    logger.debug("This is a DEBUG message.");
    logger.info("This is an INFO message.");
    logger.warn("This is a WARN message.");
    logger.error("You guessed it, an ERROR message.");

    return "Welcome to Spring Logging! Check the console to see the log messages.";
  }
}
If you haven’t already, stop the current running application by pressing Ctrl-C again in the console. Then, run the updated application again:
$ ./gradlew bootRun
Refresh your browser, and you’ll see our wonderful message:
Once that finishes loading, look over at the console to see our log messages in all their glory:
2021-02-04 13:43:11.939  INFO 12880 --- [nio-8080-exec-1] com.example.logging.LoggingController    : This is an INFO message.
2021-02-04 13:43:11.939  WARN 12880 --- [nio-8080-exec-1] com.example.logging.LoggingController    : This is a WARN message.
2021-02-04 13:43:11.939 ERROR 12880 --- [nio-8080-exec-1] com.example.logging.LoggingController    : You guessed it, an ERROR message.
Hmm… Looks like we’re only seeing the INFO, WARN, and ERROR log level messages, and not the TRACE and DEBUG messages.
If you’re at all familiar with Java logging, this probably won’t come as a surprise. The Spring Boot logger is configured to only log messages of INFO level or higher. We can see the TRACE and DEBUG messages if we add the following to our application.properties file (the file can be found under src/main/resources):
logging.level.root=WARN
logging.level.com.example=TRACE
Now rerun the application and refresh your browser. In the console output you’ll see our missing log statements:
2021-02-04 13:45:51.932 TRACE 1140 --- [nio-8080-exec-1] com.example.logging.LoggingController    : This is a TRACE message.
2021-02-04 13:45:51.932 DEBUG 1140 --- [nio-8080-exec-1] com.example.logging.LoggingController    : This is a DEBUG message.
2021-02-04 13:45:51.932  INFO 1140 --- [nio-8080-exec-1] com.example.logging.LoggingController    : This is an INFO message.
2021-02-04 13:45:51.932  WARN 1140 --- [nio-8080-exec-1] com.example.logging.LoggingController    : This is a WARN message.
2021-02-04 13:45:51.932 ERROR 1140 --- [nio-8080-exec-1] com.example.logging.LoggingController    : You guessed it, an ERROR message.
We now have working code outputting log messages. Let’s move onto configuring Logback by creating a separate configuration file to override the defaults. While we’re at it, we’ll go ahead and add a custom message layout as well.
Enabling Color-Coded Output
With Spring Boot, it’s easy to enable color-coded output for your logging, if you’re using a terminal that supports ANSI. That way, readability can be improved, by having different colors assigned to each log level. Though you can assign custom colors to each log entry, the easiest way is simply go with the defaults. The following table shows the default colors for each level:
| Log Level | Output color |
| TRACE | Green |
| DEBUG | Green |
| INFO | Green |
| WARN | Yellow |
| ERROR | Red |
| FATAL | Red |
We enable this by, again, editing our application.properties file. More specifically, we’ll configure the spring.output.ansi.enabled property.
The possible values for this property are three: ALWAYS, NEVER, and DETECT. The effect of ALWAYS and NEVER are pretty obvious: they enable and disable color-coded output, respectively. DETECT—which is the default value—works by trying to detect whether the terminal has ANSI capabilities. However, some terminals won’t display colorful output unless you explicitly set your configuration to always. That’s what we’ll do. Paste the following line to your file:
spring.output.ansi.enabled=ALWAYS
Go back to the terminal. If the application is running, stop it with CTRL + C. Then, start it again by running $ ./gradlew bootRun. Finally, use your browser and go to localhost:8080. Back to the terminal, you should see the output in color:

Though the colors you see above are the default ones, cccording to Spring Boot’s documentation, this is the complete list of colors and styles supported:
- blue
- cyan
- faint
- green
- magenta
- red
- yellow

Create a Custom Logback Configuration
While we can configure everything we need to for Logback in our application.properties file, this isn’t recommended, as this file is prone to be polluted with a lot of settings for various things in any sizable application.
The recommended way in Spring is to store the Logback configuration in a separate file named logback-spring.xml. Spring will load this before any other Logback configuration if it exists.
Go ahead and create the logback-spring.xml file under src/main/resources in the same place as application.properties and drop the following into it:
<?xml version="1.0" encoding="UTF-8"?>
<configuration>
  <appender name="Console" class="ch.qos.logback.core.ConsoleAppender">
    <layout class="ch.qos.logback.classic.PatternLayout">
      <Pattern>
        %d{yyyy-MM-dd HH:mm:ss} [%thread] %-5level %logger{36} - %msg%n
      </Pattern>
    </layout>
  </appender>

  <root level="info">
    <appender-ref ref="Console" />
  </root>

  <!-- Log everything at the TRACE level -->
  <logger name="com.example" level="trace" additivity="false">
    <appender-ref ref="Console" />
  </logger>
</configuration>
We won’t get into all the details of the Logback configuration here, but we are directing everything at TRACE level or higher (effectively logging everything) in our application to the console. If you want to dive into additional Logback configuration, all of it is well documented.
In short, we create a console log appender and set a custom message pattern. This controls the formatting of any messages being logged with it. Our log messages will now look like this:
2021-02-04 20:49:17 [http-nio-8080-exec-1] TRACE c.example.logging.LoggingController - This is a TRACE message.
2021-02-04 20:49:17 [http-nio-8080-exec-1] DEBUG c.example.logging.LoggingController - This is a DEBUG message.
2021-02-04 20:49:17 [http-nio-8080-exec-1] INFO  c.example.logging.LoggingController - This is an INFO message.
2021-02-04 20:49:17 [http-nio-8080-exec-1] WARN  c.example.logging.LoggingController - This is a WARN message.
2021-02-04 20:49:17 [http-nio-8080-exec-1] ERROR c.example.logging.LoggingController - You guessed it, an ERROR message.
This message pattern uses the following Logback variables:
- %d{yyyy-MM-dd HH:mm:ss}—Date in the specified format
- [%thread] —Current thread identifier writing the message
- %-5level —The message level with five-character, fixed-width spacing
- %logger{36} —The name of the logger writing the message
- %msg%n —The actual message followed by a new line
That’s it for the Logback configuration. This configuration file is also where you can add any additional appenders or formatters. Refer to the Logback documentation for all the configuration examples.
Now let’s swap out our Logback setup for our trusty logging library: Log4j2.
Configure Log4j2 for Logging
Spring Boot uses the SLF4J library under the hood to abstract its logging. This makes switching to Log4j2 relatively simple. It’s just a matter of adding a new configuration file and the Log4j2 dependency to our dependencies.

Since we started with the Spring Boot web starter, we currently have a transitive dependency on the Logback library. The Logback library comes in through the spring-jcl library dependency.
To use Log4j2, we need to first exclude the Logback library. We’ll then include the Log4j2 library. Let’s update our Gradle build to make these changes.
Currently, our Gradle build file, build.gradle, looks like this:
plugins {
   id 'org.springframework.boot' version '2.1.8.RELEASE'
   id 'io.spring.dependency-management' version '1.0.8.RELEASE'
   id 'java'
}

group = 'com.example'
version = '0.0.1-SNAPSHOT'
sourceCompatibility = '1.8'

repositories {
   mavenCentral()
}

dependencies {
   implementation 'org.springframework.boot:spring-boot-starter-web'
   testImplementation 'org.springframework.boot:spring-boot-starter-test'
}
Replace the contents of build.gradle with this:
plugins {
    id 'org.springframework.boot' version '2.1.8.RELEASE'
    id 'io.spring.dependency-management' version '1.0.8.RELEASE'
    id 'java'
}

group = 'com.example'
version = '0.0.1-SNAPSHOT'
sourceCompatibility = '1.8'

repositories {
    mavenCentral()
}

configurations.all {
   exclude group: 'org.springframework.boot', module: 'spring-boot-starter-logging'
}

dependencies {
    implementation 'org.springframework.boot:spring-boot-starter-web'
   implementation 'org.springframework.boot:spring-boot-starter-log4j2'
    testImplementation 'org.springframework.boot:spring-boot-starter-test'
}
In the updated build script, we’ve added an exclude group for the spring-boot-starter-logging module, which is where the Logback dependency comes from. We then add an additional compile time dependency on the spring-boot-starter-log4j2, which, as you guessed right, includes the Log4j2 library and the relevant Spring Boot configuration.
We’ll configure our Log4j2 logging to output the same message format used in our earlier Logback example. Let’s add a Log4j2 configuration file to our project.
Create the following named log4j2-spring.xml file in src/main/resources where our application.properties resides:
<?xml version="1.0" encoding="UTF-8"?> <Configuration>   <Appenders>     <Console name="Console" target="SYSTEM_OUT">       <PatternLayout           pattern="[log4j] %d{yyyy-MM-dd HH:mm:ss} [%thread] %-5level %logger{36} - %msg%n"/>     </Console>   </Appenders>   <Loggers>     <!-- LOG everything at INFO level -->     <Root level="info">       <AppenderRef ref="Console" />     </Root>     <!-- LOG "com.example" at TRACE level -->     <Logger name="com.example" level="trace">     </Logger>   </Loggers> </Configuration>
While this looks very similar to the Logback example, there are a few minor differences. Running our application, we see that we have the same output as before:
[log4j] 2021-02-04 21:02:04 [http-nio-8080-exec-1] TRACE com.example.logging.LoggingController - This is a TRACE message. [log4j] 2021-02-04 21:02:04 [http-nio-8080-exec-1] DEBUG com.example.logging.LoggingController - This is a DEBUG message. [log4j] 2021-02-04 21:02:04 [http-nio-8080-exec-1] INFO com.example.logging.LoggingController - This is an INFO message. [log4j] 2021-02-04 21:02:04 [http-nio-8080-exec-1] WARN com.example.logging.LoggingController - This is a WARN message. [log4j] 2021-02-04 21:02:04 [http-nio-8080-exec-1] ERROR com.example.logging.LoggingController - You guessed it, an ERROR message.
We’ve now successfully swapped out Logback for Log4j2.
Why Use Log4j2 Instead of Logback?
Why would we want to go through this extra setup to use Log4j2 when Logback is ready to go?
Being able to swap over to Log4j2 is handy, especially when moving from an existing project to Spring Boot. We can carry over our existing Log4j2 configuration file and not have to worry about it.

This is particularly useful when working with an existing and complex Log4j2 configuration. It’s common to have various appenders writing to multiple files with different formats or specific package-level logging. We can always convert the configuration into Logback when there’s more time to spare before the release!
While Logback is considered the successor to Log4j2, Log4j2 is still used in many applications. If you’ve never used Logback before, check out the following reasons to switch.
Using Log4J2 Without SLF4J
Keep in mind that, while recommended, it’s not obligatory to use Log4j2 through SLF4J. It’s totally possible to bypass SLFJ and use Log4j2 directly. How to do that?
First, we have to change the imports. Remove the following lines:
import org.slf4j.Logger;
import org.slf4j.LoggerFactory;
And replace them with these ones:
import org.apache.logging.log4j.Logger;
import org.apache.logging.log4j.LogManager;
The next—and last—change is in the code that instantiates the logger. You have to replace the following line:
Logger logger = LoggerFactory.getLogger(LoggingController.class);
With this one:
Logger logger = LogManager.getLogger(LoggingController.class);
That’s it! You’re now logging natively with Log4j2 without using SLF4J. So, what’s the point of that?
Well, SLF4J is a facade or abstraction for many logging frameworks. Its goal is to allow developers to easily and quickly change the logging frameworks used by their applications. As long as you use logging frameworks that adhere to the SLF4J interface, it should be very easy to swap one implementation for another.
That flexibility comes at a cost, though. The various logging frameworks—Log4j2, for instance—will often add valuable exclusive new features you might want to try. However, adhering to SLF4J prevents you from using these new features, since they don’t conform to SLF4J’s interface. So, in short, that’s the reason why you’d want to bypass SLF4J and use Log4j2—or any other logging framework, for that matter—directly.
The End of Our Logging Journey
At this point, you’ve successfully configured Spring Boot to log with two different logging frameworks. We’ve also looked at how to add additional logging configuration to the Spring Boot project. This may also be your first experience using Gradle, and I’d highly recommend trying it out for a while.
Logging is paramount to successfully monitoring and troubleshooting applications. Don’t overlook security needs when adding logging to an application.
It’s important to ensure we aren’t logging sensitive information such as passwords or account details. Refer to the OWASP Logging Cheatsheet for additional suggestions on what to look out for.
And, with that, you should be all set to get started on your own with Spring Boot logging.
The Next Step
What should your next steps be? Firstly, keep reading and practicing. There’s a lot to learn about logging. From the main best practices to how to keep your logs well-formatted, you have enough topics to keep you busy for a while.
Then, once you have a solid understanding of the fundamentals of logging, it’s time to venture into deeper waters. You might want to start learning about more advanced topics, such as log analytics. Why is this important? Well, despite being commonly considered a mechanism for helping in debugging applications, logging can be much more.
Firstly, it can help an organization not only fix problems but prevent them from happening altogether. In addition, logging can be a source of invaluable business insights. By leveraging log aggregation and log analysis, you gain the ability to extract the knowledge buried deep in your log files.
After bringing it to the surface, you can use it to inform your decision-making. And to be able to adopt those processes, you need a comprehensive log management solution. Scalyr is such a platform; we invite you to give it a try, today.

