
Background
When dealing with kernel exploits, the main goal of an attacker would usually be to elevate itself from low privileges to high or system-level privileges. This type of attack is commonly referred to as LPE (local privilege escalation), and can be achieved through a myriad of exploitation techniques, exploiting different classes of vulnerabilities in kernel code, either in NTOSKRNL itself or in 3rd-party drivers.
While Microsoft does a great job in mitigating many of these vulnerabilities, there’s always more room for improvement. As part of this ongoing effort, we started a new, open-source project entitled SKREAM (SentinelOne’s KeRnel Exploits Advanced Mitigations). This project will host multiple independent features meant to detect or mitigate different types/phases of the kernel exploitation lifecycle. Right now it only contains one such mitigation, but stay tuned for more.
In this blog post we will explore the very first mitigation introduced by SKREAM. This mitigation addresses a specific exploitation technique, used mostly when weaponizing pool overflow vulnerabilities, and renders the use of it ineffective on Windows 7 and 8 systems.
Introduction to Kernel Pool Overflows
Kernel pool overflow is a well-known class of vulnerabilities, used extensively by LPE exploits for the past few years. It becomes available when a kernel-mode driver copies user-supplied data into a pool allocation without first validating its size. This allows a malicious user to supply data that is longer than the allocation made by the kernel driver and thus overwrite pool memory that belongs to the next adjacent allocation.
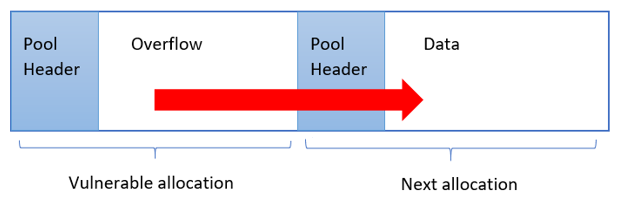
Figure 1 – Schematic illustration of a pool overflow vulnerability
Combined with kernel pool spraying techniques, the contents of the following pool allocation can be made predictable, thus allowing the attacker to completely engineer its overwrite.
TypeIndex Overwrite
There are various methods for actually exploiting a pool overflow vulnerability. In this blog post, we will concentrate our efforts on one specific technique, which works by overwriting the TypeIndex member found in every OBJECT_HEADER structure.
As documented by numerous sources, every object allocated by the Windows object manager has an object header describing it, which immediately follows the respective pool header in memory. This object header contains a member called “TypeIndex”, which serves as an index into the nt!ObTypeIndexTable array.
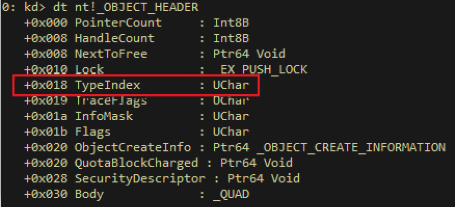
Figure 2 – The in-memory layout of an OBJECT_HEADER structure. Highlighted in red is the TypeIndex member.
The nt!ObTypeIndexTable is an array of OBJECT_TYPE structures, each describing one of the many object types available on Windows (e.g. process, event, desktop. etc.). The OBJECT_TYPE structure supplies Windows – among other things – with the information necessary for performing various operations on the object, such as what methods should be called when the object is opened, closed, deleted, etc.
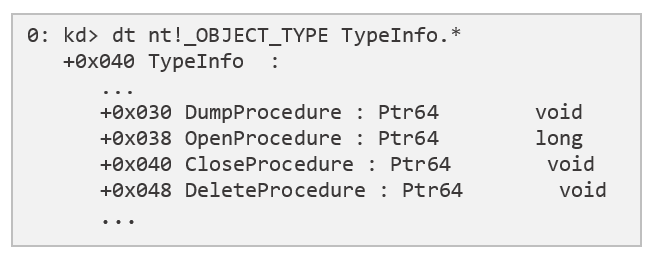
Figure 3 – A few of the methods implemented by every OBJECT_TYPE
As is turns out, the first 2 entries of the nt!ObTypeIndexTable array are actually pseudo-entries which don’t seem to point to actual OBJECT_TYPE structures. The first entry holds a NULL pointer and the second one holds the magic constant 0xbad0b0b0:
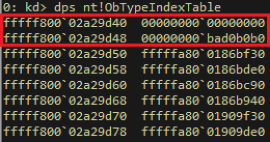
Figure 4 – The first 2 pseudo-entries in the nt!ObTypeIndexTable array
Since on x64 both of these values are zero-extended into user-mode addresses, they unintentionally provide a way for attackers to achieve code execution with kernel-level privileges. Given a pool overflow vulnerability, an attacker could:
- Allocate the page 0xbad0b0b0 resides in and construct there a fake OBJECT_TYPE structure. This fake object type will contain function pointers pointing to the attacker’s elevation-of-privilege code (on Windows 7 x86, we could also allocate the NULL page for that purpose, but on newer Windows versions this is no longer possible).
- Spray the pool with objects of a known type and size. This ensures that the contents of the overflown allocation will be known to the attacker.
- Free some of these objects to create “holes” in the pool. Ideally to the attacker, the overflowing allocation will inhabit one of these “holes”.
- Trigger the vulnerability in order to overflow into the next object, smashing its OBJECT_HEADER and changing its TypeIndex member to 1.
- Trigger some action on the overflown object (e.g. close a handle to it). This will cause the system to fetch the OBJECT_TYPE from 0xbad0b0b0 and call one of its methods (in our example the CloseProcedure). Since this function pointer was provided by the attacker, it actually runs the attacker’s code with kernel-mode permissions, resulting in elevation of privileges.
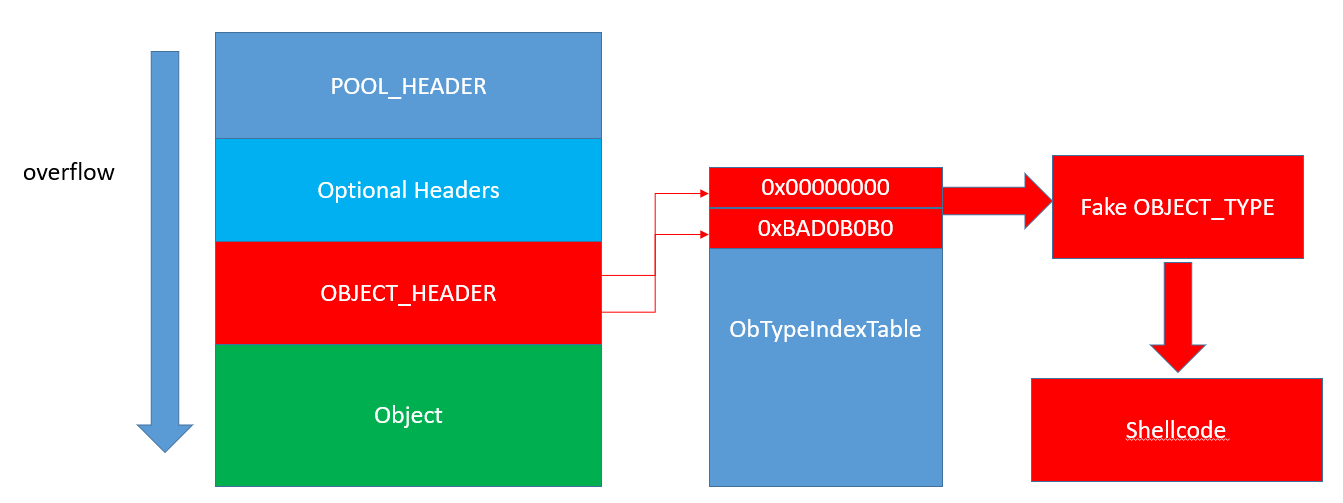
Figure 5 – Pool overflow visualization, by Nikita Tarakanov (source)
This technique was found and developed by Nikita Tarakanov and was first published by him here.
The Mitigation
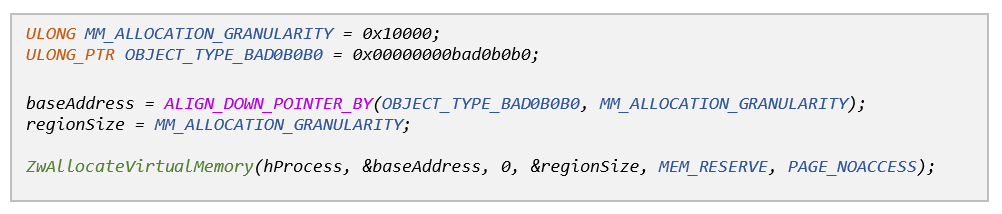
Our proposed mitigation aims to thwart this exploitation technique on a per-process basis by pre-allocating the memory region that contains 0xbad0b0b0, before any exploit gets a chance to abuse it. In order for our mitigation to be as effective as possible we can’t just allocate this page, but have to secure it against malicious attempts to unmap, free or modify it in any way.
A similar project was conducted by Tarjei Mandt back in 2011, where he demonstrated the ability to secure the NULL page against NULL-page dereference exploits on Windows 7 systems. To do so, he wrote a kernel-mode driver which utilized a bunch of VAD (Virtual Address Descriptors) manipulation techniques to manually build a VAD entry for the NULL page and then insert it into the VAD tree as a “synthetic” leaf entry.
We needed to do pretty much the same thing but wanted to do so in a more “organic” fashion – i.e. to offload as much work as possible to the Windows virtual memory manager and thus avoid potential complications. The initial creation of the VAD entry as well as the insertion of it into the VAD tree could be easily offloaded to the system by means of simply allocating the region containing 0xbad0b0b0 (since we know every virtual memory allocation ultimately translates into VAD entry creation).
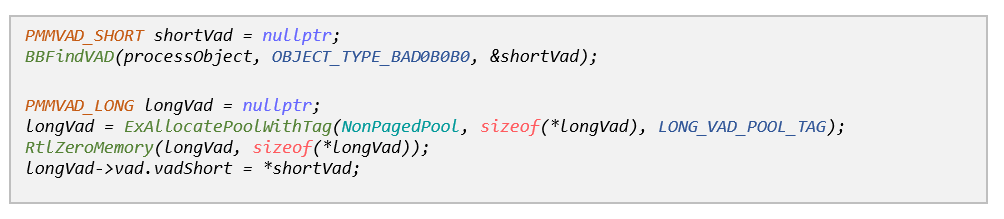
Then we went on to retrieve the VAD entry we have just created so that we could further edit it to meet our needs (i.e. secure the memory range). To do so we borrowed the ‘BBFindVad’ utility function from the Blackbone library, which very conveniently implements this functionality for different Windows versions.
Unfortunately, the VAD entry that was retrieved from the VAD tree was of type MMVAD_SHORT, while the VAD we needed (according to Tarjei’s paper) was of type MMVAD_LONG. It also seemed that the flags we were interested in were located in the MMVAD_LONG structure, and not in the smaller MMVAD_SHORT we had.

Figure 6 – The VAD describing the memory region containing 0cbad0b0b0, before being secured
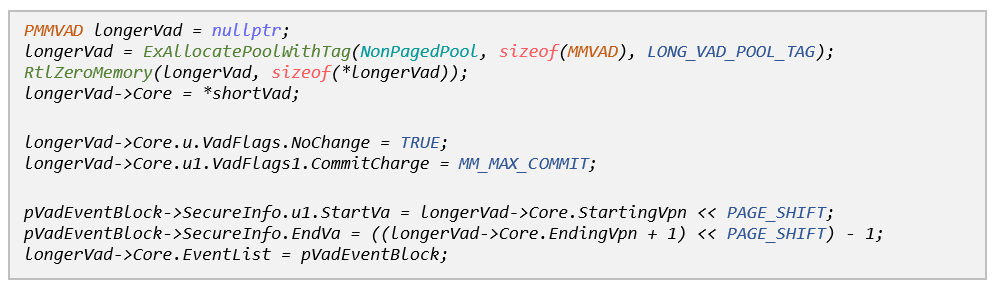
To overcome this discrepancy, we allocated our own MMVAD_LONG structure and started initializing it. As it turns out, every MMVAD_LONG structure has an MMVAD_SHORT substructure embedded inside it, so we could setup this portion by simply copying the MMVAD_SHORT we retrieved earlier.
The next step was to edit the VAD flags so as to make it secure. According to Tarjei’s paper, the modifications we had to make eventually boiled down to this:
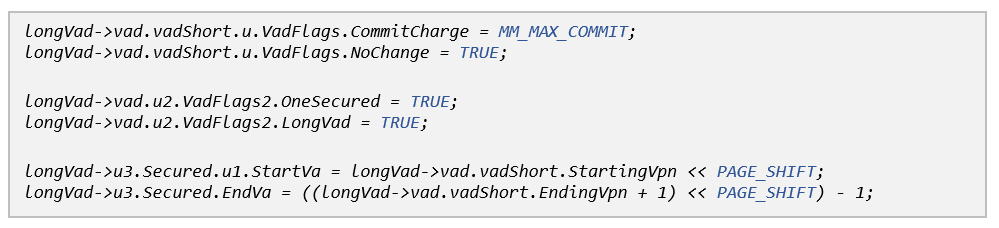
These changes made our VAD look like this:

Figure 7 – The VAD describing the memory region containing 0cbad0b0b0, after being secured
Finally, we needed to replace the MMVAD_SHORT in the VAD tree with our newly-secured MMVAD_LONG. In a nutshell, this involved a three-phase operation:
- Setting the parent node of the short VAD’s children to point to our MMVAD_LONG entry.
- Setting the appropriate child node (either left or right) of the short VAD’s parent to point to our MMVAD_LONG entry.
- Freeing the short VAD entry, as it is no longer referenced by the VAD tree.
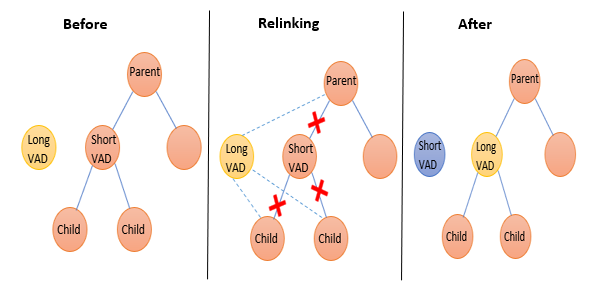
Figure 8 – Replacing the MMVAD_SHORT in the VAD tree with our MMVAD_LONG
Video of SKREAM mitigating pool overflow vulnerability in KdExploitMe
Windows 8
On Windows 8 there were a few minor changes to the various VAD structures, which forced us to make slight adjustments to our codebase:
- There is no longer an MMVAD_LONG structure, only MMVAD_SHORT and MMVAD.
- The flags we set on Windows 7 have either changed their location inside the MMVAD structure (NoChange, StartVA, EndVA), or don’t seem to exist at all (OneSecured).
After taking these into consideration, our code for making the necessary VAD modifications on Windows 8 looked something like this:
Windows 8.1 and Beyond the Infinite
The specific exploitation technique described in this blog post only works on Windows 7 and Windows 8 systems. Starting from Windows 8.1, nt!ObTypeIndexTable[1] no longer points to 0xbad0b0b0, and instead holds the value of nt!MmBadPointer which is guaranteed to cause an access violation when dereferenced. Additionally, in Windows 10 the TypeIndex value stored in the OBJECT_HEADER structure is encoded using a security cookie, so this technique will obviously no longer work on newer Windows systems without some additional work on the attacker’s behalf.

