
Here at the Scalyr blog, we’ve been publishing a long-running series of posts on how to get started logging. Each article in the series focuses on a specific programming language or framework. Today’s post covers neither; instead, we cover a platform by showing you how to get started with Android logging, as quickly as humanly possible.
If you’re familiar with the series, you’ll know how it usually goes. It starts as hands-on as possible, by offering the quickest possible guide on how to get started with logging using the language or framework the post targets. Then, we take a step back and go into a more theoretical territory, by defining logging, explaining what the motivations are behind its use, and the types of information one would typically log. After that, we explain why our initial logging approach, while functional, is insufficient for most real purposes and replace it with a more sophisticated approach.
Today we’re doing this a little bit differently. We start right away with the “proper” approach since it’s probably easier than the quick-and-dirty logging we usually do in other languages. After that, we do the usual explanation of logging, and end showing how to configure our logger in Android.
And what about the language used? We already have a post that covers Java logging, and another one that covers Kotlin. Since we have to pick a language for this guide, let’s go with Kotlin. Let’s get started.

Android Logging: As Easy as It Gets
For this guide, I’m going to use the free Android Studio IDE. If you don’t already have it, please download it and install it so you can follow the tutorial. Also, make sure you have the JDK installed. Everything set? Let’s continue, then.
In order to log, we need an application. We’re going to use a super simple calculator app, but for brevity’s sake, we’ll not cover the creation of the app. To follow the tutorial, clone the application (or download a zip file with the source code) from its repository on GitHub.
All set up? Great! Open the project using Android Studio. Locate and open the mainActivity class. It should look like this (not including the imports):
enum class Operation {
    PLUS, MINUS, TIMES, DIVIDEDBY
}

class MainActivity : AppCompatActivity() {

    override fun onCreate(savedInstanceState: Bundle?) {
        super.onCreate(savedInstanceState)
        setContentView(R.layout.activity_main)
        addButton.setOnClickListener{ sum() }
        minusButton.setOnClickListener{ subtract() }
        timesButton.setOnClickListener{ multiply() }
        divisionButton.setOnClickListener{ divide() }
    }

    private fun sum() {
        resultTextView.text = performOperation(Operation.PLUS).toString()
    }

    private fun subtract() {
        resultTextView.text = performOperation(Operation.MINUS).toString()
    }

    private fun multiply() {
        resultTextView.text = performOperation(Operation.TIMES).toString()
    }

    private fun divide() {
        resultTextView.text = performOperation(Operation.DIVIDEDBY).toString()
    }

    private fun performOperation(operation: Operation): Double {
        var (a, b) = getNumbers()

        return when(operation) {
            Operation.PLUS -> a + b
            Operation.MINUS -> a - b
            Operation.TIMES -> a * b
            Operation.DIVIDEDBY -> a / b
        }
    }

    private fun getNumbers(): Pair<Double, Double> {
        var a = firstNumberEditText.text.toString().toDouble()
        var b = secondNumberEditText.text.toString().toDouble()
        return Pair(a, b)
    }

}
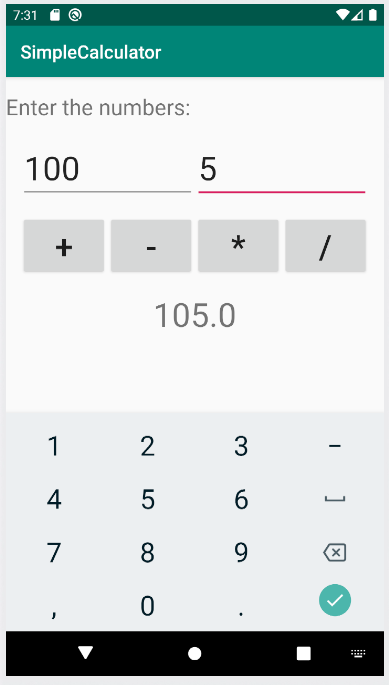
Our app, as mentioned before, is a simple calculator. Its code, as you can see, is short and simple. Run the application and perform some quick calculations using it. That’s how it should look like, running on Android emulator:
Perform some more calculations until you’re satisfied with the app’s functioning. Ready? Let’s go on. Now you’re going to add logging to our app.
As it turns out, in order to log in Android, you don’t need either to devise a complete approach from scratch or to rely on external tools. Android provides an API for logging, in the form of the Log class.
To use the class, the first thing you need to do is add the following line to your list of imports:
import android.util.Log
After you’re done, you’ll need to do a small change to your “sum” function. Its new code should look like this:
private fun sum() {
        Log.i("Main","Trying to perform a sum!")
        resultTextView.text = performOperation(Operation.PLUS).toString()
        Log.i("Main","Sum successfully performed!")
}
Here, we’re using the “i” method, which logs entries using the INFO level. We’re now doing the same with all operations. The complete code with the four functions should look like this:
private fun sum() {
        Log.i("Main","Trying to perform a sum!")
        resultTextView.text = performOperation(Operation.PLUS).toString()
        Log.i("Main","Sum successfully performed!")
    }

private fun subtract() {
    Log.i("Main","Trying to perform a subtraction!")
    resultTextView.text = performOperation(Operation.MINUS).toString()
    Log.i("Main","Subtraction successfully performed!")
}

private fun multiply() {
    Log.i("Main","Trying to perform a multiplication!")
    resultTextView.text = performOperation(Operation.TIMES).toString()
    Log.i("Main","Multiplication successfully performed!")
}

private fun divide() {
    Log.i("Main","Trying to perform a division!")
    resultTextView.text = performOperation(Operation.DIVIDEDBY).toString()
    Log.i("Main","Division successfully performed!")
}
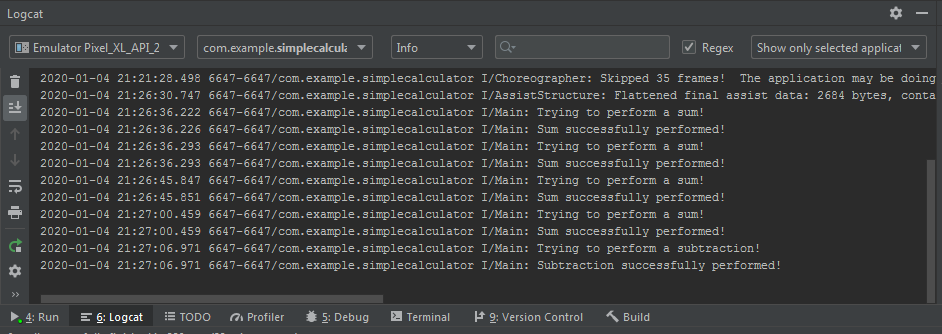
How do we verify whether this is having any effect? You do that by using Logcat. Go to “View,” then “Tool Windows,” and finally, “Logcat.” Then debug the application as usual, and you’ll see the log statements being printed as you perform the calculations:
Now, let’s see a little bit of theory on application logging, both in Android and in general.
Defining Application Logging
There are plenty of definitions for logging around the web, but I’m partial to the one provided in the very first post of our series. It’s short, simple, and straight to the point. Here it is:
Application logging involves recording information about your application’s runtime behavior to a more persistent medium.
Think a little bit about the tiny calculator app we’ve just created. All we did was add those logging statements to it.
Well, before the statements, the app worked as intended, but it didn’t leave any traces of its behavior behind. What if we needed to record the calculations it performed? That’s where logging comes in handy, allowing us to create this historical record, if you will, so we can investigate the event later when the application is no longer running.
In short, application logging is deciding what’s worth capturing and then capturing it and recording it, so it can be accessed later when it’s needed.
The next question then obviously becomes: why do we need to do that?
The General Motivations for Logging
We’ve just covered the “what” of logging. We’ve also touched briefly on the “why,” but in this section, we’re getting a little bit deeper. So, why bother logging?
The first big motivation for logging is troubleshooting. Log entries allow future readers to “time-travel” so they can understand how the application behaved at a certain time. That enables them to retrace the events that took place and the actions taken by the users, in order to understand why a certain error has happened.

It doesn’t have to be all doom and gloom, though. You can—and should—also log “good things,” like registering a user logging in or creating a new document. Logs of this nature are useful to answer business-related questions.
The third big motivation for logging is sort of the evolution of the last point. It’s “logging at service of the business,” on steroids. I’m talking about concepts such as log analytics, predictive analytics, and log analysis. Put simply, instead of just using logging in reactive scenarios (things go wrong, we look at logs to fix them), we can use it in a more proactive way. By aggregating and analyzing their logs, companies can obtain valuable insights and use those to inform their decision-making processes and even prevent problems before they happen.
So, in a nutshell, application logging is a crucial component of healthy software organizations. It helps us detect and fix errors and also to collect information that might improve our businesses, and that’s why we log.
What Goes Into a Log Message?
As you’ve seen, the most basic piece of information you should include in a log entry is a message explaining what the event was. The first thing to remember is that context is king when it comes to log entries. So, write your log messages in such a way that it conveys as much context as possible, so the reader can more easily understand the scenario in which that log entry was created. There’s a lot more to it than that, though, so let’s keep going.
A log represents an event, a “thing” that happened, and someone deemed it important enough to record it. So, after the message, the second most important piece of information we need to include in a log entry is the time. After all, it’s useless to know that something worth capturing happened without knowing when it happened.
Another crucial thing you’ll want to add to your logs is log levels. Even though we have a whole post explaining those, but the TL;DR version is that they’re labels you add to each log entry, to categorize them according to their severity. Afterward, you can use them for searching and filtering, but especially for controlling the destination and granularity of the logs. Speaking of searching and filtering, things like tags and categories for entries are also useful for that end.
If you’re developing a multi-threaded application, then a crucial piece of information you should log is the name of the thread. In a similar vein, a unique id for each event would also be advisable.
These are just some of the possible pieces of data you can include in a log entry. In short, a log entry should have as much context as possible, while remaining both machine-parsible and human-readable.

The Realities and Challenges of Android Logging
During the three previous sections, we’ve discussed some of the fundamentals behind logging. We’ve defined application logging, explained why it’s so important and detailed some of the typical contents of a log entry. All of that is correct, and it’s perfectly valid for the majority of tech environments out there. When it comes to Android, things might be a little more…peculiar.
You see, a great part of the value of logging derives from the possibility of the developers accessing production logs after the fact. So, if you’re developing a web application and things go wrong, you can search through the logs in order to understand the problem.
Things are trickier on Android. As it turns out, in this platform, logging is used mostly as a diagnostic tool by developers. In other words, you log mainly during development mode, in order to troubleshoot and fix problems you come across while working on some new feature or bug fix. In fact, it’s even a good practice to remove all logging statements for an app before it’s deployed.
With that in mind, how to reap all of those benefits of logs we’ve mentioned earlier? That’s an often asked question, and we’ll see some alternatives next.
Crash Reports
Most of the time, you want to consult logs because something went wrong. There are ways to fulfill that need by having access to the application’s crash report.
A popular solution for Android developers is to use the ACRA open-source library.
Google Play Console
Google offers the Play Console, which is a centralized dashboard where developers can monitor their apps. Via the Play Console, you can access both crash reports and ANR (application not responding) statistics for your application.
The Play Console also allows developers to see usage statistics for their apps, as well as track the app’s performance.
Android Logging: What Are the Next Steps?
When it comes to logging, Android is somewhat of a different beast than most other platforms/languages/frameworks we’ve covered during our series.
It has a dead-simple logging API that you can start using in a few seconds. Unlike some other platforms that require you to download and install third-party packages in Android, you can just import a class and start using right away. However, all of that simplicity comes with the price of the challenge that it is to get access to production logs.

In this post, we’ve covered all of that. We’ve covered how to use the “Log” class. We’ve explained the fundamentals behind logging, what its benefits are, and what are the typical pieces of information you’d put in a log entry.
What are the next steps for you?
For starters, you could get better at Logcat. There’s a lot you can learn about this tool, and getting to an advanced level with it will make you more productive, even when using logging for debugging and local troubleshooting purposes only.
Additionally, you could—and should—learn more about the Log class. It has comprehensive documentation covering all of its public API.
When it comes to production monitoring, don’t forget to explore and learn the available tools offered by the Play Console. Alternatively, you can experiment with the ACRA library.
And you can always stay tuned to the blog here at Scalyr for additional posts about logging and logging practices, like this one.
And, of course, don’t forget to stay tuned to the Scalyr blog. New posts about logging and logging best practices keep being published. Additionally, if you ever have the need to log into a platform other than Android, we’ve probably got that covered. Here is a non-exhaustive list of chapters in our ongoing “Get Started Logging” series:
While you’re there, take a look at Scalyr’s product, which is a log aggregation tool that can help your organization organize and analyze large quantities of log entries, obtaining insights from them.
Thanks for reading.

