
Today we add yet another installment to the ongoing “how to get started logging quickly” series. We’ve already covered C#, Java, Python, Ruby, Node.js, and JavaScript.
In this post, we’ll be looking at how to get up and running quickly with Angular logging.
“But wait!” you might be thinking. “Do you mean Angular or AngularJS?” I mean both.
After a bit of Angular history, we’ll look at logging with AngularJS first, and then we’ll use the current Angular version to show you logging in action.
As we did in the previous posts, we’ll also cover what application logging is, and what are the motivations for doing it.
A Bit of Angular History
The history of Google’s Angular development is tumultuous. Each major version made the previous one obsolete, as the codebase in previous Angular versions were not compatible with newer versions.
If the cost of refactoring the entire codebase was too high for your company, you never made the upgrade to newer Angular versions.
Like all front-end development frameworks of the time, Angular started as a JavaScript framework.
The first version of Angular was called AngularJS. The JS in the name stands for JavaScript.
Around 2015 at the Angular Conference, the Angular team announced they were moving to TypeScript instead of JavaScript, which marked another major change in the codebase.

This is when the JS was dropped from the product name and it simply became Angular.
In addition to moving away from JavaScript, newer Angular versions started embracing component- and service-centered development.
While it added more complexity to getting started, this approach is the better architecture for supporting large single-page applications.
Currently, Angular has a very structured and opinionated approach to front-end development.
There you have it—some background on Angular. Now, let’s get started with logging in AngularJS!
Angular Logging Using AngularJS
Let me start with a blast from the past, when Angular was young and called AngularJS. Even though it’s an old version now, there are many current applications still using Angular version 1.
In AngularJS (last version 1.7.2), things were simpler to bootstrap. Let’s revisit a simple example for logging with AngularJS.

With Windows Explorer, I create a new folder called angular-logging. I place this in my development folder on my hard drive.
This folder will contain my two simple files: script.js (containing my logging logic) and index.html (containing my template view).
In Visual Studio Code, I open this folder by choosing File > Open Folder. Then I click File > New File (CTRL+N) and type the file name: script.js.
This new file will contain my Angular 1 controller, which will perform the Angular logging logic.
var loggingModule = angular.module('logExample', []);

loggingModule.controller('LogController', ['$scope', '$log',
    function($scope, $log) {
      $scope.logger = $log;
      $scope.message = 'Angular 1 Logging!';
    }
]);
When creating an Angular controller, we pass in a name for the controller and an array of parameters that define this controller’s dependencies.
In our case, we’re passing the $scope object and the $log module that we’ll use.
The last parameter is the actual function that performs our logic…logging. To keep things simple, we add two variables on the global $scope object: logger and message.
The logger variable is the actual $log library, and the message variable will be bound to the HTML template index.html.
Next, we create the HTML template, our view, that will be controlled by LogController.
<!doctype html>
<html lang="en">
<head>
  <meta charset="UTF-8">
  <title>Example - example-log-service-production</title>
  <script src="https://code.angularjs.org/1.7.5/angular.min.js"></script>
  <script src="script.js"></script>
</head>
<body ng-app="logExample">
  <div ng-controller="LogController">
  <label>Message:
  <input type="text" ng-model="message" /></label>
  <button ng-click="logger.log(message)">log</button>
  <button ng-click="logger.warn(message)">warn</button>
  <button ng-click="logger.info(message)">info</button>
  <button ng-click="logger.error(message)">error</button>
  <button ng-click="logger.debug(message)">debug</button>
</div>
</body>
</html>
What do we have in our HTML view? Let’s take a closer look above, inside index.html.
After importing the Angular library and our controller code, we start binding the HTML elements to the LogController and the message variable.
In addition, we add click listeners using the Angular 1 directive ng-click so that when we click the buttons, our controller’s function will be called.
Testing Our AngularJS Logging Application
In Firefox, I click File > Open File and navigate to my index.html file. Once the file loads, I bring up Firefox Developer Tools and then I click the Console tab.
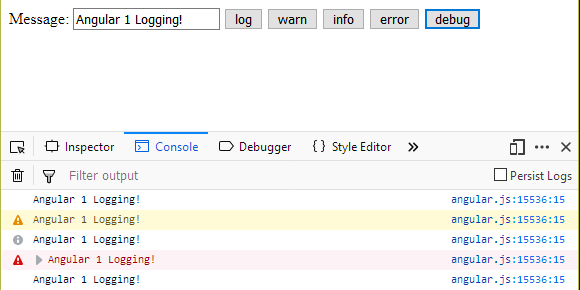
As I click on the buttons, I see the various logging levels displayed. I can also change the text being logged in the Message field since it’s bound two ways to the controller.
In AngularJS, the $log module is a simple wrapper to console.log and doesn’t provide any extra functionality.
There you have it! Logging with AngularJS in a few steps. In AngularJS, things are much simpler.
Now, the next step would be to move on to logging in today’s version of Angular.
In order to do that, we need to build a simple Angular application skeleton. This will prove to be more difficult than it was with AngularJS.

Before starting writing our sample application, though, allow me to take a brief detour. You’ve just written your first AngularJS logger.
But what’s logging, after all? Why should we care about?
The next section will answer these questions, and more.
What Is Application Logging?
You’ve just had your first taste of what Angular logging feels like, by writing the simplest possible AngularJS logging application.
But what exactly is logging? In our C# logging post, we offer the following definition:
Application logging involves recording information about your application’s runtime behavior to a more persistent medium.
As far as definitions go, the one above is one of my favorites ever: it’s short, straightforward, and true.
That’s pretty much logging in a nutshell. You decide what information is worth capturing and then you…well, capture it and write it to someplace for future access.
What’s the Motivation For Logging?
When it comes to logging, the “what” is easy to understand. With that out of the way, let’s think about the “why.”
Why should you care about logging? It all comes down to software’s own nature.
Software in production is a very complicated thing. It often runs in environments you have no control at all over.
When things go wrong, you’re none the wiser about the causes.
This is where logging comes in handy. Long story short, logging gives you time-traveling abilities, so to speak.
By reading the log entries, you go back in time to analyze the application’s behavior, understanding the sequence of events that happened to it.
You could even repeat the actions taken by a user, in order to recreate and fix whatever problem you’re fighting with.
Let’s wrap the section what another quote from the pioneer C# post:
In short, you log so that you can retroactively debug and analyze your application as if you were running it in the moment.
Angular Logging: The Improved Approach
Up until now, the post followed the overall structure of the other posts in the series. We’ve started out by teaching you a simple approach to logging by using AngularJS.
Then, we’ve proceeded to cover some fundamentals: what is application logging? Why should you care?
The third act of the posts in this series is usually dedicated to creating a more realistic logging approach.
In our case, we’re going to do that by showing you an example of logging in Angular.
Building a Simple Angular Application
Now, getting started with Angular is a lot more complicated than with AngularJS.
Gone are the days when you can simply load an HTML file straight from your browser and get going coding very quickly.
Even to get a simple application bootstrapped, you must have a few things installed.
First, you need to install Node.js. Node comes with its own package manager npm, which you’ll need in order to install Angular.
Next, we need to install the Angular command line interface (CLI). Before we can talk about logging with Angular, we’ll need to use Angular CLI to generate an application skeleton:
npm install -g @angular/cliThe -g flag stands for global. If you don’t use -g, Angular CLI will only be installed in the current folder, and it’s not going to be accessible anywhere else.
If you’re on a Mac, you need to put sudo at the beginning of this command to execute it as an administrator. Otherwise, you’ll get permission errors.
If you’re doing this for the first time, this step might take a while. Once you’ve installed Angular CLI, we can create a simple application:
ng new hello-world
Here we’re telling Angular CLI to generate a new project called hello-world and store it in a folder with the same name.
It’ll be created in the folder where you’re running the Angular CLI commands, and it’ll contain all the files needed for the Angular application to run.
Now, let’s run it.
cd hello-world
npm install
ng serve
Ugh! Now you have to wait a little (depending on your machine’s muscles) for Angular to actually compile all that TypeScript code that was generated.
Look for an output like this:
** Angular Live Development Server is listening on localhost:4200,
open your browser on http://localhost:4200/ **

Date: 2018-11-30T02:46:09.577Z
Hash: 4fccbbbd920580e605e9
Time: 25095ms
chunk {main} main.js, main.js.map (main) 15.3 kB [initial] [rendered]
chunk {polyfills} polyfills.js, polyfills.js.map (polyfills) 223 kB [initial] [rendered]
chunk {runtime} runtime.js, runtime.js.map (runtime) 6.08 kB [entry] [rendered]
chunk {styles} styles.js, styles.js.map (styles) 16.2 kB [initial] [rendered]
chunk {vendor} vendor.js, vendor.js.map (vendor) 3.54 MB [initial] [rendered]
i 「wdm」: Compiled successfully.
Testing Our New Angular Application
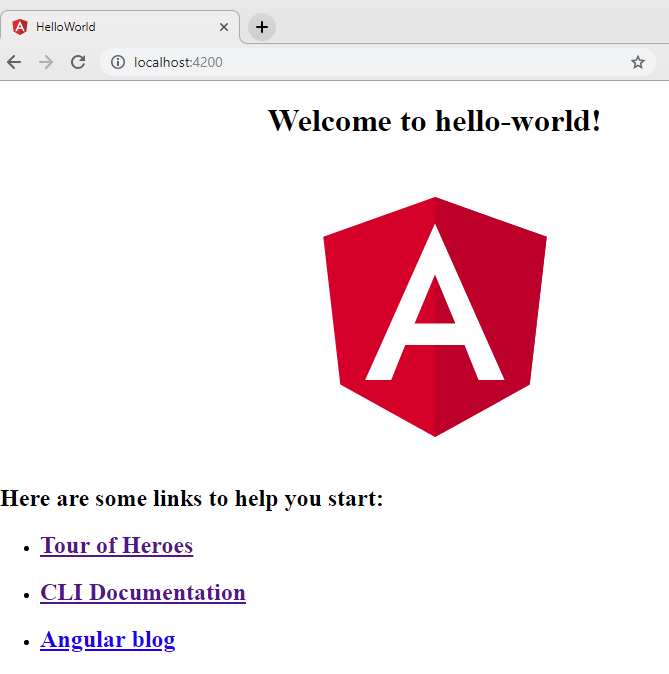
Finally! Now you can simply point your browser to localhost:4200 and see the Angular logo. As you can see, wow—this was not trivial.
Now let’s take a look at the hello-world folder and see what Angular CLI actually created for us:
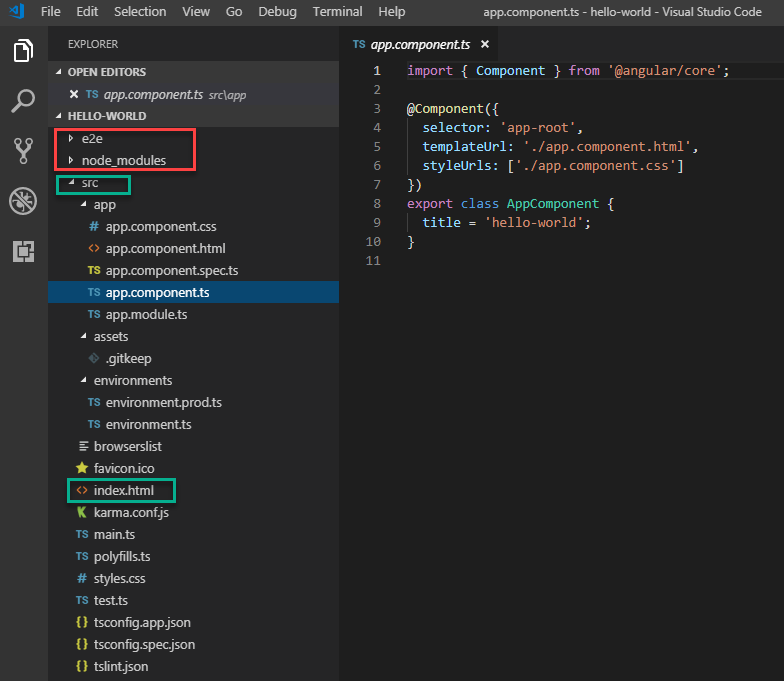
Remember that we’re still trying to get to logging with Angular. But for now, here’s a quick summary of an Angular application structure:
The top folder called e2e is for testing your application. The next one, node_modules, is for all the modules your application needs.
If you expand node_modules, you’ll see that even for the simplest applications, there are a lot of modules needed.
Finally, we get to the src folder that has our source code. This is where we will do our work.
And down the tree, you’ll see index.html, which is your application’s entry point.
Generating an Angular Logging Component
Now, as promised, let’s turn our attention to logging in Angular.
We’ll add a new Angular component that has several buttons, and these buttons will trigger logging at the console at different levels.
In addition, we’ll add a time stamp to each logging statement.
Our first step is to generate a new Angular component for logging. We’ll do this using the Angular CLI in the same folder as our project hello-world.
ng g c logger
In this command, g stands for generate, while c stands for component. Logger is the name of our new component.
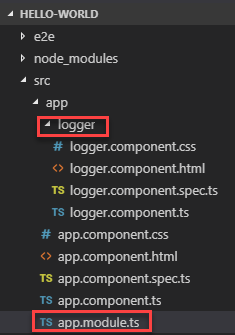
Taking a look at the project folder (hello-world) inside the src/app folder, you should see a new folder called logger.
The logger folder contains the four basic parts of an Angular component: styling (.css), view (.html), test (spec.ts) and model (.ts).
In addition, our application’s module file (app.module.ts) has been modified to automatically import the new component.
import { BrowserModule } from '@angular/platform-browser';
import { NgModule } from '@angular/core';

import { AppComponent } from './app.component';
import { LoggerComponent } from './logger/logger.component';

@NgModule({
  declarations: [
    AppComponent,
    LoggerComponent
  ],
  imports: [
    BrowserModule
  ],
  providers: [],
  bootstrap: [AppComponent]
})
export class AppModule { }
This way, as soon as we generate a new component, we can immediately use it.
So, let’s use our brand-spanking-new Angular component.
Adding Logging Logic in Our Angular Component
To start adding logging logic, we’ll first open our application view file app.component.html.
We generated this file at the very beginning when we created the Hello World application.
Let’s add our new Angular component, as well as the new custom HTML tag that was just created (<app-logger></app-logger>):
<div style="text-align:center">
  <h1>
    Welcome to {{ title }}!
  </h1>
  <img width="300" alt="Angular Logo" src="data:image/svg+xml;base64,PHN2ZyB4bWxucz0iaHR0cDovL3d3dy53My5vcmcvMjAwMC9zdmciIHZpZXdCb3g9IjAgMCAyNTAgMjUwIj4KICAgIDxwYXRoIGZpbGw9IiNERDAwMzEiIGQ9Ik0xMjUgMzBMMzEuOSA2My4ybDE0LjIgMTIzLjFMMTI1IDIzMGw3OC45LTQzLjcgMTQuMi0xMjMuMXoiIC8+CiAgICA8cGF0aCBmaWxsPSIjQzMwMDJGIiBkPSJNMTI1IDMwdjIyLjItLjFWMjMwbDc4LjktNDMuNyAxNC4yLTEyMy4xTDEyNSAzMHoiIC8+CiAgICA8cGF0aCAgZmlsbD0iI0ZGRkZGRiIgZD0iTTEyNSA1Mi4xTDY2LjggMTgyLjZoMjEuN2wxMS43LTI5LjJoNDkuNGwxMS43IDI5LjJIMTgzTDEyNSA1Mi4xem0xNyA4My4zaC0zNGwxNy00MC45IDE3IDQwLjl6IiAvPgogIDwvc3ZnPg==">
  <app-logger></app-logger>
</div>
Now, let’s go inside our new Angular component model (logger.component.ts) and add some logging logic.
import { Component, OnInit } from '@angular/core';

@Component({
  selector: 'app-logger',
  templateUrl: './logger.component.html',
  styleUrls: ['./logger.component.css']
})
export class LoggerComponent implements OnInit {
  title = "Logging in Angular";
  logStatement = "no logging";

  log(level, message) {
    this.logStatement = this.createLogStatement (level, message);
    switch (level) {
      case 'debug' : {
        console.debug(this.logStatement);
        break;
      }
      case 'warning' : {
        console.warn(this.logStatement);
        break;
      }
      case 'info' : {
        console.info(this.logStatement);
        break;
      }
      case 'error' : {
        console.error(this.logStatement);
        break;
      }
    }
  }

  getCurrentDate () {
    let now = new Date();
    return "[" + now.toLocaleString() + "]";
  }

  createLogStatement (level, message) {
    let SEPARATOR = " ";
    let date = this.getCurrentDate();
    return "[" + level + "]" + SEPARATOR + date + SEPARATOR + message;
  }
  constructor() { }
  ngOnInit() {
    this.log("info", "logger initialized");
  }

}
Let’s take a look at our model file. Our main method is log (level, message) method that simply logs to the console the message passed in, according to the level passed in.
Let’s take a look at our model file above (logger.component.ts).
Our main method is log (level, message), and it simply logs to the console the message passed in as a parameter.
Additionally, logging is done according to the logging level, also passed in as a parameter.
We then finish formatting each log statement to include the level and a simple timestamp, in addition to the message.
Now, let’s add our controls to the HTML view in logger.component.html:
<h2>{{ title }}</h2>
<button (click)="log('debug', 'Clicked debug')">debug</button>
<button (click)="log('info', 'Clicked info')">info</button>
<button (click)="log('warning', 'Clicked warn')">warn</button>
<button (click)="log('error', 'Clicked error')">error</button>
<h3>{{ logStatement }}</h3>
Let’s note a few things here in our view. First notice lines 1 and 6: {{title}} and {{logStatement}}.
These are our model variables bound to our view. In Angular, they’re bound two ways, which means that if the value changes in the view, the model value is updated and vice versa.
If you change the value in the model, the value in the view will also be updated.
In our particular case, the {{logStatement}} will change in our model as we click the various logging level buttons.
The HTML view will update when the model value updates.
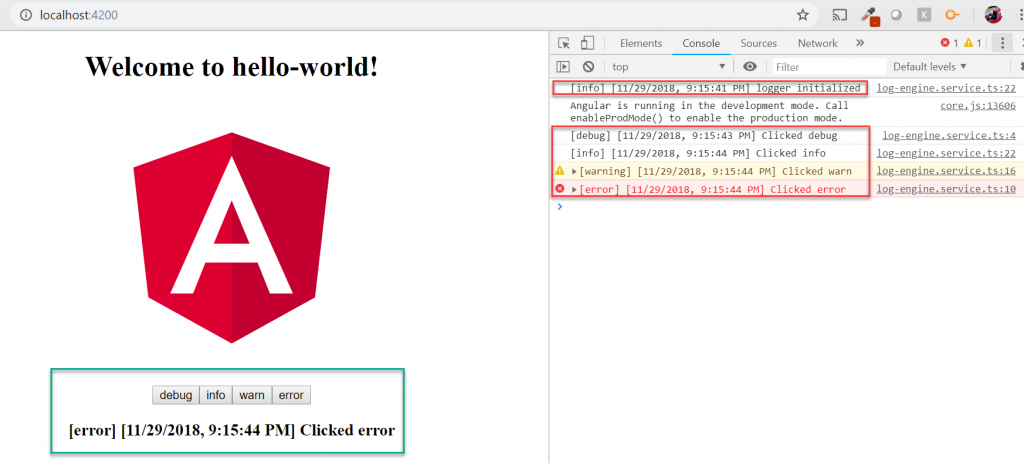
Let’s take a look at our Angular logging application:
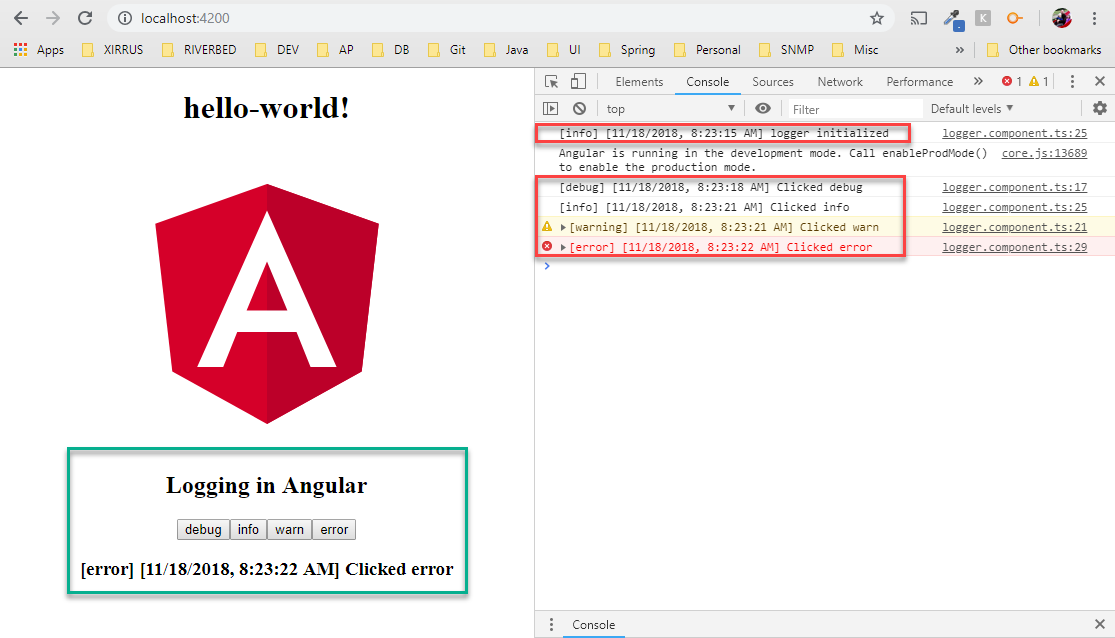
On the right-hand side, we have our Google Chrome console, which displays first the message in the ngOnInit method.
Then, as we click on the various logging buttons, we log to the console in the appropriate logging level.
Generating a New Service With Angular CLI
Logging inside an Angular component was a very quick way to log with Angular, certainly. But that’s not the proper way to create a logging utility that can be reused to log in our Angular application.
To do it properly, let’s create a logging service called LogEngine.
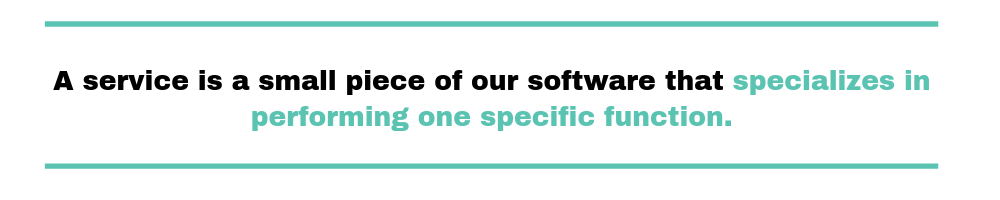
A service is a small piece of our software that specializes in performing one specific function. Our new service specializes in logging messages to the console.
This time, since we already have our logger component, let’s create an Angular service that will contain our logging logic. We’ll also change our logger component to only have our user interface that will use the new service.
We could simply use the Angular CLI again to generate a service, just as we generated the Angular component above.
To do that, in a terminal window, we’d make sure we’re inside our hello-world folder. We’d then use Angular CLI to generate a service instead of a component:
ng g s services/log-engine/logEngine
As usual, g stands for generate, while s stands for service. We’re naming our logging service logEngine. Notice that in addition to the service name, we also include the path to this new service.
And let me share a piece of advice: make sure you don’t use the word “service” in the name of your service when you’re creating through the CLI.
Angular CLI automatically adds the word “service” to the class definition.
But I chose not to generate our new service using Angular CLI. Let’s discuss how to do this manually instead.
Creating a New Angular Logging Service Manually
This time, let’s create the new Angular logging service manually.
It’s good to know how to do this because, many times, it’s helpful to see what happens behind the scenes when things are generated for us.
In Visual Studio Code, under src/app, we’ll create a new folder called services.
Inside that, create another new folder called log-engine.
This folder will hold our logEngine service. Inside this new folder, let’s create a new file called log-engine.service.ts. This is our service file.
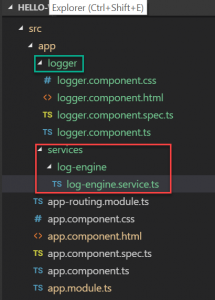
Next, let’s take a look at our IDE. We should still see the logger component folder from above. Now we have the services folder with the log-engine subfolder inside it.
It’s here that we’ll find our new log-engine.service.ts file. In this file, we’ll create our LogEngineService logic.
Now, let’s move all our logging logic from the old logger.component.ts to the new logging service, log-engine.service.ts.
We’ll also refactor our logging methods to better resemble a normal logging interface, with specific methods for each logging level.
Moving Logging Logic to the New Angular Service
At this point, we’ll simply move our existing logging logic from our logger component to our new LogEngineService.
In addition, we’ll refactor the existing log method and split it into specific methods dedicated to each log level.
This is a much better interface for logging, as it resembles the well-known console logging interface.
export class LogEngineService {
  debug(message: string)   {
    let logEntry = this.createLogStatement('debug', message)
    console.info(logEntry);
    return logEntry;
  }

  error(message: string) {
    let logEntry = this.createLogStatement('error', message)
    console.error(logEntry);
    return logEntry;
  }

  warn(message: string)  {
    let logEntry = this.createLogStatement('warning', message)
    console.warn(logEntry);
    return logEntry;
  }

  info(message: string) {
    let logEntry = this.createLogStatement('info', message)
    console.info(logEntry);
    return logEntry;
  }

  createLogStatement (level, message) {
    let SEPARATOR = " ";
    let date = this.getCurrentDate();
    return "[" + level + "]" + SEPARATOR + date + SEPARATOR + message;
  }

  getCurrentDate () {
    let now = new Date();
    return "[" + now.toLocaleString() + "]";
  }

  constructor() { }
}
Notice that the class name is LogEngineService. Angular CLI automatically adds the word “service” when creating a service.
And we should do the same, even though we’re creating the file manually.
We still want to add the logging level and the timestamp in each log entry. In addition, each method in our LogEngineService returns each log entry.
We want to also display the logging statement in our application via our HTML view. This will become clearer in a little bit.
Now let’s wire our LogEngineService and use it in our logger Angular component.
Wiring the New Angular Logging Service
Now let’s work on wiring the new logging service. To do that, open app.module.ts.
Here is where we define our application-level dependencies. We need to add our new service as one of the providers.
@NgModule({
  declarations: [
    AppComponent,
    LoggerComponent
  ],
  imports: [
    BrowserModule,
    AppRoutingModule
  ],
  providers: [LogEngineService],
  bootstrap: [AppComponent]
})
export class AppModule { }
Notice that we added LogEngineService in the providers list—providers: [LogEngineService].
Using Our Service Inside Our Angular Component
Next in our journey toward logging quickly with Angular, we need to add LogEngineService to our logger component inside logger.component.ts.
Let’s take a look at the import statement on top of the file:
import { Component, OnInit } from '@angular/core';
import { LogEngineService } from '../services/log-engine/log-engine.service';

@Component({
  selector: 'app-logger',
  templateUrl: './logger.component.html',
  styleUrls: ['./logger.component.css']
})
Now our existing logger component is ready to use our new logEngine service. I’ve also refactored our existing component so it has clear button listeners, specific to each button.
Our old component doesn’t have any logging logic because we’ve moved all that logic to our new service.
Let’s take a look again at the entire logger.component.ts file:
import { Component, OnInit } from '@angular/core';
import { LogEngineService } from '../services/log-engine/log-engine.service';

@Component({
  selector: 'app-logger',
  templateUrl: './logger.component.html',
  styleUrls: ['./logger.component.css']
})

export class LoggerComponent implements OnInit {
  logStatement = "no logging";

  constructor(private logService: LogEngineService) {
  }

  debugClicked (message) {
    this.logStatement = this.logService.debug(message);
  }

  warnClicked (message) {
    this.logStatement = this.logService.warn(message);
  }

  errorClicked (message) {
    this.logStatement = this.logService.error(message);
  }

  infoClicked (message) {
    this.logStatement = this.logService.info(message);
  }

  ngOnInit() {
    this.logStatement = "logger initialized";
    this.logService.info(this.logStatement);
  }

}
I’m sure you quickly noticed the new button listeners. But what’s logService?
Well, it’s our new LogEngineService that we just created and imported into our logger component.
Notice the constructor. That’s how LogEngineService becomes logService:
constructor(private logService: LogEngineService) { }
Now all our button listeners can use the logService instance to call the logging methods on our new service.
Take special note of the logStatement variable. We bind this model variable to our HTML view.
Our LogEngineService updates this variable with the value of the last log entry. That’s why our LogEngineService log methods return every log entry.
Refactoring the HTML View and Retesting
The last step is to update our logger component’s HTML view (logger.component.html) to use the new button listeners that we just created:
<h2>{{ title }}</h2>
<button (click)="debugClicked('Clicked debug')">debug</button>
<button (click)="infoClicked('Clicked info')">info</button>
<button (click)="warnClicked('Clicked warn')">warn</button>
<button (click)="errorClicked('Clicked error')">error</button>
<h3>{{ logStatement }}</h3>
Here, we just added calls to each button listener with a message.
We no longer have to pass the desired logging level since each button listener will send the right logging level to the LogEngineService methods.
All we have to do now is to save all files and refresh our application running at localhost:4200. Let’s take a look:
There you have it! Same exact functionality as we previously implemented when we were logging from inside the container itself.
However, now we have an independent Angular service, specialized in logging our messages, embellished with the logging level and timestamp.
Enhance Your Angular Logging Approach!
In this post, we attempted to get started logging quickly with Angular and AngularJS. We also touched on installing Angular CLI and using it for creating a skeleton for developing with Angular.
Plus, we refactored our logging component so that it uses an Angular logging service. That equates to much better organization of our code and logic.
It’s probably obvious that logging to the console doesn’t bring much value other than during debugging.
However, after exploring Angular services, you should have some ideas now how you could enhance your logging service so that it can persist logs via REST calls or integrate with a log aggregation service.
So go forth and log in Angular like a pro!

