
In the previous post in this series, we looked at powering up radare2 with aliases and macros to make our work more productive, but sometimes we need the ability to automate more complex tasks, extend our analyses by bringing in other tools, or process files in batches. Most reverse engineering platforms have some kind of scripting engine to help achieve this kind of heavy lifting and radare2 does, too. In this post, we’ll learn how to drive radare2 with r2pipe and tackle three different challenges that are common to RE automation: decrypting strings, applying comments, and processing files in batches.
Scripting radare2 with C, Go, Swift, Perl, Python, Ruby…
No matter what language you’re most comfortable working in, there’s a good chance that r2pipe supports it. There are 22 supported languages, though they are not all supported equally.
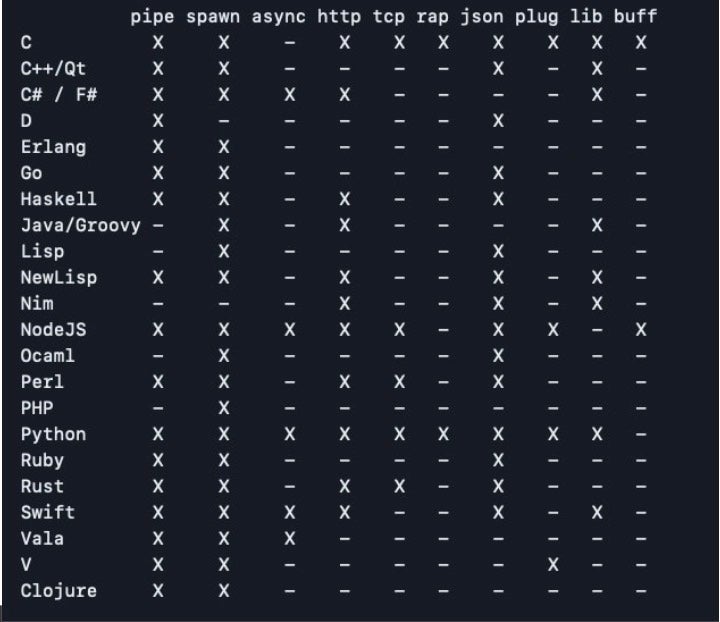
C, NodeJS, Python and Swift are the most well-supported languages, but I tend to use Go for speed and brevity, and it lets me hack scripts together rather haphazardly to achieve what I need. When scripting your own reversing sessions, there’s little need to worry about the niceties of programming style or convention as we would do when shipping code for production or other purposes. Although performance can be improved by doing things in one language rather than another, that’s something I rarely need to worry about in practice in my reversing work.
All that’s a preamble to saying that you can – and probably should! – write better scripts than those I’ll show here, but these examples will serve as a good introduction to how you can easily hack your way around problems thanks to r2’s shell integration to get a working solution without worrying too much about “the right” or “the best” way to do it.
Automated String Decryption in OSX.Fairytale
We’ll use a sample of OSX.Fairytale to illustrate automated string decryption. Though I’ll be using Go, you can easily apply the same techniques in whatever other language you prefer.
Like many simple malware families, Fairytale encrypts strings with a combination of base64 and a hard coded XOR key. In this case, the XOR key is 0x30.

Once we have determined the XOR key, there’s various simple ways to decrypt a given string or even the whole binary (e.g., cyberchef, or writing your own decryption function), but our eventual aim is to add comments to the disassembly (as well as learn a few useful tricks), so we’ll take a different approach.
Note that radare2 comes with a useful little tool called rahash2 , which among other things, can decrypt strings. Here’s an example you can run on the command line:
% rahash2 -D base64 -s 'H1JZXh9cUUVeU1hTRFw=' | rahash2 -D xor -S 0x30 -
/bin/launchctl%
As we discussed in the previous post, we could easily make this into a function in our .zshrc file. However, one drawback with that approach is r2 won’t let us call such functions from the r2 prompt. We can solve that by creating a standalone executable and saving it in our path, like so:
#!/bin/zsh
if [ "$#" -eq 2 ]; then
	echo $(rahash2 -D xor -S $1 -s $2)
elif [ "$#" -eq 3 ]; then
	echo $(rahash2 -D base64 -s $3 | rahash2 -D xor -S $2 -)
elif [ "$#" -eq 1 ]; then
	echo "
		  # USAGE:
			# rxorb
			# rxorb 0x30 "\|YRBQBI"
			# Use '-b' to base64 decode the string before the xor
			# rxorb -b 0x30 FXAffFlSQlFCSR98UUVeU1hxV1VeREMfFXAeQFxZQ0Q=
		"
else
	echo "INPUT ERROR, type 'rxorb help' for help."
fi
Saving this as /usr/local/bin/rxorb and giving it executable permissions (e.g., via chmod +X) will now make this available to us both on the command line and from within r2, once we open a new shell and new r2 session.

Great, we now have a general string decryption tool that we can feed a string, a key and cipher text and we are able to specify whether the cipher needs to be base64 decoded before being XOR’d with the given key. This alone will take care of a lot of use cases!
However, while this works well for manual decryption, it becomes tedious for anything more than a few strings. What would be much better is if we could simply type one command that would iterate over encrypted strings in the binary and either print out all the decrypted text or comment the code where the string is referenced. Ideally, our solution should give us the option to do both.
Let’s see how we can implement that by leveraging radare2’s scripting engine, r2pipe (aka r2p).
Building the Script
We’ll call the Go program “decode.go”, and the first part of it requires importing the r2pipe package from github.
package main
import (
  "fmt"
  "github.com/radareorg/r2pipe-go"
)

var r2p, _ = r2pipe.NewPipe("") 	// Declare r2p as a global

func check(err error) {
     if err != nil {
	panic(err)
     }
}
After the imports, we declare a global variable r2p, which provides a pipe to the r2 instance when we call it from within an r2 session. This global will allow us to send and receive commands to the r2 session. We also implement a generic error function for use throughout the code.
Next, we’ll implement a decrypt function. We could (and probably should) write a native version of this, but since we already have a decrypt function using rahash2 above, we’ll reuse that. This will also allow us to see and solve some other common challenges we might face in other scenarios.
func decryptStrAtLoc(loc string, key string) {
     bytes := fmt.Sprintf("ps @ %s", loc) 		// [1]
     str, err := r2p.Cmd(bytes)
     check(err)
     decodeCmd := fmt.Sprintf("!rxorb -b %s %s > /tmp/rxorb.txt", key, str) // [2]
     r2p.Cmd(decodeCmd)
}
The decryptStrAtLoc() function does most of the work in our program. As parameters, it takes an address and the XOR key. We’ve chosen not to return the decrypted string to the caller but instead consume it within the function. We’ll see why shortly.
For each command we want to pass to the r2 session, we first format the command as a string, then pass the command to r2p. Thus, [1] formats a command that returns the bytes at the current address as a string. At [2], we format a command that decodes the string by passing it to the rxorb utility we wrote earlier.
As r2pipe’s Go implementation doesn’t support easy capture of stderr and stdout, we write this to a temporary file, which we’ll consume in the next part of the code. Had we chosen to implement the XOR decryption natively in our code, we could have avoided that, but seeing how to deal with stdout when using r2pipe and Go is a useful exercise for other scripts.
func writeCommentAtLoc(loc string) {
     readCmd := fmt.Sprintf("CCu `!cat -v /tmp/rxorb.txt | sed 's/\\(.*\\)/\"\\1\"/g'` @ %s", loc)
     r2p.Cmd(readCmd)
}
Our decoded string is now sitting in a file in /tmp. In the function above we do two things with one command: we read the string into a buffer and we write it out as a comment at the disassembly address in the file under analysis. The sed code is another work around for wrapping the string in quotes so that any special characters in the string do not get interpreted by the r2 shell when we pass it back.
func printCommentAtLoc(loc string) {
     pdCmd := fmt.Sprintf("pd 1 @ %s", loc)   // [3]
     pdStr, _ := r2p.Cmd(pdCmd)
     fmt.Println(pdStr)
}
We next implement a function that will print out the disassembly along with the commented string to the r2 prompt. At [3], the “pd 1” command tells r2 to print one line of disassembly from the given address.
Finally, we implement our main() function that will call all this code as well as handle cleaning up the temporary file now that we’re done.
func main() {
     key := "0x30"
     addr, err := r2p.Cmd("s") 			// [4] 's' = return current address
     check(err)
     decryptStrAtLoc(addr, key)
     writeCommentAtLoc(addr)
     printCommentAtLoc(addr)

     delCmd := fmt.Sprintf("!rm /tmp/rxorb.txt")  // clean up the temp file
     r2p.Cmd(delCmd)
     if err != nil {
     	 fmt.Println(err)
     }
     defer r2p.Close()
}
Note that at [4], due to the simplicity of the command, we just supplied the command directly to r2p.Cmd rather than format a separate string. The entire script can be found here.
Using the Script
To use the script, build the decode.go program and take a note of the output path. Open an r2 session with the target binary and at the prompt type:
#!pipe /usr/local/bin/godec/decode # change the path to suit
If you hit return now, you’ll likely see an error and then some disassembly.
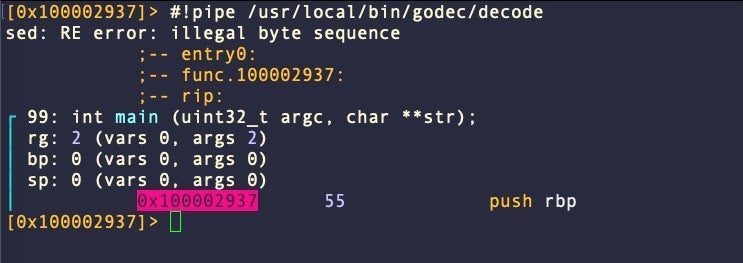
That’s because we have executed the script while located at an address that does not contain any strings to consume. Let’s find an encrypted string and try again. The r2 command izz~== will output any strings in the binary that contain “==” – a common padding for base64-encoded strings.
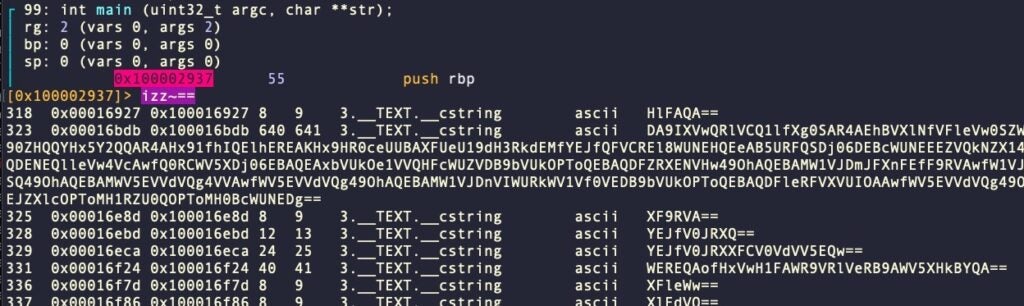
Let’s seek to location 0x100016bdb to test our decryption program.
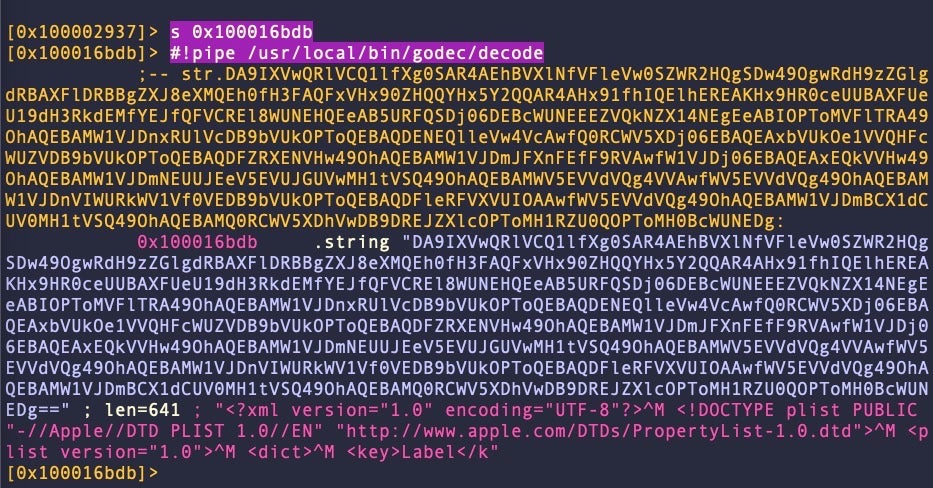
We can see that our decoder has appended a comment containing the decrypted string, which looks like the beginning of a LaunchAgent or LaunchDaemon plist. Great! Let’s try again, this time feeding it all the strings that contain “==” in one go. Try this:
#!pipe /usr/local/bin/godec/decode @@=`izz~==[2]`
Here’s an example of the output:
At this point, since the #!pipe command is awkward to remember and type out every time, you might want to create an alias and/or macro for that.
$dec=#!pipe /usr/local/bin/godec/decode
(script x;  #!pipe $0)
The $dec alias allows us to call this particular script easily, while the script macro allows us to pass in any script path as an argument to the #!pipe command.
Note that we didn’t decode all encrypted strings in the binary. We could iterate over all strings (including non-encrypted ones) with something like $dec @@=`izz~cstring` but that will lead to errors. The right way to approach this would be to add code to our program that determines whether the string at the current address is a valid base64 encoded string or not. We’ll leave that as an exercise for the reader.
Our script could also do with some other improvements: passing the key as an argument would make it more reusable, and of course, there are many points where we lazily use r2 to shell out rather than using Go’s own os package, but for now, this simple script will handle the job it was intended for and is simple to repurpose or build on.
Running a Script Without an Interactive radare2 Prompt
Sometimes you just need to run a script and get the results without needing an interactive r2 prompt. You can tell r2 to execute a script on a binary, either before or after loading the binary, with the -i and -I flags, respectively. The -q option will tell r2 to quit after running the script.
r2 -Iq <script file> <binary>
You can also do the same thing with commands, aliases and macros directly without using a script, using the -c option. For example, this will print out the result of the meta macro without leaving you in an r2 session:
r2 -qc ".(meta)" /bin/ls
Batch Processing Files with a radare2 Script
If you want to process a number of files without having to start an r2 session for each one, you can pass the file path to your script as an argument when you call r2pipe as follows:
func main() {
	args := os.Args
	if len(args) < 2 || len(args) > 2 {
		fmt.Printf("Usage: Provide path to a binary.")
		os.Exit(1)
	}

	argPath := os.Args[1]
	r2p, err := r2pipe.NewPipe(argPath)
	check(err)
	defer r2p.Close()
	r2p.Cmd("aaa") // run analysis

	// do your stuff
	// write results to file or stdout
}
You can now process all files in a folder from the command line with something like:
% for i in ./*; do my_r2pipe_script $i; done
Conclusion
In this post, we’ve learned a number of useful skills. We’ve seen how to automate tasks like grabbing disassembly, adding comments, and decoding strings, and we have navigated some of the complexities of dealing with stdout when using Go to drive r2pipe.
We’ve looked at how to pass file paths as arguments and how to run scripts, commands and macros without opening an interactive radare2 session. With a good understanding of the r2 commands explored throughout this series, you should now be able to readily adapt these skills to other automation tasks.
References and Further Reading
R2pipe – The Official Radare2 Book
Radare2-r2pipe-api repository
Radare2 Python Scripting
Automating RE Using r2pipe
Decrypting Mirai configuration With radare2
Running r2Pipe Python in batch
Scripting r2 with Pipes