Daniel Bunce explaining how to decrypt communication traffic between an attacker’s C2 and an endpoint infected with ISFB/Ursnif malware.
Carrying on from last week’s topic of writing malware configuration extractors for ISFB/Ursnif, this week we will be taking a look at writing a traffic decrypter for ISFB. Our aim is to pass a binary and PCAP as an argument and decrypt the traffic to get access to downloaded payloads, received commands, and more.
Traffic Decrypters are very useful when dealing with a prior infection as they allow the analyst to understand what data was received from and sent to the C2 server. The only downside is a packet capture is obviously required to get a full overview of what occured.
In this post, I will be using the Ursnif payload and corresponding PCAP from the Malware Traffic Analysis site which you can find here.
Summary of the Network Protocol
In this post, I won’t be covering the reverse engineering of the network protocol; however, I will sum it up.
-
- The payload sends an initial GET request to the C2, typically pointing to the directory
/images/with a long string of Base64 encoded, Serpent-CBC encrypted data containing information about the PC and implant. - If the C2 is online, it will reply with a chunk of Base64 encoded and Serpent-CBC encrypted data. The last 64 bytes, however, are not Serpent-CBC encrypted and are in fact encrypted using RSA. Upon decoding and decrypting this using the RSA key embedded in the executable (pointed to by the JJ structure we discussed last time), we are left with data following a similar structure as seen below.
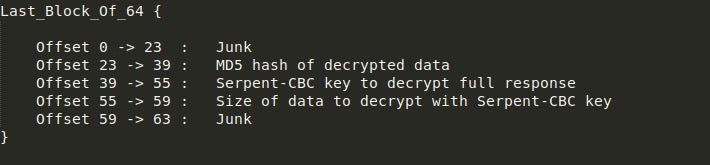
- Using the Serpent-CBC key, MD5, and Size, the sample will decrypt the response and validate it using the MD5 sum. What the sample does next depends on what was received.
- Typically, this is used to download the final stage of ISFB, which will be executed after being downloaded.
- The payload sends an initial GET request to the C2, typically pointing to the directory
So, with that covered, let’s take a look at writing a script to extract and decrypt responses!
Writing main() For Our Traffic Decryptor
So the main function only needs to do two things – accept the PCAP and filename as arguments (which can be done very easily with argparse), and then call the functions responsible for gathering packets, extracting the necessary keys, and then decrypting the packets. 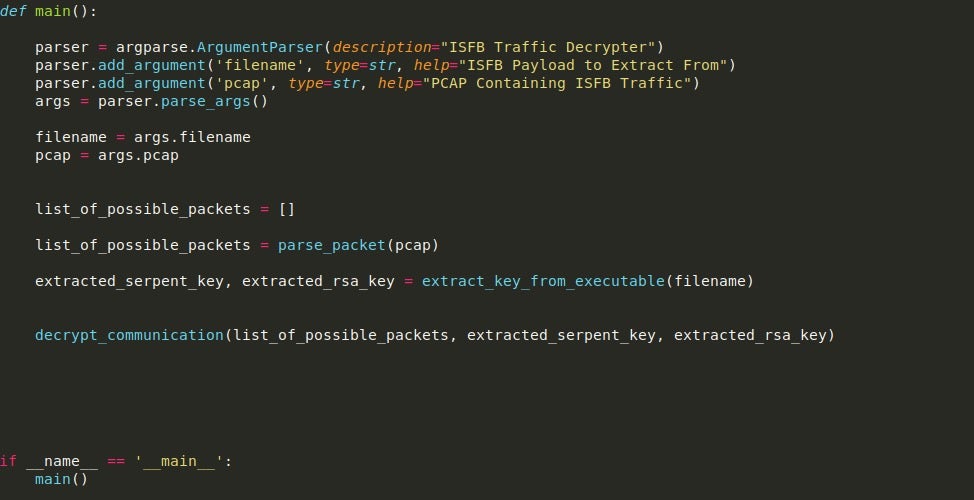
With that function complete, let’s move onto scanning the PCAP for suspicious packets that could be responses from the C2 server.
Parsing PCAP Files With parse_packet()
In order to parse the given PCAP I will be using the Scapy module as it contains tools allowing us to easily locate and identify whether a packet is from a possible C2. We can read in the PCAP using rdpcap(), which will store each packet in a list allowing us to loop through it, checking each packet for certain signs.
Firstly, we can filter for the packets that contain some form of raw data inside them. We can then load this raw data into a variable for further parsing.
The raw data contains the headers of the packet, and the chunk of data sent/received, so we can split it using the n delimiter to search specific lines for values. In the first loop seen in the image, we are checking for GET requests pointing to the /images/ directory, and if the packet matches the condition, the destination IP address is appended to the list suspect_c2. Due to some false positives I had in this script, specifically packets containing the strings “GET” and “/images/” due to google searches contaminating the PCAP, I added an additional check for the string “google.com” to prevent false IP’s being added to the list.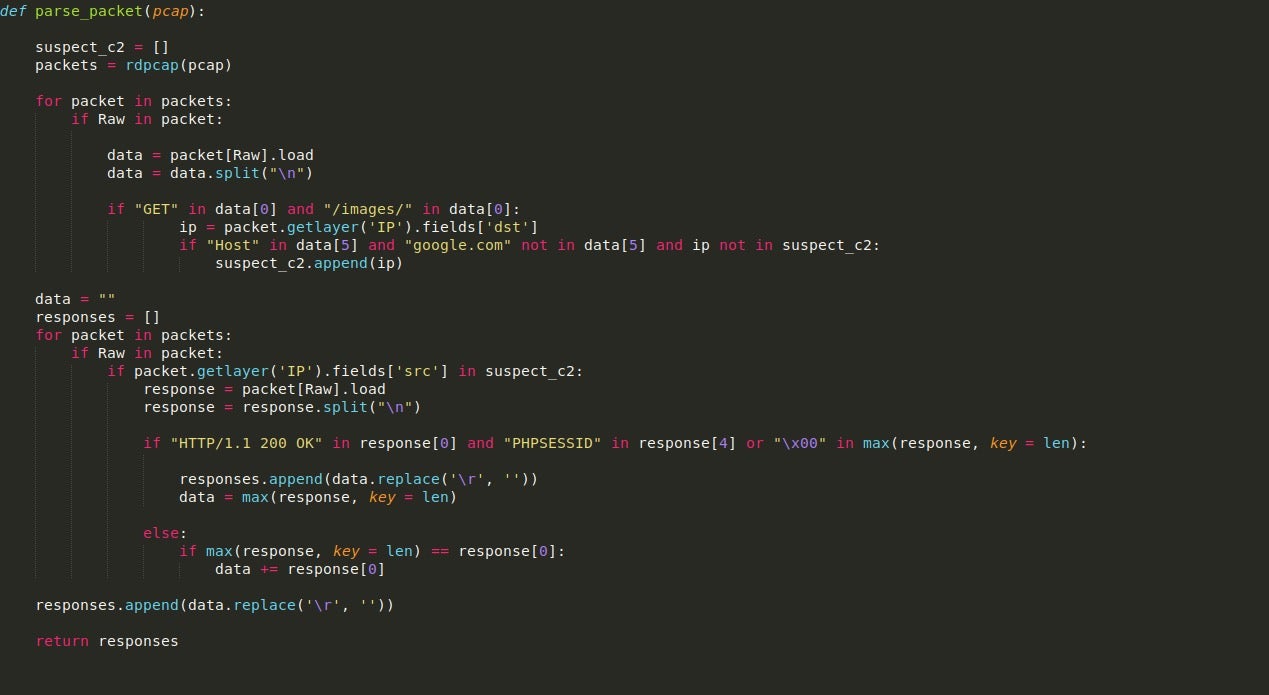
With a list of suspicious IPs in hand, we can now use these to get the C2 responses. These two loops can be compressed into one; however, I have separated them to improve readability. So, this next loop will once again loop through each of the packets; however, it will only search for packets that are from any of the IPs inside of the suspect_c2 list.
If a valid response is found, it will be loaded into the variable response, and then split once again using n. Using this, we check for the HTTP 200 response, meaning the C2 is online. We then search for the string “PHPSESSID” inside the headers, as this is usually present in most ISFB responses (at least for version 2).
We then check for whether or not a null byte is present in the C2 response – this is to prevent overlapping responses. Looking at the PCAP, once the first GET request is made to the C2 server and a response is received, the sample then queries favicon.ico, which contains raw binary data that is not part of the previous response. If we did not search for a null byte in the packet, then the raw binary data would simply be appended to the base64 encoded data – due to the fact that “PHPSESSID” is not present in the packet headers. The reason we append data if it doesn’t have the correct headers is because the response is extremely large, meaning it is sent in chunks of data which we must append together to get the full response.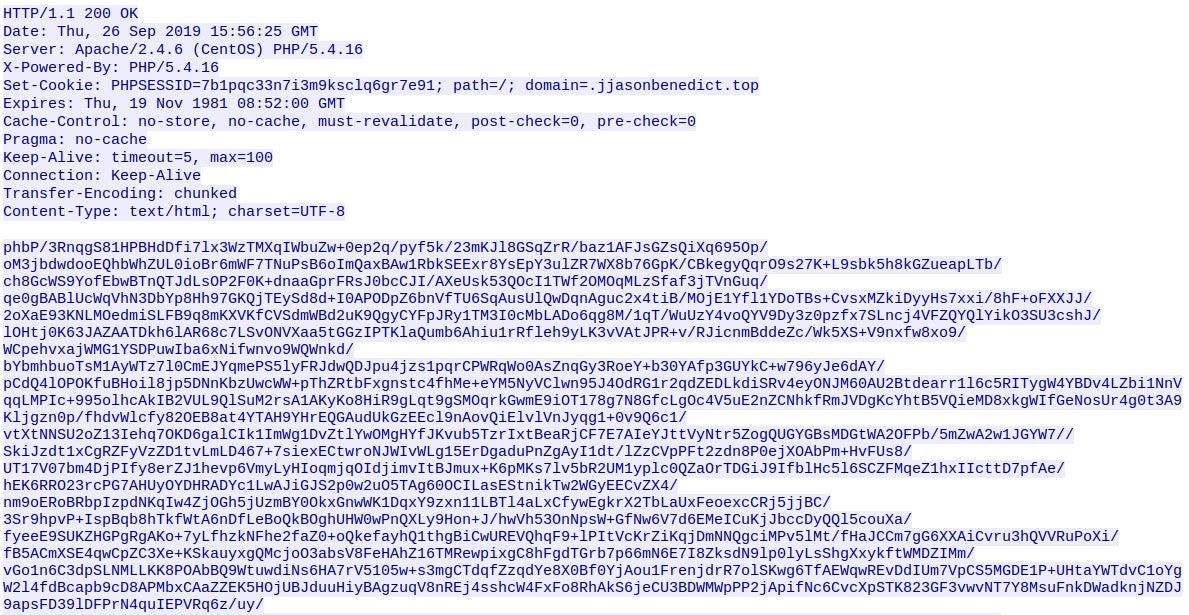
Once a list of packets has been created, we return from the function, but before doing so, we add whatever is stored in data to the responses list. This is done as the final packet that matches all the conditions will not be added to the list as the loop will simply exit.
Now that we have a list of suspicious packets, let’s move over to extracting both the RSA key and Serpent key from the executable!
How to Extract RSA & Serpent Keys
This function will be very similar to the configuration extractor due to the fact that the RSA key is stored in one blob of data and the serpent key is stored in another, both of which are pointed to by the JJ structures we looked at last time. This is a bit different as we are looking at extracting and parsing the configuration, so I will focus on that.
Once we have located the offsets of the blobs and extracted them, the size of each blob is checked to see if it is equal to 132 bytes (0x84). The reason for this is that this is the typical length of the RSA key stored in the binary. If the length is not equal, then we call the function parse_config(), and pass the APLib decompressed blob as an argument.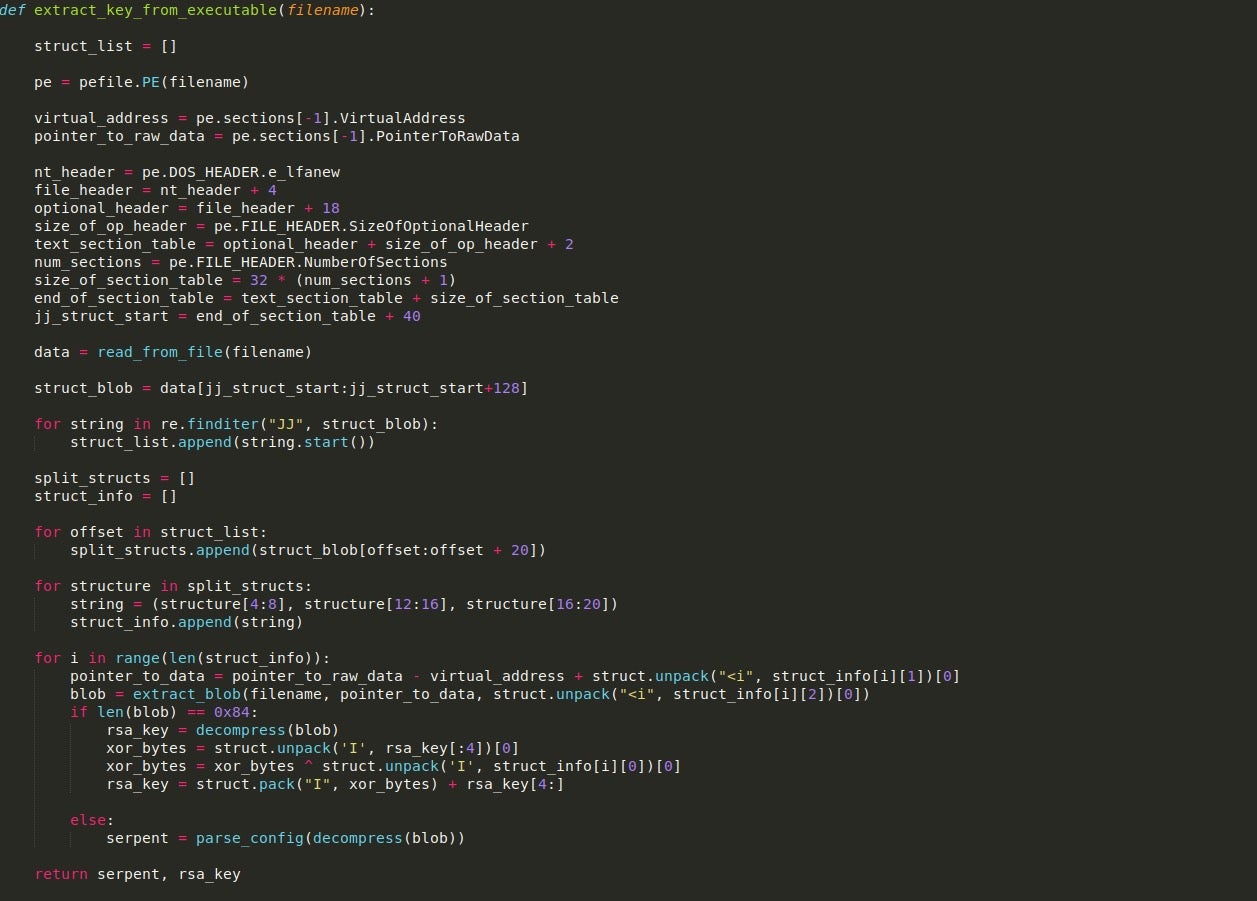
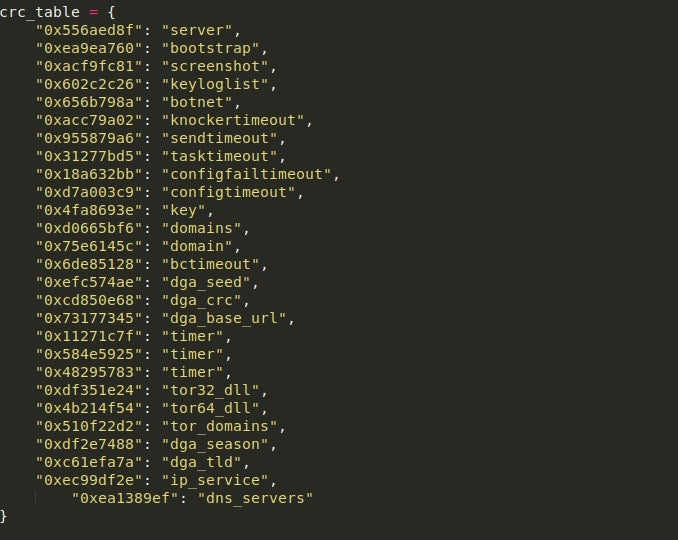
The config parser function is fairly simple. The configuration stored in the binary (after decompression) contains information such as C2 addresses, any DGA URLs, DNS servers to utilize, and also a Serpent key which is used to encrypt the packets sent out. In this case, as we are not looking at decrypting any of the GET requests, it is not vital to have, although if we wanted to see what data was transmitted to the C2, it is required. An example of the config can be seen below. 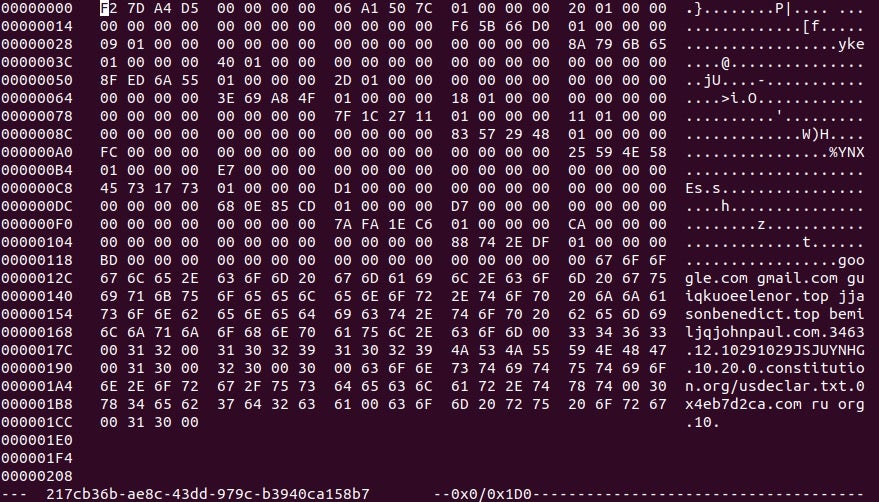
Looking at the image, you’ll notice the strings in the bottom half of the configuration, but you might be wondering what the top half is supposed to be. Well, this is actually a lookup table used by the sample to retrieve specific values. The first two DWORDs in the image shown above are skipped, and then the table begins. The structure of the lookup table values can be seen below and is fairly simple. We are mainly interested in the first three DWORDs as those are the important values. 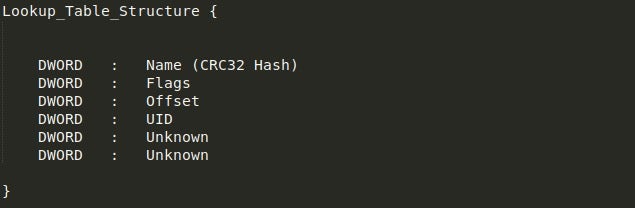
Essentially, what happens here is we loop through the lookup table, unpacking the four (includes the UID) DWORDs into four different variables, and using the value in Flags to determine whether the value is a direct pointer to the string or if it must be added to the current position.
From there, it will check if the CRC hash stored in Name is found in the dictionary containing CRC hashes, which can be seen below. If it is located in the dictionary, it will check the value and see if it matches the string “key“. If it does, the value will be returned and used as the Serpent-CBC key. Otherwise, it will continue to parse the table. More information about this routine and ISFB in general can be found in this paper written by Maciej Kotowicz.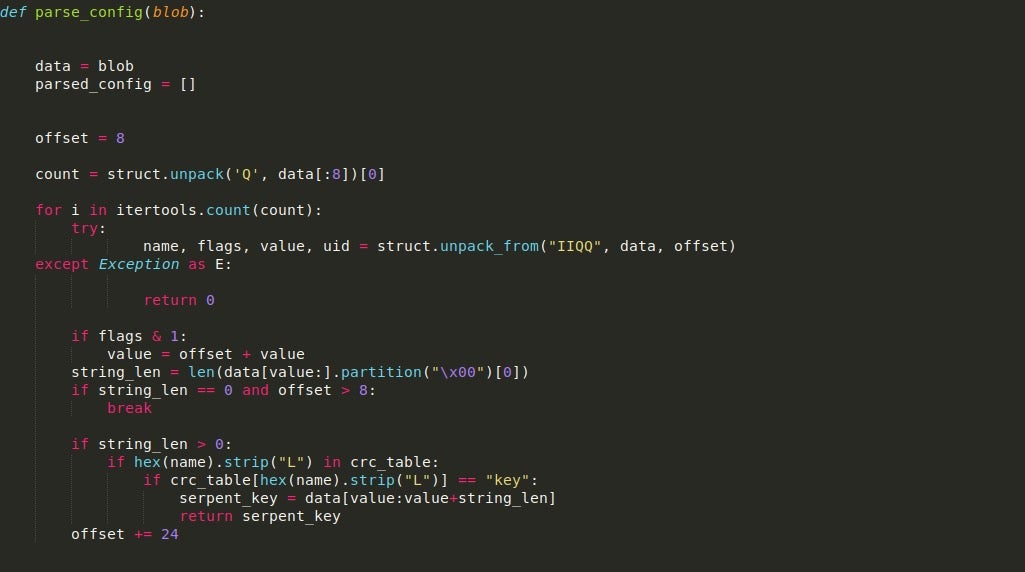
Now, with both the extracted RSA key and Serpent-CBC key, we can start decrypting the packets!
Functions for Decrypting Suspicious Packets
We’ll now write the final three functions we need to complete our malware traffic decrypter script. The decrypt_communication() function is fairly simple. First, we check to see if each packet in the list of suspicious packets is base64 encoded by checking for padding at the end.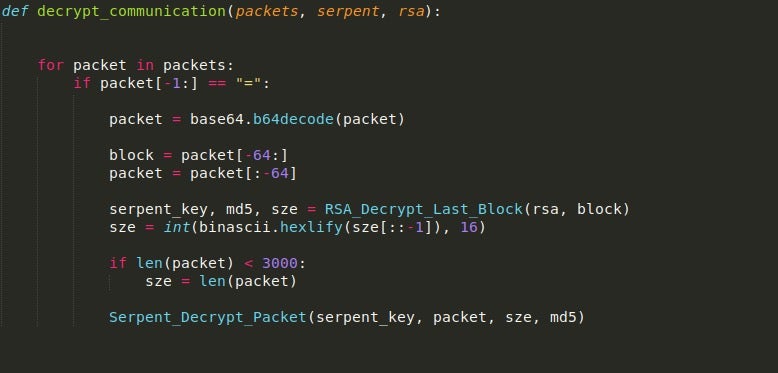
If it is, we base64 decode it and store the last 64 bytes in a variable, which is then passed into RSA_Decrypt_Last_Block(). 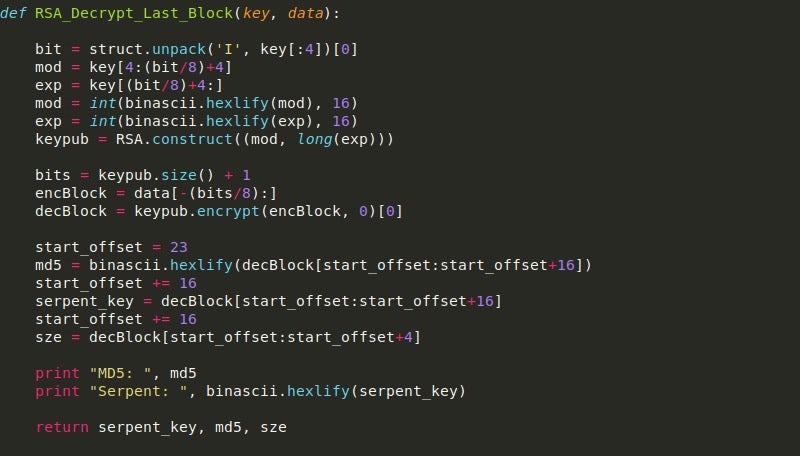
The packet is then stripped of the last 64 bytes as they are no longer needed. Then, the size returned by the RSA decrypt function is converted to an integer, and if it is less than 3000, the size is altered to be the full size of the packet. The reason for this is on the smaller packet sent from the C2 server, the decryption script fails to decrypt the entirety of the data, so to fix this we can simply choose to decrypt the entire packet.
From there, we pass the data into the Serpent_Decrypt_Packet, which will decrypt the data, and then MD5 hash it, comparing the resulting hash to the hash in the RSA decrypted block.
Regardless of whether or not the hashes match, it will dump out the data to a file.
Executing the Traffic Decrypter Script
Upon executing the script (as long as no issues are raised), the payloads should have successfully been dumped!
Interestingly, one of the packets failed to decrypt, and performing an RSA decryption of the final 64 bytes yielded a strange result, completely different to the first decrypted packet. This could be due to it coming from a different sample of Ursnif, or due to a parsing issue from my script, although in that case there would be issues with the first and third packet, which there was not.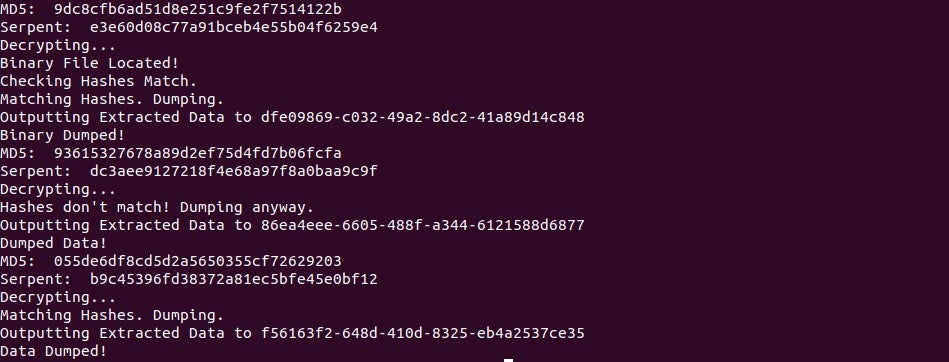

Wrapping Up…
So! That brings us to an end to this blog post. I hope you have been able to learn something new from it! If you are interested in trying to replicate this decrypter yourself, you can find the Python implementation of Serpent-CBC encryption/decryption here. If you’ve completed the traffic decrypter for this version of ISFB, why not try writing one for version 3? You’ll have to change up the extraction a bit as they use a more complex method of storing it, but it’ll be a good challenge!